# Quick start guide
This quick start guide will show you how to create a MobileID user, register a MobileID device, and perform an authentication in just a few steps.
You can find detailed information about all available MobileID endpoints in our MobileID API reference documentation.
Page contents
# Overview
To be able to use MobileID, you need to:
Have a Signicat account that has been onboarded to MobileID. To do this, see the prerequisites section.
Have a tool to initiate MobileID operations. To get this, see the set up MobileID in Postman section.
Have a mobile application to perform the operations on. To get this, see the install our Authenticator App and configure our Authenticator App sections.
Once you have everything set up, the guide will then show you how to:
Activate a MobileID device for that user.
Perform an authentication with that device.
# Prerequisites
# Before you start
If you do not have an account already, then you need to sign up to Signicat.
In the Signicat Dashboard, you must create an organisation and create an account.
Add a domain
It is also possible to add a domain, but this is not required for MobileID.
To authenticate against our APIs, you need to set up an API client. From this step, you will obtain a Client ID and a Client Secret.
To use MobileID, you need to set the required permissions. Ensure that you select both MobileID API and MobileID Admin API as permissions.
# Onboard to MobileID
Next, you need to complete the onboarding of your account for MobileID. To do this:
Log in to the Signicat Dashboard (opens new window).
In the top navigation bar, use the dropdown menu next to your organisation name to select the account that you want to use MobileID on.
In the left-side menu, select MobileID.
Click the Create account button.
Success!
You have now created a MobileID account in the MobileID service.
Using our REST API
It is also possible to onboard using our MobileID Admin REST API instead. To do this, make a request to the Add MobileID account endpoint.
# Result of the onboarding
As a result of the onboarding, an account is added to the MobileID service. For each MobileID account, we will create an application configuration and an E2E key:
The application configuration is identified by an
applicationId, and contains specific settings for you app. You can see all of the configurable properties in our application configuration feature documentation.The E2E key is used for end-to-end encryption of all communication between our MobileID SDK and our service.
Why are these values important?
The application ID (applicationId) and public E2E key (publicKey) are required for configuring the Authenticator App and the mobile SDK.
You can obtain these values in the Signicat Dashboard at any time once you have onboarded to MobileID.
# Set it up
Next, you have to set up a tool for triggering operations, and access our Authenticator App to perform them.
# Set up MobileID in Postman
You need to set up MobileID in Postman.
Using other tools
This guide provides steps for using Postman (opens new window) as a tool for initiating the APIs, however, you can use the preferred tool of your choice.
Open postman.
Import the collection. To do this:
a. Navigate to the Collections tab on the left-hand side of the screen, then click the Import button.

b. In the blank field in the dialogue box, paste the URL to our MobileID API specification
https://api.signicat.com/mobileid/core/openapi.json.c. Click the Import button in the dialogue box to finalise the import.
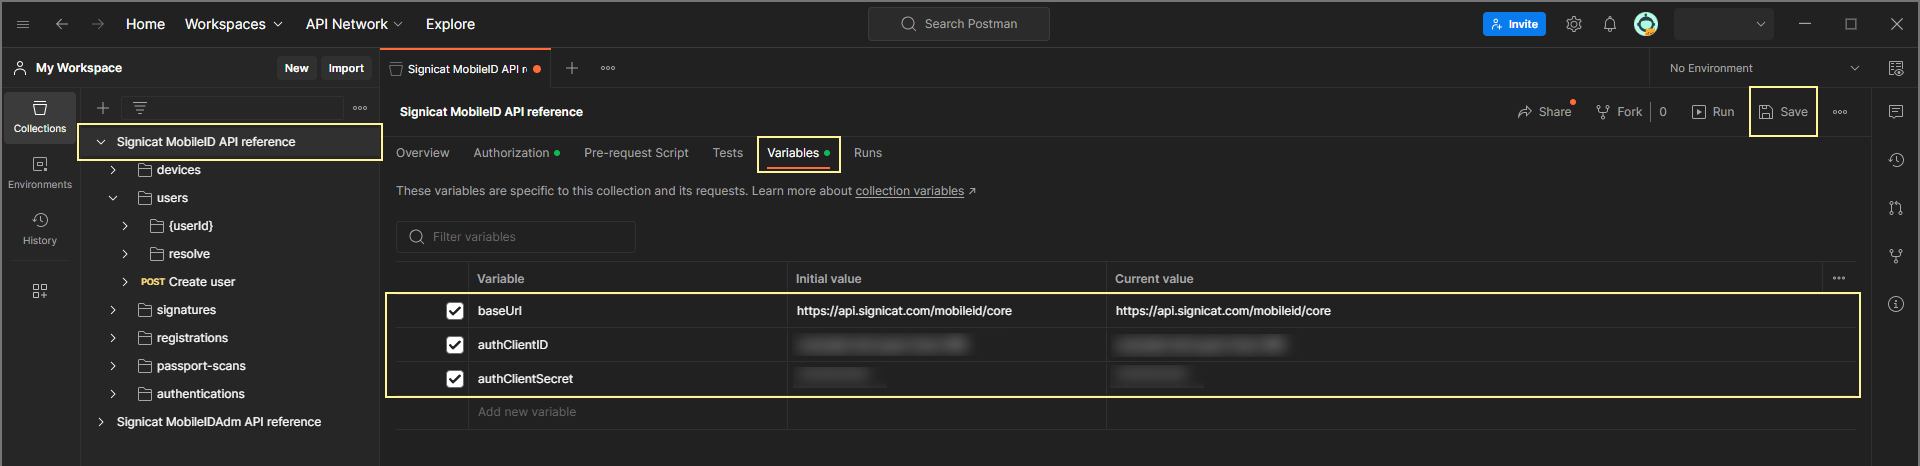
Create variables. To do this, click the Variables tab, and add the following:
| Variable | Value |
|---|---|
baseUrl | This variable becomes present after import. Make sure that the value is https://api.signicat.com/mobileid/core. |
authClientID | Enter the Client ID obtained when you created an API client. |
authClientSecret | Enter the Client Secret obtained when you created an API client. |
- Set up authorisation. To do this, go to the Authorization tab and and update the following:
| Name | Value |
|---|---|
| Type | OAuth 2.0 |
| Grant type | Client Credentials |
| Access Token URL | https://api.signicat.com/auth/open/connect/token |
| Client ID | {{authClientID}} |
| Client Secret | {{authClientSecret}} |
| Scope | signicat-api |
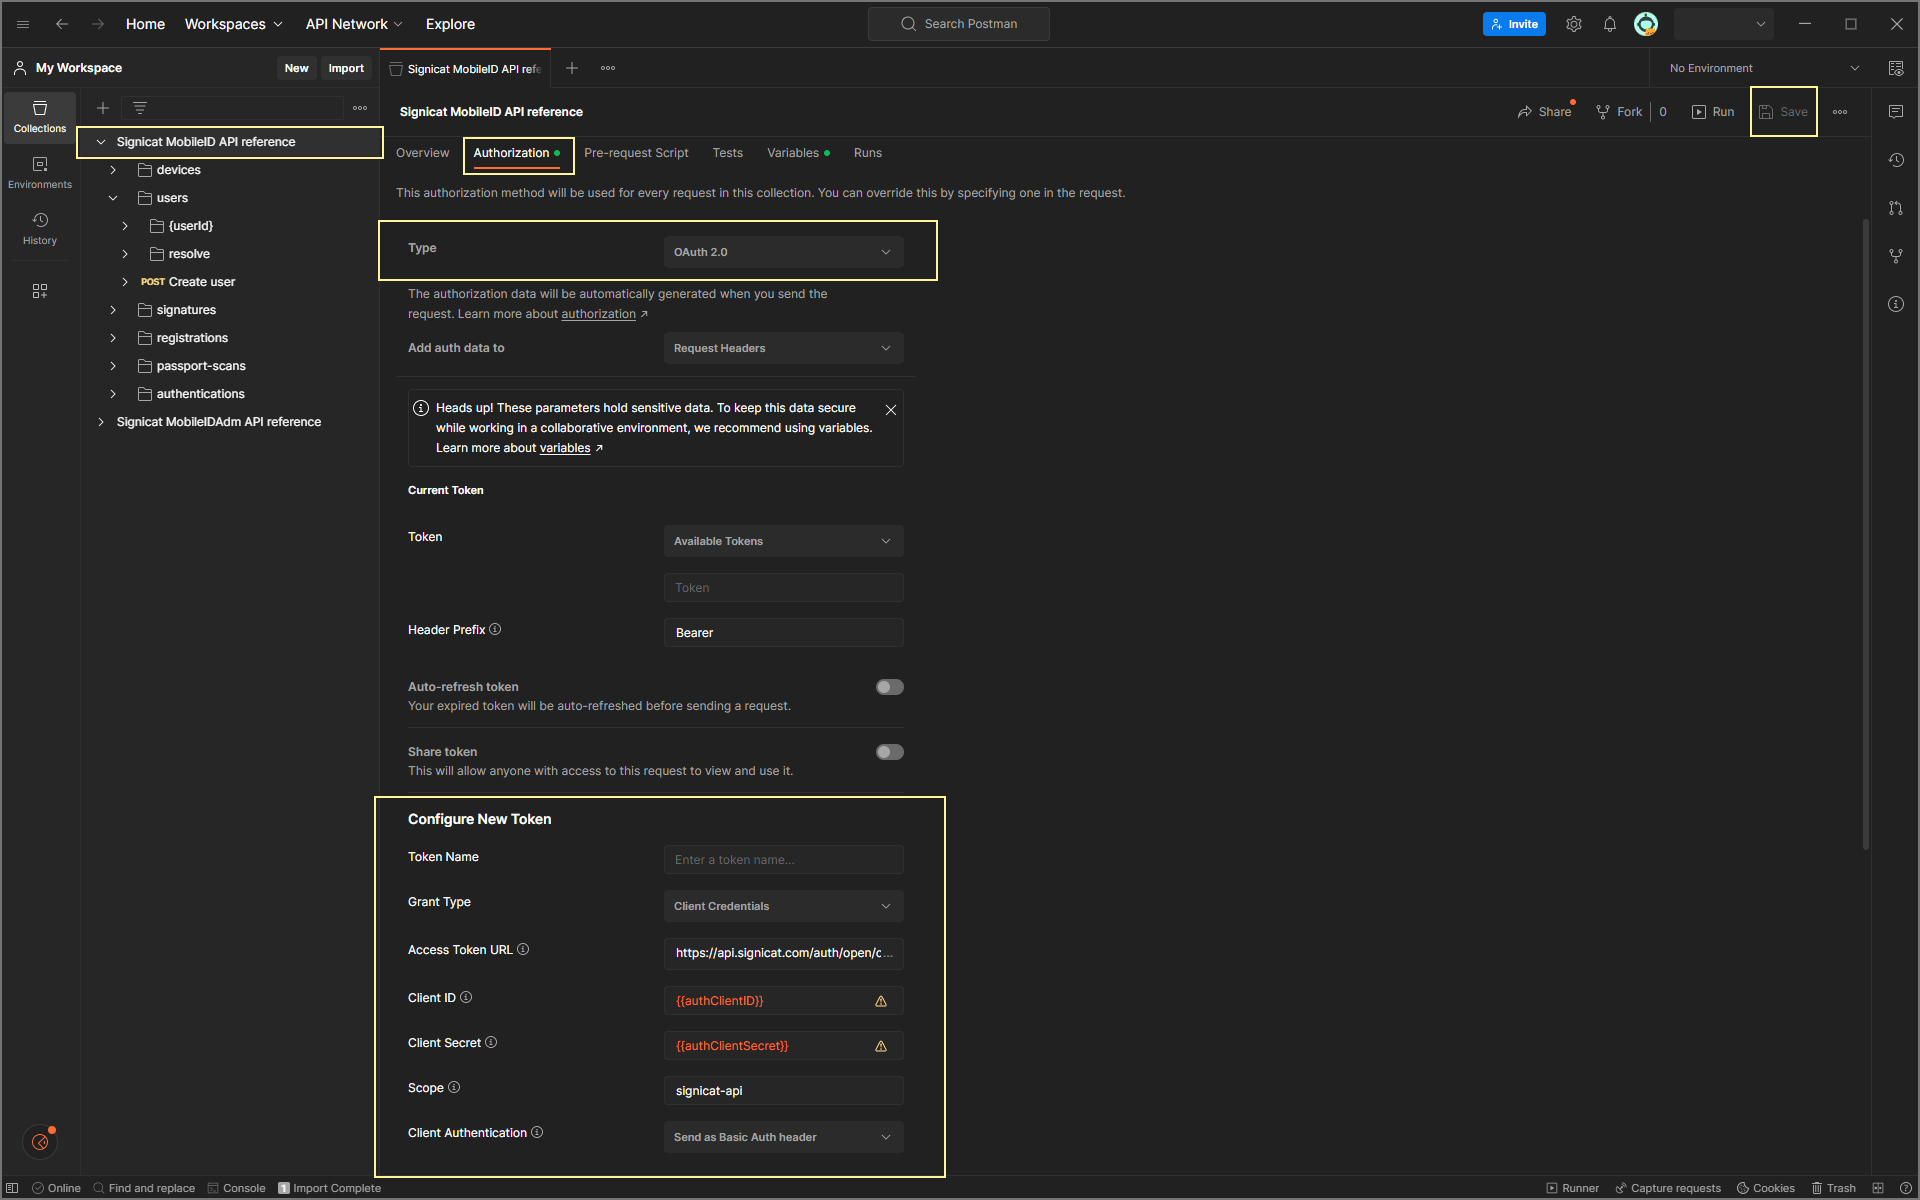
Click on the Get new access token button to get an access token.
To add the token to the requests, click Proceed, then Use Token.
Save your changes.
Success!
You have now set up Postman for the MobileID APIs.
New access tokens
At some point, the access token will expire. When this happens, you need to go back to the Authorisation tab in Postman and obtain a new token by clicking on the Get new access token button.
If you receive a 401 error response when carrying out an operation, it can mean that the access token has expired.
# Install our Authenticator App
To perform the operations on a mobile device you can use our Authenticator App. This is our white-label mobile application, and will enable you to get hands-on with testing out our product the fastest.
Want to use our SDK instead?
It is also possible to use our SDK and integrate it into your own app instead. To get access to the SDK, you can contact us at support@signicat.com.
When using the SDK, you need to configure the controller to use your MobileID account. To do this, you use the same values as those required to configure the Authenticator App.
See the configure our Authenticator app section for the values to configure.
See our Android and iOS SDK documentation for details on how to configure the controller.
# iOS
To install our Authenticator App on your iPhone, you have to:
Install Apple's TestFlight (opens new window) app.
Install our Authenticator App. To do this, you can either:
Follow this TestFlight link (opens new window) on your mobile device.
Scan the QR code below on your mobile device.

# Android
To install our Authenticator App on your Android, you have to:
Scan the QR code below on your mobile device.
Install the latest version.

# Configure our Authenticator App
Once you have installed the Authenticator App, you need to configure it to use your MobileID account.
To do this, you need to update the following values:
Application ID (
applicationId)Public E2E key (
publicKey)Server URL (
https://api.signicat.com/encore/encap)
Note
Our server URL is the same for both sandbox and production accounts.
# Obtaining the values
To get your application ID (applicationId) and public E2E key (publicKey), you need to:
Log in to the Signicat Dashboard (opens new window).
In the top navigation bar, use the dropdown menu next to your organisation name to select the account that you have onboarded to MobileID.
In the left-side menu, select MobileID.
Use the tabs for Account and E2E keys to see your Application ID and Public key.
Using our REST API
It is also possible to obtain these details using our MobileID Admin REST API instead. To do this:
Make a request to the Get MobileID account endpoint in our MobileID Admin API to fetch your
applicationId.Make a request to the Get E2E keys endpoint in our MobileID Admin API to fetch your
publicKey.
# iOS
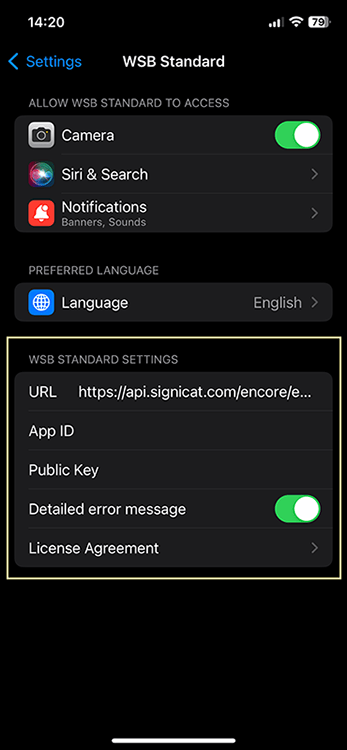
Open the Settings app on your iPhone, then locate and open the settings for Authenticator.
Under the Authenticator SETTINGS heading, update with the server URL and the values that you obtained.
# Android
Open the Authenticator app.
Click on the menu in the top right corner of the app, then select Preferences.
Update with the server URL and the values that you obtained.
# Get started
You have now completed all required preparations, and are now ready to get started with MobileID operations.
# Create a MobileID user
Want to learn more?
You can find information about all of the different user management endpoints in our MobileID API reference documentation.
You can now create a MobileID user. To do this:
In Postman, open the Collections tab.
In the Signicat MobileID API reference collection, open the users folder.
Click on Create user.
Under the Params tab, deselect
signicat-accountid. This is an optional parameter that you do not need.Under the Body tab, you can input your own request body.
Example: Request to create a MobileID user
{
   "attributes": {
      "first_name": "Jane",
      "last_name": "Smith"
   }
}
- Click the Send button.
Example: Response from creating a MobileID user
{
    "id": "76bfe9e6-1fe2-4b92-b742-a66015a98981",
    "created": "2023-08-16T11:25:50.923Z",
    "state": "ACTIVE",
    "attributes": {
        "last_name": "Smith",
        "first_name": "Jane"
    }
}
Success!
You have now created a MobileID user.
Our recommendation
We recommend that you save the id of your MobileID user (user ID), as it is needed in future operations.
# Register a MobileID device
Want to learn more?
You can find information about all of the different registration endpoints in our MobileID API reference documentation.
Now that you have created a MobileID user, you can register a MobileID device. To do this:
In Postman, open the Collections tab.
In the Signicat MobileID API reference collection, open the registrations folder.
Click on Start registration.
Under the Params tab, deselect
signicat-accountid. This is an optional parameter that you do not need.Under the Body tab, you can input your own request body. For this API, it is required to set the user ID (
userId). This is the ID of the MobileID user that you created in the previous section.
Example: Request to register a MobileID device
{
  "userId": "76bfe9e6-1fe2-4b92-b742-a66015a98981"
}
Click the Send button.
You have now started a registration operation. The response contains an
activationCode, which you need in the next step.
Example: Response from registering a MobileID device
{
    "accountId": "a-spge-7NS53Bt6di0YlzA9SYQO",
    "transactionId": "c9a0d33d-3366-4561-b47f-ec48428e2962",
    "state": "PENDING",
    "created": "2023-08-16T11:33:08.537Z",
    "device": {},
    "user": {
        "id": "76bfe9e6-1fe2-4b92-b742-a66015a98981",
        "created": "2023-08-16T11:25:50.923Z",
        "state": "ACTIVE"
    },
    "operationProperties": {
        "activationCode": "057771",
        "registrationMode": "REGISTRATION",
        "sessionExpiryTime": "2023-08-16T11:34:38.441Z"
    }
}
Open the Authenticator App.
Click on the button to start the registration operation on the device.
Enter the
activationCodethat was obtained in step 5.
Note
The activation code is only valid until the session expiry time (sessionExpiryTime).
Select a PIN code.
Select if you want to activate biometrics.
In Postman, open the registrations folder.
Click on Get state of ongoing registration.
Under the Params tab, deselect
signicat-accountid. This is an optional parameter that you do not need.Under the Params tab, update the value of
transactionIdto the value you obtained in the Start registration response.Click the Send button.
Example: Response from fetching the state of a MobileID registration
{
    "accountId": "a-spge-7NS53Bt6di0YlzA9SYQO",
    "transactionId": "c9a0d33d-3366-4561-b47f-ec48428e2962",
    "state": "COMPLETED",
    "created": "2023-08-16T11:36:57.759Z",
    "completed": "2023-08-16T11:37:19.110Z",
    "device": {
        "id": "dc55de99-b11f-40ad-8c12-adb98be9ec61",
        "state": "ACTIVE",
        "lastOperationType": "REGISTRATION",
        "lastUsed": "2023-08-16T11:37:19.122Z",
        "created": "2023-08-16T11:37:19.111Z"
    },
    "user": {
        "id": "76bfe9e6-1fe2-4b92-b742-a66015a98981",
        "created": "2023-08-16T11:25:50.923Z",
        "lastUsed": "2023-08-16T11:37:19.100Z",
        "state": "ACTIVE"
    },
    "operationProperties": {
        "activationCode": "662815",
        "authLevel": "TWO_FACTOR",
        "registrationMode": "REGISTRATION",
        "sessionExpiryTime": "2023-08-16T11:38:27.660Z"
    }
}
Success!
You have now registered and activated a MobileID device.
Our recommendation
We recommend that you save the id of your MobileID device (device ID), as it is needed in future operations.
# Authenticate your MobileID user
Want to learn more?
You can find information about all of the different authentication endpoints in our MobileID API reference documentation.
Now that you have registered a MobileID device, you can authenticate with that device. To do this:
In Postman, open the Collections tab.
In the Signicat MobileID API reference collection, open the authentications folder.
Click on Start authentication.
Under the Params tab, deselect
signicat-accountid. This is an optional parameter that you do not need.Under the Body tab, you can input your own request body. For this API, it is required to set both the user ID (
userId) and the device ID (deviceId). These are the IDs of the MobileID user and MobileID device that you obtained in the previous sections.
Example: Request to authenticate
{
   "userId": "76bfe9e6-1fe2-4b92-b742-a66015a98981",
   "device": {
      "id": "dc55de99-b11f-40ad-8c12-adb98be9ec61"
   },
   "operationProperties": {
      "preOperationContext": {
         "content": "Approve your first MobileID authentication",
         "mimeType": "text/plain"
      },
      "postOperationContext": {
         "content": "Cool! You have successfully completed a MobileID authentication",
         "mimeType": "text/plain"
      }
   }
}
- Click the Send button.
Example: Response from the authentication
{
   "accountId": "a-spge-7NS53Bt6di0YlzA9SYQO",
   "transactionId": "e33c5cd4-03d2-42ca-acc1-407a72c234ce",
   "state": "PENDING",
   "created": "2023-08-16T11:53:24.863Z",
   "device": {
      "id": "dc55de99-b11f-40ad-8c12-adb98be9ec61",
      "state": "ACTIVE",
      "lastOperationType": "AUTHENTICATION",
      "lastUsed": "2023-08-16T11:51:14.703Z",
      "created": "2023-08-16T11:37:19.111Z"
   },
   "user": {
      "id": "76bfe9e6-1fe2-4b92-b742-a66015a98981",
      "created": "2023-08-16T11:25:50.923Z",
      "lastUsed": "2023-08-16T11:51:14.693Z",
      "state": "ACTIVE"
   },
   "operationProperties": {
      "postOperationContext": {
         "content": "Cool! You have successfully completed a MobileID authentication",
         "mimeType": "text/plain"
      },
      "preOperationContext": {
         "content": "Approve your first MobileID authentication",
         "mimeType": "text/plain"
      },
      "pushSent": true,
      "sessionExpiryTime": "2023-08-16T11:54:54.955Z"
   }
}
Open the Authenticator App.
The app shows a dialogue box with the pre-operation context (
preOperationContext). If you do not see the pre-operation context, then you can use the reload button.Click the Approve button.
In Postman, open the authentications folder.
Click on Get state of ongoing authentication.
Under the Params tab, deselect
signicat-accountid. This is an optional parameter that you do not need.Under the Params tab, update the value of
transactionIdto the value you obtained in the Start authentication response.Click the Send button.
Example: Response from fetching the state of an authentication
{
    "accountId": "a-spge-7NS53Bt6di0YlzA9SYQO",
    "transactionId": "e33c5cd4-03d2-42ca-acc1-407a72c234ce",
    "state": "COMPLETED",
    "created": "2023-08-16T11:53:24.863Z",
    "completed": "2023-08-16T11:53:37.407Z",
    "device": {
        "id": "dc55de99-b11f-40ad-8c12-adb98be9ec61",
        "state": "ACTIVE",
        "lastOperationType": "AUTHENTICATION",
        "lastUsed": "2023-08-16T11:53:37.392Z",
        "created": "2023-08-16T11:37:19.111Z"
    },
    "user": {
        "id": "76bfe9e6-1fe2-4b92-b742-a66015a98981",
        "created": "2023-08-16T11:25:50.923Z",
        "lastUsed": "2023-08-16T11:53:37.382Z",
        "state": "ACTIVE"
    },
    "operationProperties": {
        "postOperationContext": {
            "content": "Cool! You have successfully completed a MobileID authentication",
            "mimeType": "text/plain"
        },
        "authLevel": "TWO_FACTOR",
        "authMethod": "DEVICE_IOS_FACE_ID",
        "preOperationContext": {
            "content": "Approve your first MobileID authentication",
            "mimeType": "text/plain"
        },
        "pushSent": true,
        "sessionExpiryTime": "2023-08-16T11:54:54.955Z"
    }
}
Success!
You have now completed a MobileID authentication.
# Learn more
You can explore our developer documentation to learn more about what you can do with MobileID and further test out the product.