FaceTec
FaceTec is a third-party eIDV provider integrated with the Assure API. Combining FaceTec with Assure's identity verification capabilities, increases the confidence in the onboarding process and prevents fraud attempts.
Supported features
Signicat supports the following identity verification features from FaceTec:
- Face match between ID document and selfie
- Liveness check of live video recording
User flow example
More information will follow later.
Mobile SDKs (Android and iOS)
The aim of this topic is to help a developer integrating with the Assure API using FaceTec's mobile SDKs.
Please, keep in mind that the following descriptions do not contain all the necessary steps for production mode. In addition, you must add validations, tests and error handling, which is outside the scope of this documentation.
Using the third-party SDKs means that the end-user will see FaceTec's user interface when performing the identity verification on their mobile or desktop.
The main aim of FaceTec's user interface is to check the "liveness" of an end-user against an image of the end-user's face.
Before you start the SDK integration, we recommend to familiarise yourself with the general steps for integrating with the Assure API.
Requirements
Before you start the integration, you should be aware of the following requirements for all FaceTec's SDKs:
-
You must always use the latest FaceTec SDK version.
Important!Once implemented, you must update the SDK version every 90 days. If the version is not updated, your FaceTec service will stop working. For more details, see https://dev.facetec.com/updating#update-policy.
-
Check the supported device versions on this page: https://dev.facetec.com/compatibility
-
The app needs camera permission. Access to a microphone is not a requirement.
-
Your app must always communicate with your own server and never directly with the Assure API (see Usage recommendations).
-
Since you are integrating with the Assure API in a native app context, you should choose the eIDV generic flow.
Integration steps overview
This diagram provides an abstraction of the client-side implementation.
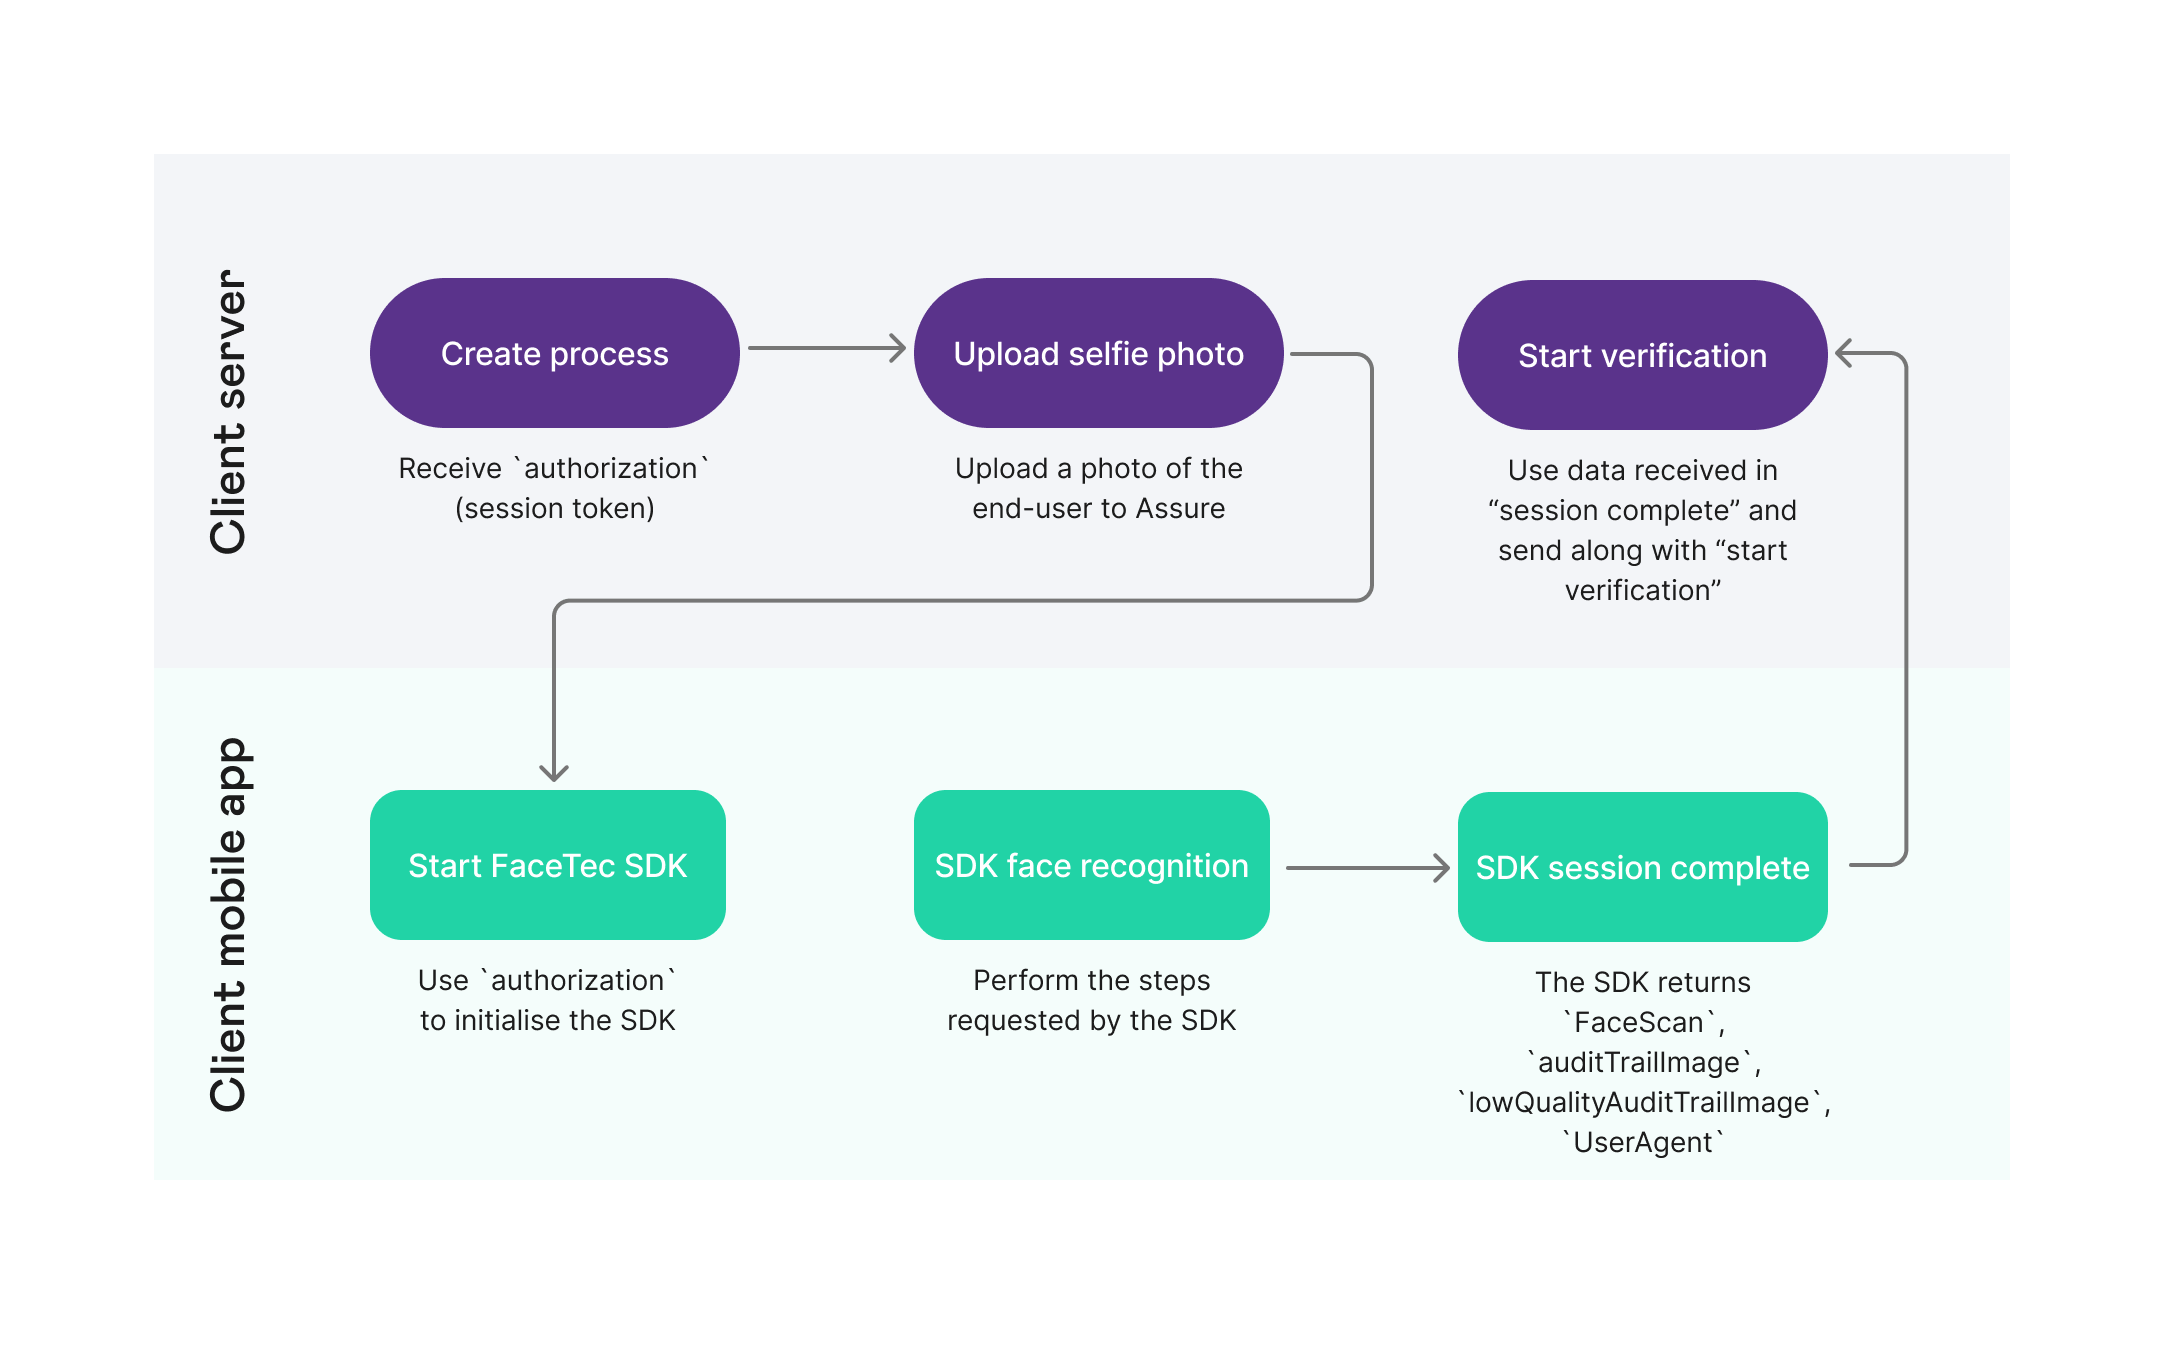
FaceTec SDK process diagram
The next sections describe all the needed steps, including the integration with Assure before and after the FaceTec SDK integration in step 4:
- Create a dossier.
- Create a process.
- Add a photo to the process.
- Integrate with the FaceTec SDK to capture liveness images.
- Start verification.
- Get result.
All the steps are similar for iOS and Android except the SDK integration in step 4, which is described below in different tabs for iOS and Android.
Create a dossier
Use the Create dossier endpoint to create a placeholder for all of your end-user's data:
curl -X POST \
  <ENVIRONMENT>/assure/dossiers \
  -H 'Accept: application/json' \
  -H 'Authorization: Bearer <OIDC_ACCESS_TOKEN>' \
  -H 'Content-Type: application/json' \
Save the dossierId from the response body to use in the next requests.
Ensure you use one dossier per end-user.
After creating a dossier, you can see all of its contents anytime you want to. To do that, use the Get dossier endpoint giving it the dossierId.
Create a process
Use the Create process endpoint to create an identity verification process inside the dossier.
Ensure you:
- Use the
dossierIdfrom the "Create dossier" response.
- Set the provider to
facetec.
curl -X POST \
  <ENVIRONMENT>/assure/dossiers/<DOSSIER_ID>/processes \
  -H 'Authorization: Bearer <OIDC_ACCESS_TOKEN>' \
  -H 'Accept: application/json' \
  -H 'Content-Type: application/json' \
  -d '{
     "provider": "facetec",
     "authorizationHeader": "Token xSUNmskaIUGh9hn5B7bKJbNOho"
   }'
When you have created the FaceTec process, you should get a backend response like this:
{
  "processId": "74ee35d5-f542-472e-a087-597bc28bc9d4",
  "status": "pending",
  "createdAt": "2021-01-05T10:54:47Z",
  "updatedAt": "2021-01-05T10:54:47Z",
  "authorization": "someAuthorizationToken",
  "facetecEncryptionPublicKey": "somePublicKey",
  "facetecDeviceKeyIdentifier": "someDeviceKeyIdentifier",
  "facetecProductionKeyText": "someOtherKey",
  "provider": "facetec"
}
Save the information from the response. You will need it in the next steps.
Add a photo to the process
The FaceTec liveness process needs to compare the liveness data (that will be obtained in the next step) with a photo of the person who is supposed to match that liveness data.
The most common use-case is that you have a photo from someone you already know is the valid owner of an ID document and then want to use FaceTec to get liveness evidence from that person.
To do that, you first create another process in the Assure API and use it to verify a person's identity using an ID document. Then you can get the photo of that person from that process (see Get Image) and feed it to the FaceTec process (Set Image “selfie”).
Integrate with the FaceTec mobile SDK to capture liveness images
To capture the live images from the end-user, you must now integrate with the FaceTec SDK for either Android or iOS:
- Android
- iOS
- Download the latest version of the FaceTec Android SDK from https://dev.facetec.com/downloads. You need a valid email/login to download the SDK.
- Add the
.aarto your android project. - In the app build.gradle file, add the following line with the correct FaceTec SDK version:
implementation 'com.facetec:facetec-sdk-X.X.XX@aar'
Ensure you enter the latest SDK version (see requirements).
- You must send the
authorization,facetecEncryptionPublicKeyand thefacetecDeviceKeyIdentifierfields to the mobile app to initialise and run the SDK.
Initialise and run the SDK (Java code example)
To initialise the SDK, use the following fields from the backend response (above):
//Check first if you already initialized the SDK.
//This is to avoid subsequent initializations, it's a heavy operation.
if (!FaceTecSDK.getStatus(this).equals(FaceTecSDKStatus.INITIALIZED)) {
     FaceTecSDK.initializeInProductionMode(this, facetecProductionKeyText, facetecDeviceKeyIdentifier, facetecEncryptionPublicKey, new FaceTecSDK.InitializeCallback() {@Override
        public void onCompletion(boolean successful) {
            if (!successful) {
               //HANDLE THE ERROR
            }
        }
    });
}
To run the SDK, use the authorization field:
FaceTecSessionActivity.createAndLaunchSession(activity, (faceTecSessionResult, faceTecFaceScanResultCallback) ->  {
    faceTecFaceScanResultCallback.cancel();
    final String faceScan = faceTecSessionResult.getFaceScanBase64();
    final String auditTrailImage = faceTecSessionResult.getAuditTrailCompressedBase64()[0];
    final String auditTrailLowQualityImage = faceTecSessionResult.getLowQualityAuditTrailCompressedBase64()[0];
    final String userAgent = FaceTecSDK.createFaceTecAPIUserAgentString(faceTecSessionResult.getSessionId());
    try {
        final JSONObject enrollmentRequest = new JSONObject();
        enrollmentRequest.put("faceScan", faceScan);
        enrollmentRequest.put("auditTrailImage", auditTrailImage);
        enrollmentRequest.put("lowQualityAuditTrailImage", auditTrailLowQualityImage);
        enrollmentRequest.put("userAgent", userAgent);
        //These fields now are sent to Assure-API via your backend.
        //The app should never talk directly to Assure-API.
    } catch (final JSONException e) {
        toast(activity, e.getMessage());
    }
}, authorization);
- Download the latest version of the FaceTec iOS SDK from https://dev.facetec.com/downloads. You need a valid email/login to download the SDK.
- Drag and drop FaceTecSDK.framework into your project. Make sure to select the Copy items if needed checkbox.
- In the General configuration tab of your App Target configuration, set Zoom Framework to Embed & Sign.
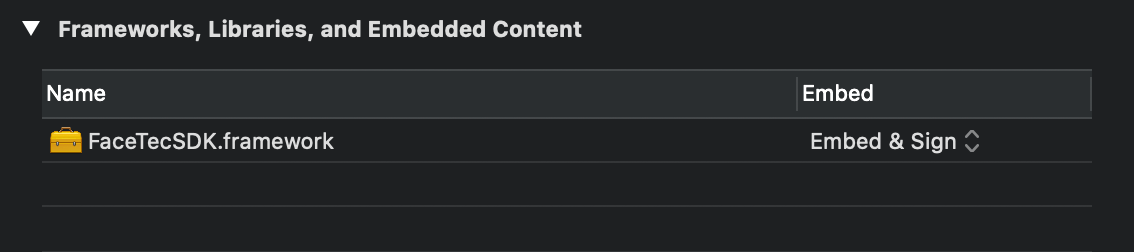
FaceTec SDK download
- Add a row to the Info.plist with the key Privacy - Camera Usage Description and enter a reason for why you need camera access.
With Xcode 12.3 you may need to open Build Settings and set Validate Workspace to Yes.
- You must send the
authorization,facetecEncryptionPublicKeyand thefacetecDeviceKeyIdentifierfields to the app to initialise and run the SDK.
Initialise and run the SDK (Swift code example)
Use the previous fields to initialise the SDK:
import UIKit
import FaceTecSDK


class ViewController: UIViewController, FaceTecFaceScanProcessorDelegate {

    let process = Process()
    var faceScan: String? = nil
    var auditTrailImage: String? = nil
    var lowQualityAuditTrailImage: String? = nil
    var userAgent: String? = nil


    override func viewDidLoad() {
        super.viewDidLoad()

        initFlow()
    }

    @IBAction func startProcess(_ sender: Any) {

        showFaceTec()
    }


    // MARK: Actions

    func initFlow() {

        // If you are in Production you should use FaceTec.sdk.initializeInProduction
        FaceTec.sdk.initializeInDevelopmentMode(deviceKeyIdentifier: process.facetecDeviceKeyIdentifier, faceScanEncryptionKey: process.facetecEncryptionPublicKey, completion: { initializationSuccessful in
            print("The facetec initialization was \(initializationSuccessful)")
        })
    }


    func showFaceTec() {

        let status = FaceTec.sdk.getStatus()
        if (status == FaceTecSDKStatus.initialized) {

            let verificationVC =  FaceTec.sdk.createSessionVC(faceScanProcessorDelegate: self, sessionToken: process.authorization)

            DispatchQueue.main.async {
                self.present(verificationVC, animated: true, completion: nil)
            }
        }
    }


    // MARK: FaceTec Delegate

    func onFaceTecSDKCompletelyDone() {}


    func processSessionWhileFaceTecSDKWaits(sessionResult: FaceTecSessionResult, faceScanResultCallback: FaceTecFaceScanResultCallback) {

        switch sessionResult.status {
        case .sessionCompletedSuccessfully:

            self.faceScan = sessionResult.faceScanBase64
            self.auditTrailImage = sessionResult.auditTrailCompressedBase64?.first
            self.lowQualityAuditTrailImage = sessionResult.lowQualityAuditTrailCompressedBase64?.first
            self.userAgent = FaceTec.sdk.createFaceTecAPIUserAgentString(sessionResult.sessionId)
            print("Done - Send this parameters to the server and request Start Verification")

            self.dismiss(animated: true, completion: nil)
        default:
            print("Something happen: \(sessionResult.status.rawValue)")
        }
    }

}
Upload the app
To upload your app to the Apple store, you must add a new Run Script to your build phases:
Go to Targets > Build Phases and add a new Run Script command (after the Embed Frameworks phase). The contents of this Run Script should be:
bash {"${BUILT_PRODUCTS_DIR}/${FRAMEWORKS_FOLDER_PATH}/FaceTecSDK.framework/strip-unused-architectures-from-target.sh"}
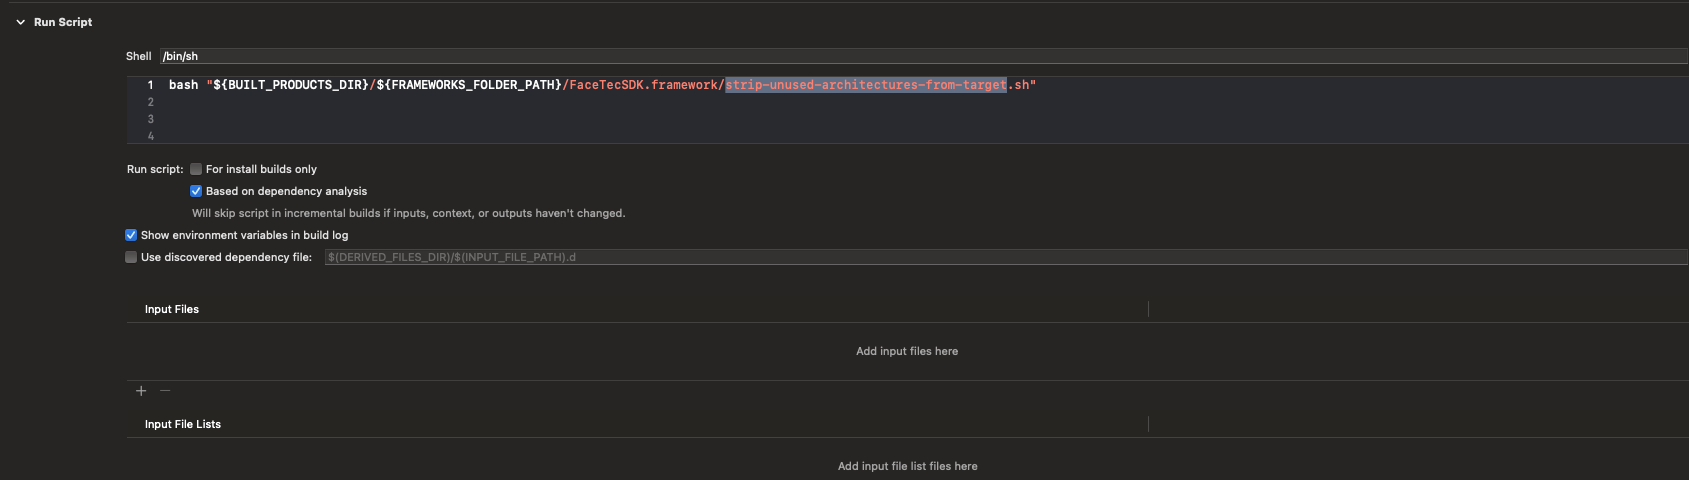
FaceTec SDK Run Script
Start verification
Your server (backend) must request the Assure API to start performing the identity verification.
To do this, you must send the necessary fields you got in the app to the backend, and then the backend communicates with Assure by calling Start verification with this request body:
{
  "facetecEnrollment": {
    "faceScan": "string",
    "auditTrailImage": "string",
    "lowQualityAuditTrailImage": "string",
    "userAgent": "string"
  }
}
Get result
It is recommended to subscribe to Assure events to be notified when the result is available (either successfully or not). For more information, see Assure events.
When the verification result is ready, you can call the Get process endpoint to see the detailed result information:
curl -X GET \
  <ENVIRONMENT>/assure/dossiers/<DOSSIER_ID>/processes/<PROCESS_ID> \
  -H 'Authorization: Bearer <OIDC_ACCESS_TOKEN>' \
  -H 'Accept: application/json' \
You will get all the process and result information in the response body.
Here is an example of an accepted process:
{
    "processId":"c573be77-b253-49e9-863a-fc04965ea66f",
    "provider":"facetec",
    "status":"accepted",
    "providerSpecific":{
        "liveness":{
            "facescanSecurityChecks.auditTrailVerificationCheckSucceeded":"true",
            "facescanSecurityChecks.replayCheckSucceeded":"true",
            "facescanSecurityChecks.faceScanLivenessCheckSucceeded":"true",
            "success":"true",
            "error":"false",
            "facescanSecurityChecks.sessionTokenCheckSucceeded":"true"
    },
        "matching":{
            "matchLevel":"8",
            "success":"true",
            "error":"false"
    }
  },
    "finalResult":{
        "livenessDetected":"true",
        "similarityScore":"high"
  },
    "createdAt":"2021-01-06T16:48:32Z",
    "updatedAt":"2021-01-06T16:49:06Z"
}
The process is accepted because both the matching of the selfie with the liveness video and the liveness check were successful.
The process is rejected if any of the conditions mentioned before is false.
For more details about the results from "Get process", see the "Service details" section below.
You can also get a zip file with the packaged process by calling the Download full result endpoint.
Service details for FaceTec
This section goes more into detail about some useful endpoints when integrating with FaceTec:
Get process
This section describes the final result statuses for FaceTec.
Final status of FaceTec processes
Assure API uses the information in the liveness and matching fields to map the process' final status:
- accepted: The end-user passed all liveness checks performed by FaceTec, and their face matched the face in the ID-photo/selfie image with matchLevel >= 6 (1/100,000 FAR).
- inconclusive: The match level (
matchLevel) between the face of the end-user and the face in the ID-photo/selfie image is between 1 (1/100 FAR) and 5 (1/10,000 FAR). - rejected: The end-user did not pass one or more of the liveness checks performed by FaceTec, or their face did not match the face in the ID-photo/selfie image.
accepted
This is a response example of a FaceTec process that was accepted:
{
   "processId":"fd3121cb-f9aa-4c77-bb65-97f6d82a9a02",
   "provider":"facetec",
   "status":"accepted",
   "finalResult":{
      "livenessDetected":"true",
      "similarityScore":"high"
  },
   "createdAt":"2021-11-11T15:23:35Z",
   "updatedAt":"2021-11-11T15:24:10Z",
   "providerSpecific":{
      "liveness":{
         "faceScanSecurityChecks":{
            "auditTrailVerificationCheckSucceeded":true,
            "replayCheckSucceeded":true,
            "faceScanLivenessCheckSucceeded":true,
            "sessionTokenCheckSucceeded":true
      },
         "error":false,
         "success":true
    },
      "matching":{
         "attempts":[
        {
               "algorithm":"facePortrait",
               "matchLevel":8,
               "imageProcessing":"faceFound",
               "success":true,
               "error":false
        }
      ],
         "algorithm":"facePortrait",
         "matchLevel":8,
         "imageProcessing":"faceFound",
         "success":true,
         "error":false
    }
  }
}
For field descriptions, see the Open API documentation > Get process and Start verification
inconclusive
This is a response example of a FaceTec process that was inconclusive:
{
   "processId":"1ca4c667-7132-45dc-a826-3bddaf4bc2a6",
   "provider":"facetec",
   "status":"inconclusive",
   "createdAt":"2022-04-21T13:44:37Z",
   "updatedAt":"2022-04-21T13:46:51Z",
   "providerSpecific":{
      "liveness":{
         "faceScanSecurityChecks":{
            "auditTrailVerificationCheckSucceeded":true,
            "replayCheckSucceeded":true,
            "faceScanLivenessCheckSucceeded":true,
            "sessionTokenCheckSucceeded":true
      },
         "error":false,
         "success":true
    },
      "matching":{
         "attempts":[
        {
               "algorithm":"facePortrait",
               "matchLevel":4,
               "imageProcessing":"faceFound",
               "success":true,
               "error":false
        },
        {
               "algorithm":"idPhoto",
               "matchLevel":5,
               "imageProcessing":"faceFound",
               "success":true,
               "error":false
        },
        {
               "algorithm":"idPhotoLowQuality",
               "matchLevel":5,
               "imageProcessing":"faceFound",
               "success":true,
               "error":false
        }
      ],
         "algorithm":"idPhotoLowQuality",
         "matchLevel":5,
         "imageProcessing":"faceFound",
         "success":true,
         "error":false
    }
  }
}
In this example, matchLevel was not high enough to get accepted.
For more details about matchLevel and other fields, see the providerSpecific element for FaceTec in the Open API documentation for Get process and Start verification.
rejected
This is a response example of a FaceTec process that was rejected. Here, liveness was detected in the recorded video of the user's face, but there was no match with the face on the ID-photo ("matchLevel":0):
{
   "processId":"5fe7a9b9-f781-44d1-b37b-6cc958ee7b7a",
   "provider":"facetec",
   "status":"rejected",
   "createdAt":"2021-11-12T13:52:10Z",
   "updatedAt":"2021-11-12T13:52:46Z",
   "providerSpecific":{
      "liveness":{
         "faceScanSecurityChecks":{
            "auditTrailVerificationCheckSucceeded":true,
            "replayCheckSucceeded":true,
            "faceScanLivenessCheckSucceeded":true,
            "sessionTokenCheckSucceeded":true
      },
         "error":false,
         "success":true
    },
      "matching":{
         "attempts":[
        {
               "algorithm":"facePortrait",
               "matchLevel":0,
               "imageProcessing":"faceFound",
               "success":false,
               "error":false
        },
        {
               "algorithm":"idPhoto",
               "matchLevel":0,
               "imageProcessing":"faceFound",
               "success":false,
               "error":false
        },
        {
               "algorithm":"idPhotoLowQuality",
               "matchLevel":0,
               "imageProcessing":"faceFound",
               "success":false,
               "error":false
        }
      ],
         "algorithm":"idPhotoLowQuality",
         "matchLevel":0,
         "imageProcessing":"faceFound",
         "success":false,
         "error":false
    }
  }
}
Download full result
Data files
liveness.json
This "raw" file contains all the liveness information FaceTec provides from the face scan of the end-user.
matching_facePortrait.json
This "raw" file contains all the information FaceTec provides when matching the end-user's face in the ID-photo/selfie with the face scan.
Media files
| Type | File name/format | Comment |
|---|---|---|
| front | front.png/jpeg | This file is only present if it was added to the FaceTec process. It contains the image of the front of the ID document. |
| back | - | This provider does not use images from the backside of the ID document. |
| selfie | selfie.png/jpeg | This file is only present if it was added to the FaceTec process. It contains the image of the end-user's face. |
| portrait | - | This provider does not extract the photo from the ID. |
| video | - | This provider does not capture videos. |
See also the API Reference for even more service details.