Quick start guide
This guide describes how to get started with the Assure API.
If you want to read more before starting the integration, we recommend the following:
- The About page with high-level information about use cases and an example user flow.
- Key concepts in the Assure API to get an introduction to the main components in the Assure API.
- The API reference to get familiar with available endpoints.
Set up an API integration
Setting up an API integration is the most flexible way of testing Signicat Assure. You can use your preferred IDE, Framework, Postman, etc. using credentials provided by Signicat.
Initial preparations
The setup descriptions below assume you have completed the following initial preparations:
- Sign up to the Signicat Dashboard. An organisation and sandbox account is automatically created for you.
- Add a domain to your sandbox account as described in the Initial setup instructions.
Get client credentials
To access the Assure API, you must use client credentials (client ID and secret) provided by Signicat. You can either obtain your own client credentials, or use test credentials:
-
If you just want to quickly try out the Assure API, you can use the following test credentials:
- Client ID:
sandbox-gray-garden-649 - Secret:
Ce75uJYZSkHRMmfabiNPXz1UJLMX0uBewZghiPrpfK6jCYm3
Do not use PII data with the test credentialsAnyone can use these test credentials. Please ensure that you DO NOT use or provide anything that contains PII data while using the test credentials.
- Client ID:
-
To obtain your own client credentials, see the general step-by-step guide, Accessing API products.
Add product permission to Assure API
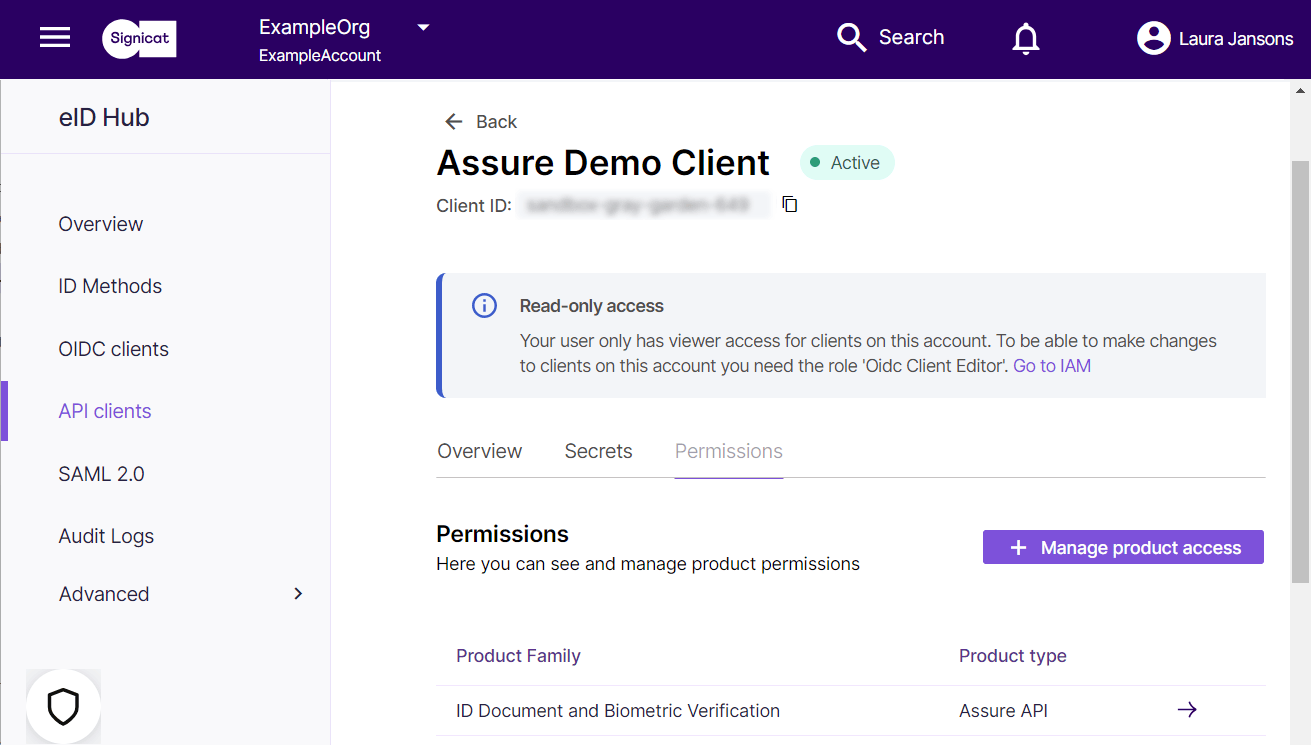
Ensure your API client has the right permissions to the Assure API. Only an administrator in your organisation can add this permission (see Managing roles and permissions).
- Your administrator sets the permissions on the API client Permissions tab, by selecting Manage product access and the Assure API checkbox.
Once your administrator has enabled the product permission to the Assure API, it should look like this:

Add permissions
In this example screen, the Permissions tab is greyed out, which means this example user has read-only access.
Access to the eIDV providers
After you have obtained your own client credentials, access to the eIDV providers is enabled automatically for sandbox accounts. Testing with sandbox accounts means that the providers will run in test mode. Be aware that some providers (for example Onfido) might return mock responses in test mode.
To enable access to the providers for your production accounts, you need to contact an onboarding manager.
Obtain an access token
Use the above client credentials to obtain an access token. For details on how to do this, see the general section, Obtaining an access token.
Example request:
curl --location 'https://api.signicat.com/auth/open/connect/token' \
--header 'Authorization: Basic c2FuZGJveC1ncmF5LWdhcmRlbi02NDk6Q2U3NXVKWVpTa0hSTW1mYWJpTlBYejFVSkxNWDB1QmV3WmdoaVBycGZLNmpDWW0z' \
--header 'Content-Type: application/x-www-form-urlencoded' \
--data-urlencode 'grant_type=client_credentials' \
--data-urlencode 'scope=signicat-api'
Example response:
{
  "access_token": "eyJhbGciOiJSUzI1NiIsImtpZCI6InNhbmRib3gtc2lnbmluZy1rZXktZmM4NDg1MWQ2NDczYmQ0ZDkyZmYwN2Q2MGJjYzhkMTQiLCJ0eXAiOiJhdCtqd3QifQ.eyJuYmYiOjE2NzY1NjUyNjUsImV4cCI6MTY3NjU2NTg2NSwiaXNzIjoiaHR0cHM6Ly9hcGkuc2lnbmljYXQuZGV2L2F1dGgvb3BlbiIsImF1ZCI6Imh0dHBzOi8vYXBpLnNpZ25pY2F0LmRldiIsImNsaWVudF9pZCI6ImRldi1yaXBlLXNhaWwtOTc4IiwiYWNjb3VudF9pZCI6ImEtc2RnZS1TbzdOV05PNFpQZjVWaHg5aG9QSSIsImp0aSI6IkRBNTg1RTZGQjBBNUI5NjNEMDUzRTA1OUJCQ0I0MzY2IiwiaWF0IjoxNjc2NTY1MjY1LCJzYW5kYm94Ijp0cnVlLCJzY29wZSI6WyJzaWduaWNhdC1hcGkiXX0.NarwHuNQAUAXK0FDcoTZoHnZvJKKCs8u4B3Dvw0_xbR48MaEvnTtIh80em1k_90P4KJvbzp90IycnrsJxb64EvmCPcPl_kRlqY6bZTlO3fBSsqjJP3IIZBpX1n7rBWBeBB26Brlgdsrmi0PDmPjR7Hmjfgk2zkl-kR4d6ka0oYCSlIR43nNmNbtITqcay5gEkA5GpFeLH8ezIJkTzomeNswsNZs7tLOrz4Lks6BxcHIW3fBnY4go_y2UoQF6qxwZNVbQhRkEEtmPIYvezXGS9JMDOTjtBAxevyt2TsXpPx_IMhSRyHXAP12Q_3HG50-b0l97irEGhVf68N5Z-WgfOA",
  "expires_in": 600,
  "token_type": "Bearer",
  "scope": "signicat-api"
}
When you have received the access token, you can use it in all requests to the Assure API (as the HTTP Bearer authentication header), for example:
curl --location --request POST 'https://api.signicat.com/assure/dossiers' \
--header 'Authorization: Bearer eyJhbGciOiJSUzI1NiIsImtpZCI6InNhbmRib3gtc2lnbmluZy1rZXktZmM4NDg1MWQ2NDczYmQ0ZDkyZmYwN2Q2MGJjYzhkMTQiLCJ0eXAiOiJhdCtqd3QifQ.eyJuYmYiOjE2NzY1NjUyNjUsImV4cCI6MTY3NjU2NTg2NSwiaXNzIjoiaHR0cHM6Ly9hcGkuc2lnbmljYXQuZGV2L2F1dGgvb3BlbiIsImF1ZCI6Imh0dHBzOi8vYXBpLnNpZ25pY2F0LmRldiIsImNsaWVudF9pZCI6ImRldi1yaXBlLXNhaWwtOTc4IiwiYWNjb3VudF9pZCI6ImEtc2RnZS1TbzdOV05PNFpQZjVWaHg5aG9QSSIsImp0aSI6IkRBNTg1RTZGQjBBNUI5NjNEMDUzRTA1OUJCQ0I0MzY2IiwiaWF0IjoxNjc2NTY1MjY1LCJzYW5kYm94Ijp0cnVlLCJzY29wZSI6WyJzaWduaWNhdC1hcGkiXX0.NarwHuNQAUAXK0FDcoTZoHnZvJKKCs8u4B3Dvw0_xbR48MaEvnTtIh80em1k_90P4KJvbzp90IycnrsJxb64EvmCPcPl_kRlqY6bZTlO3fBSsqjJP3IIZBpX1n7rBWBeBB26Brlgdsrmi0PDmPjR7Hmjfgk2zkl-kR4d6ka0oYCSlIR43nNmNbtITqcay5gEkA5GpFeLH8ezIJkTzomeNswsNZs7tLOrz4Lks6BxcHIW3fBnY4go_y2UoQF6qxwZNVbQhRkEEtmPIYvezXGS9JMDOTjtBAxevyt2TsXpPx_IMhSRyHXAP12Q_3HG50-b0l97irEGhVf68N5Z-WgfOA' \
--header 'Content-Type: application/json' \
--header 'Accept: application/json' \
--data ''
Next steps
Dive deeper into the integration with the Assure API, using either of these flows: