# Onfido
Page contents
# Supported features
Onfido (opens new window) is a third-party eIDV provider integrated with Assure API. Signicat supports the following identity verification features from Onfido:
- ID document check
- Face match between ID document and selfie
- Liveness check of live video recording
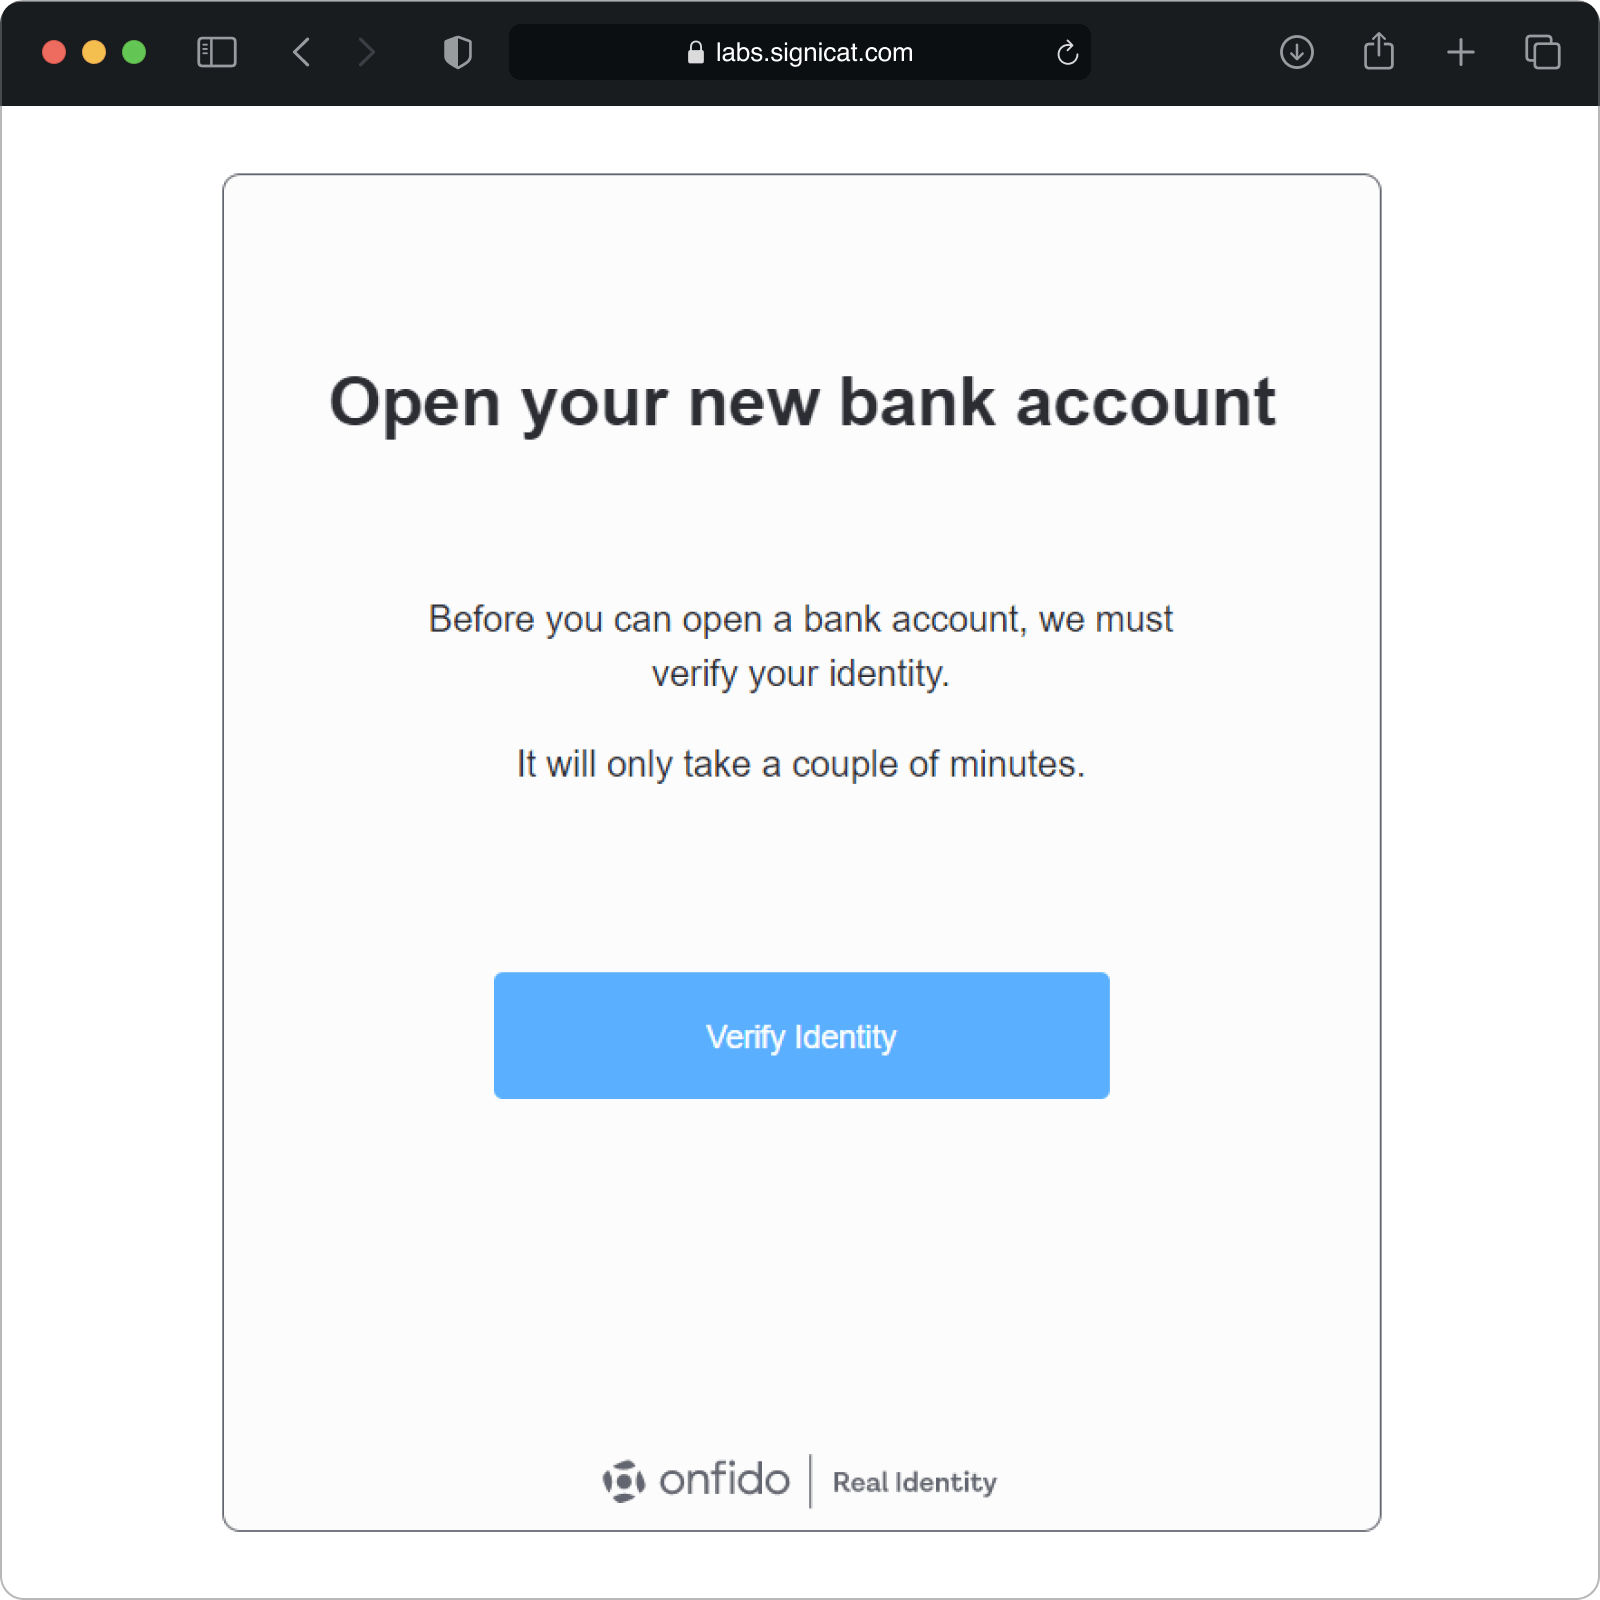
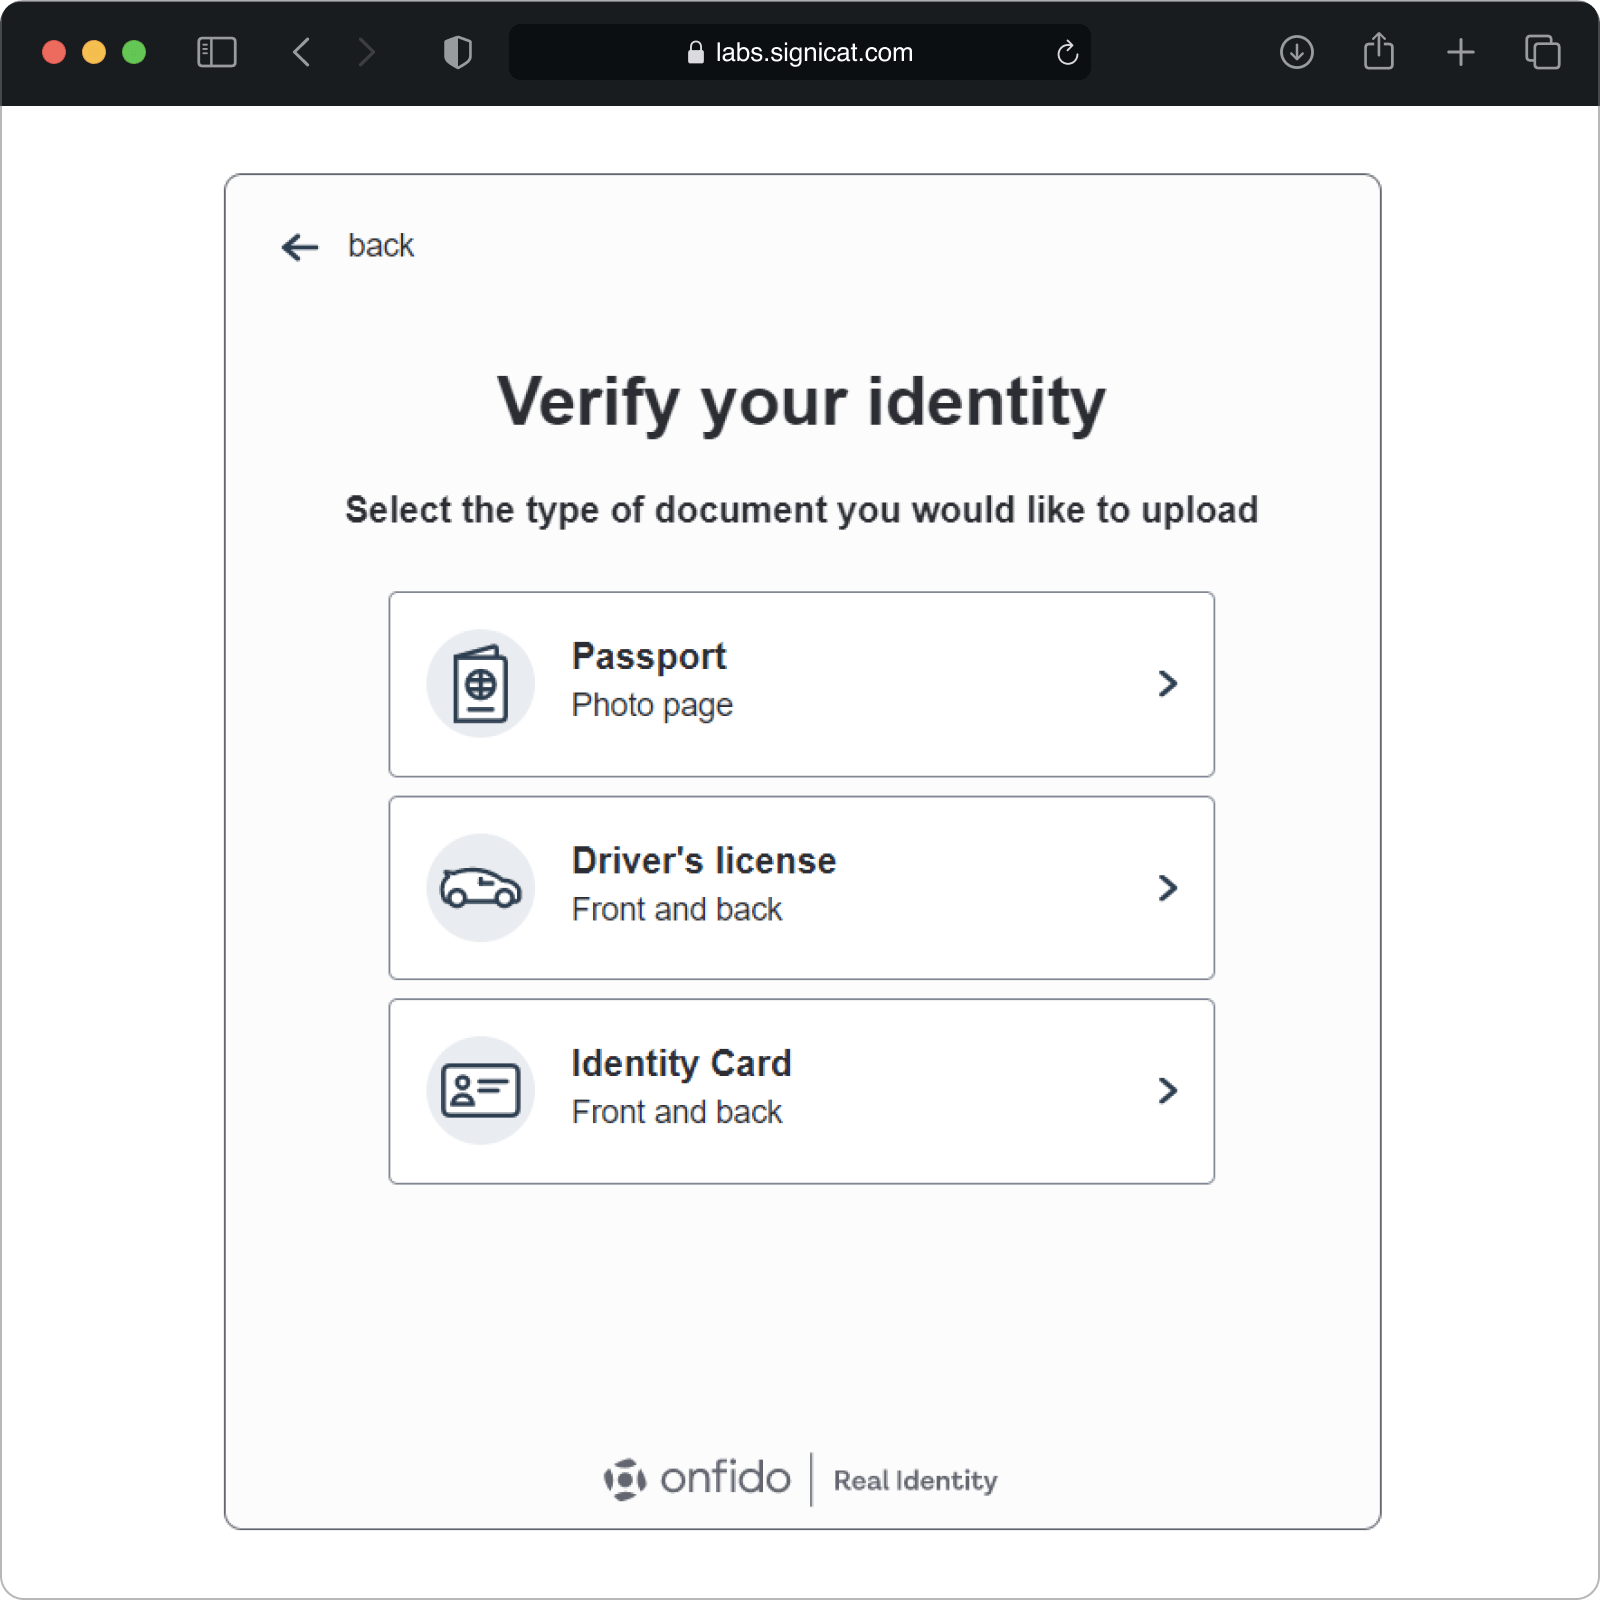
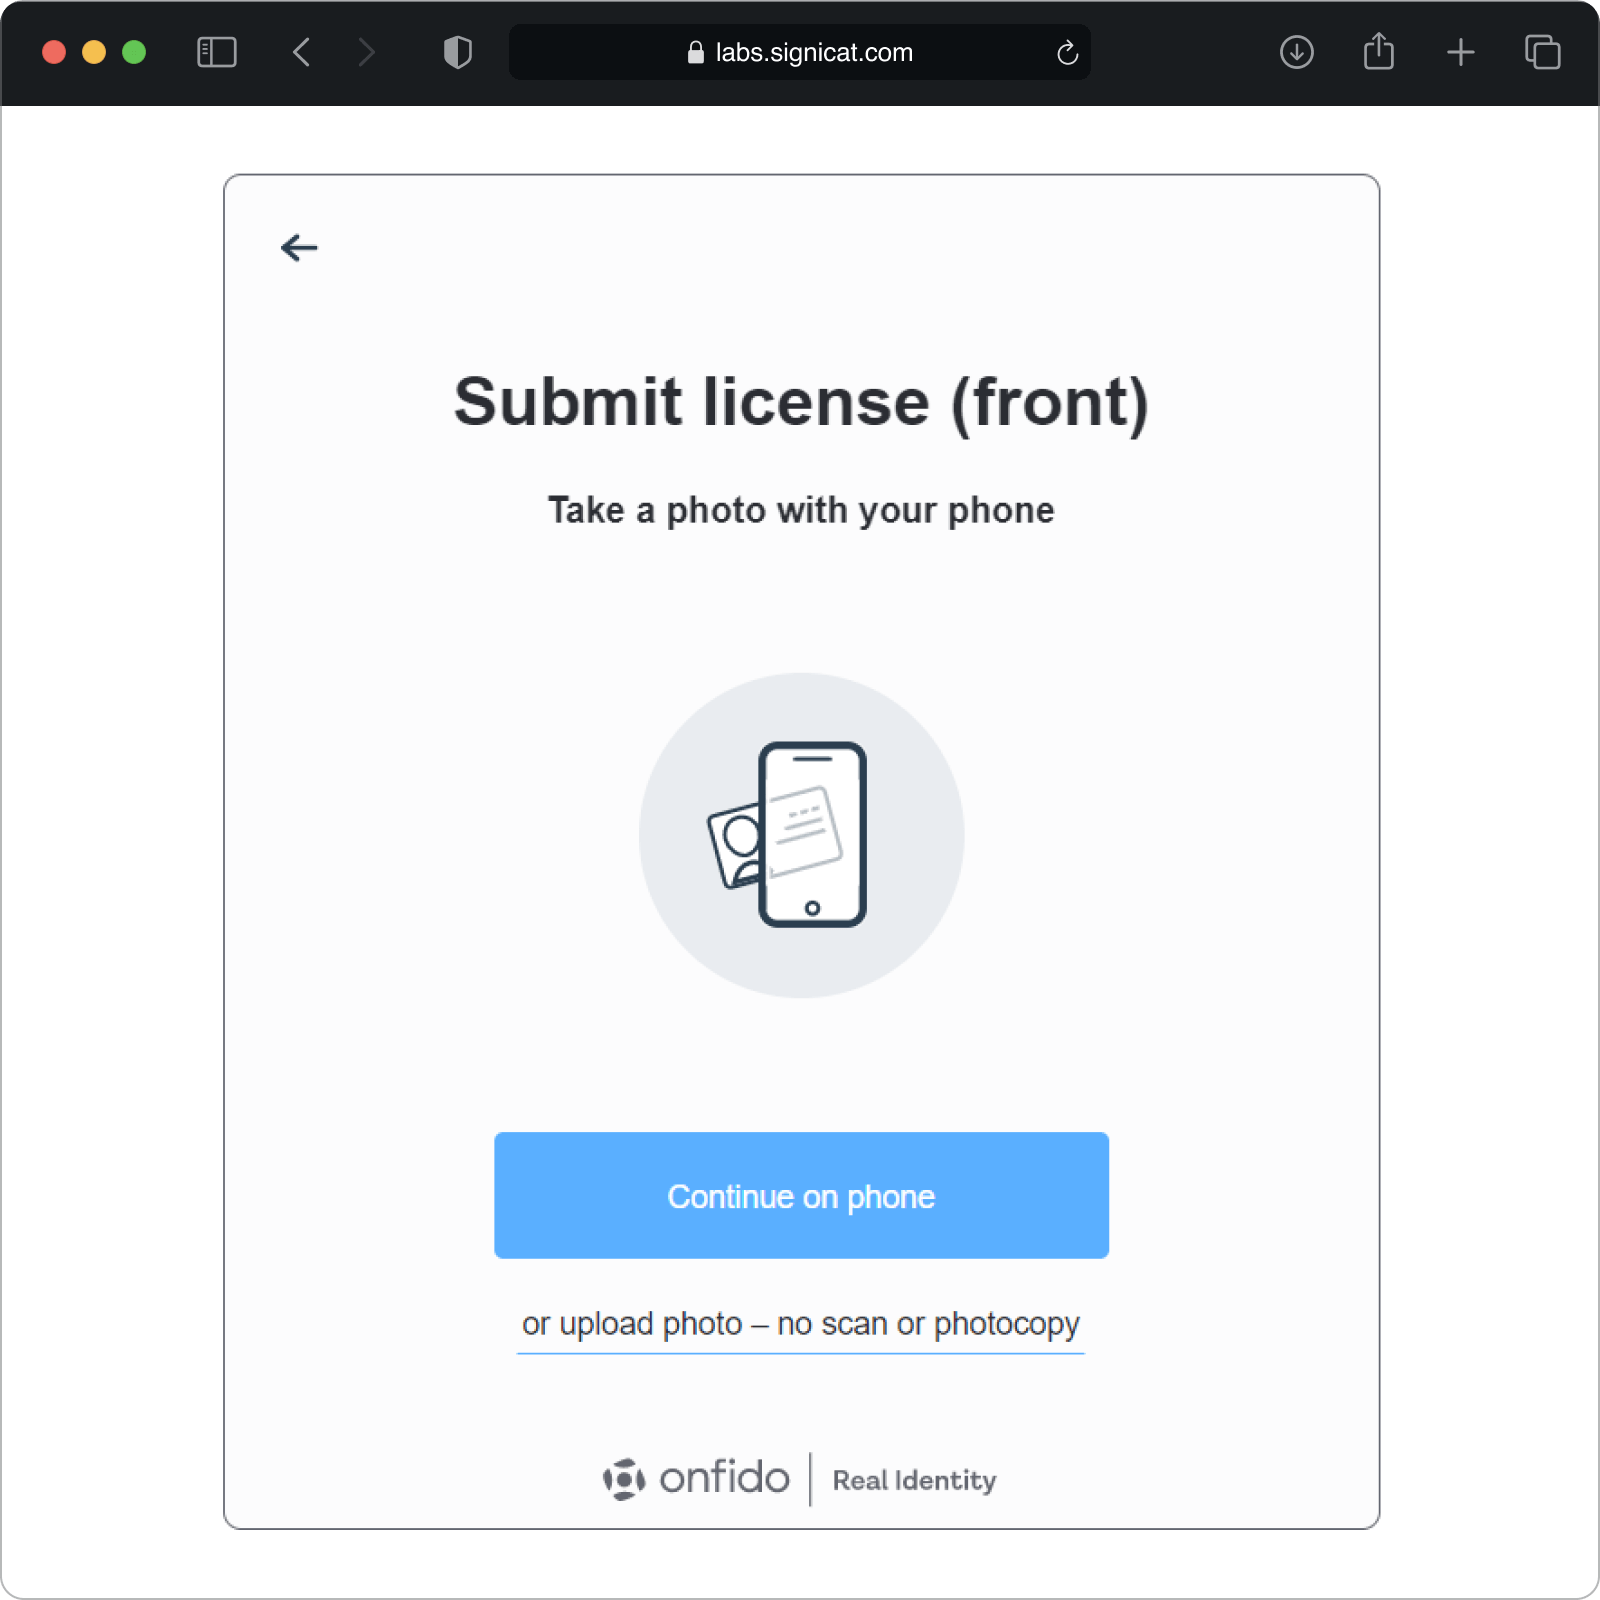
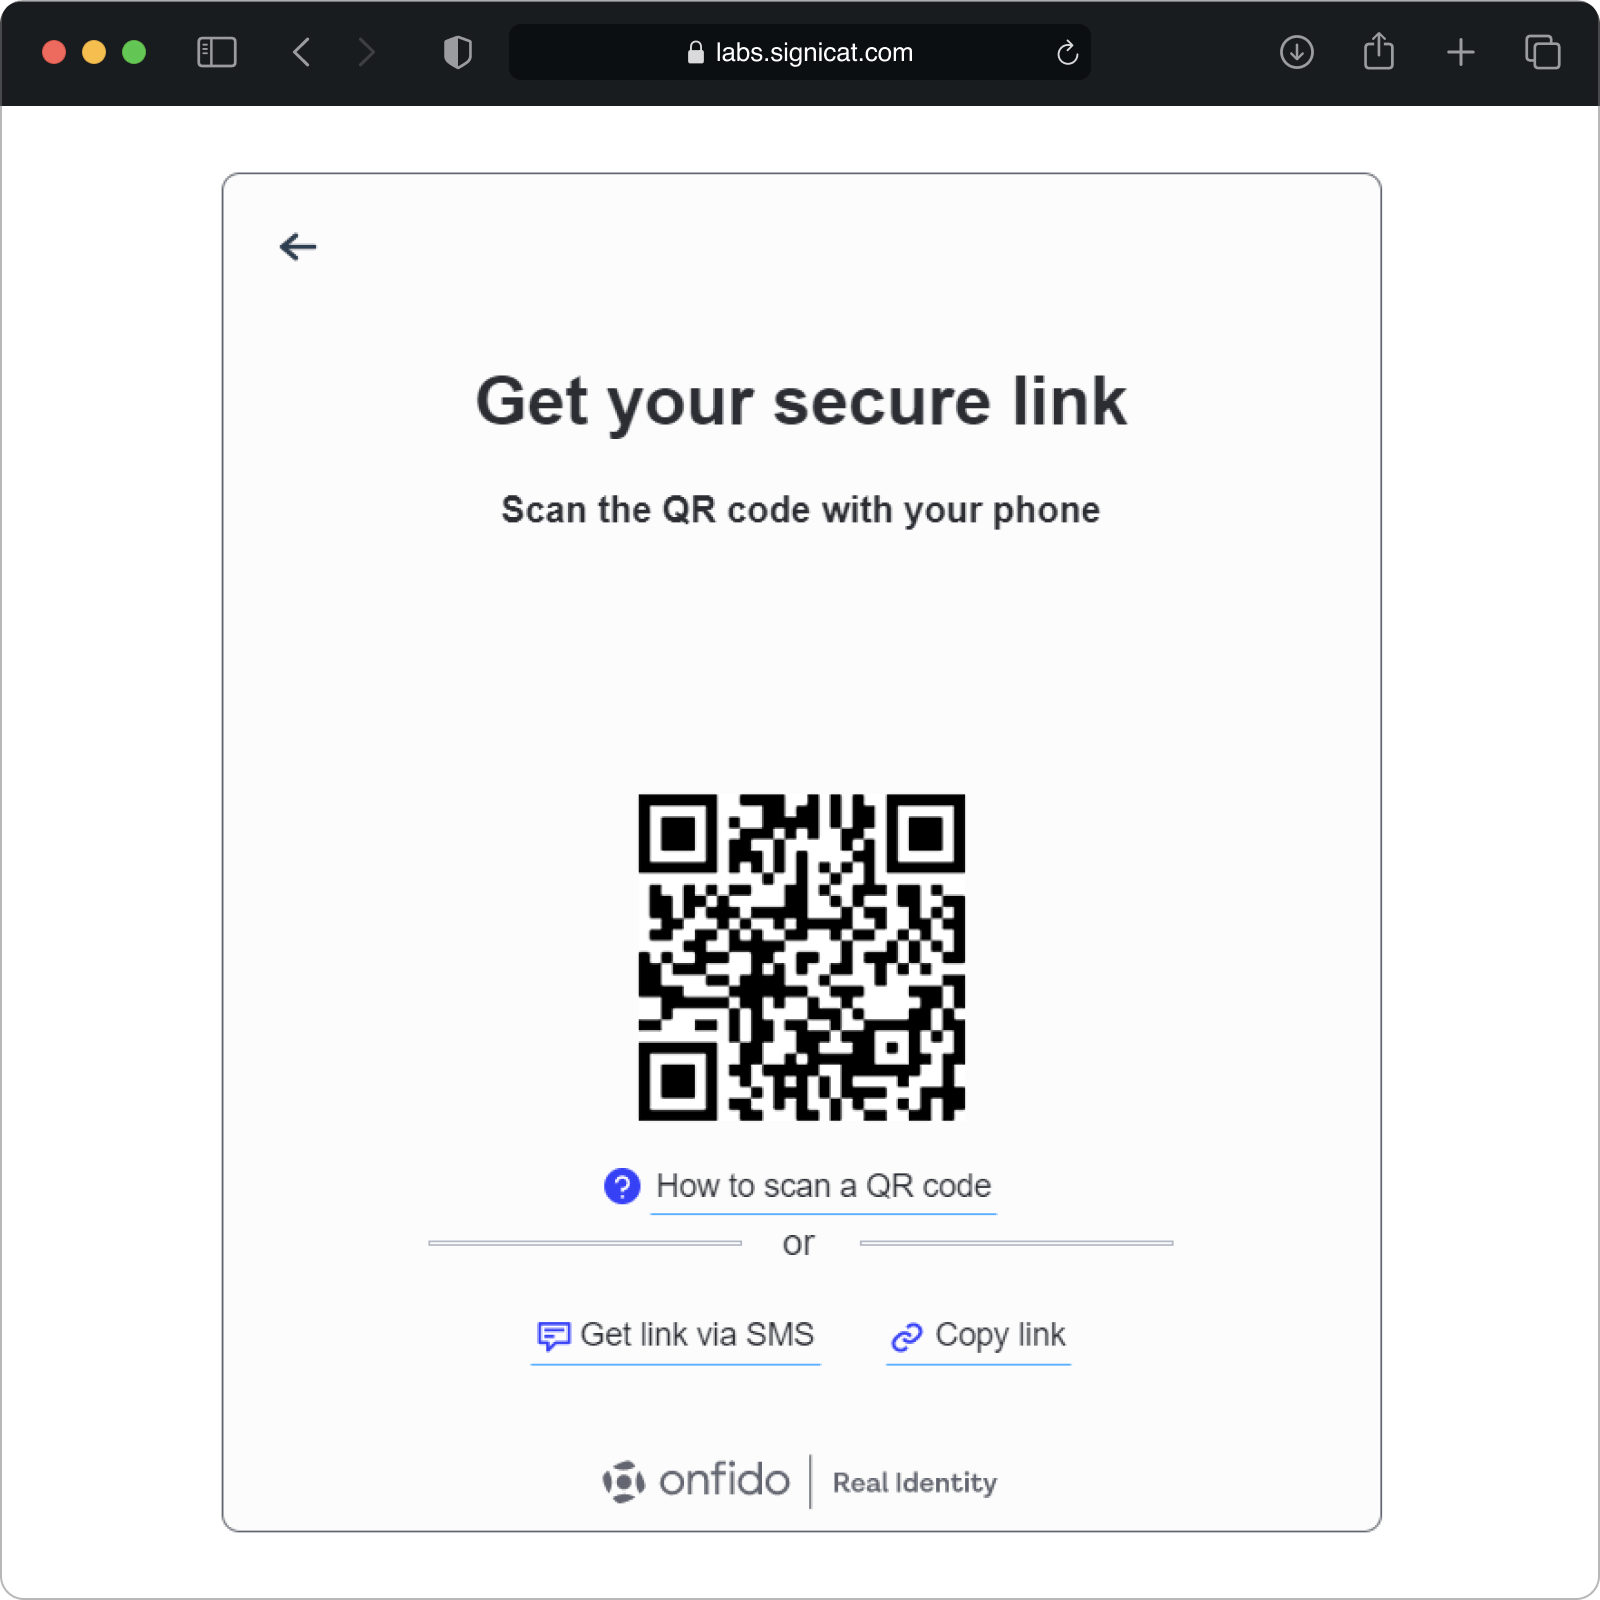
# User flow example
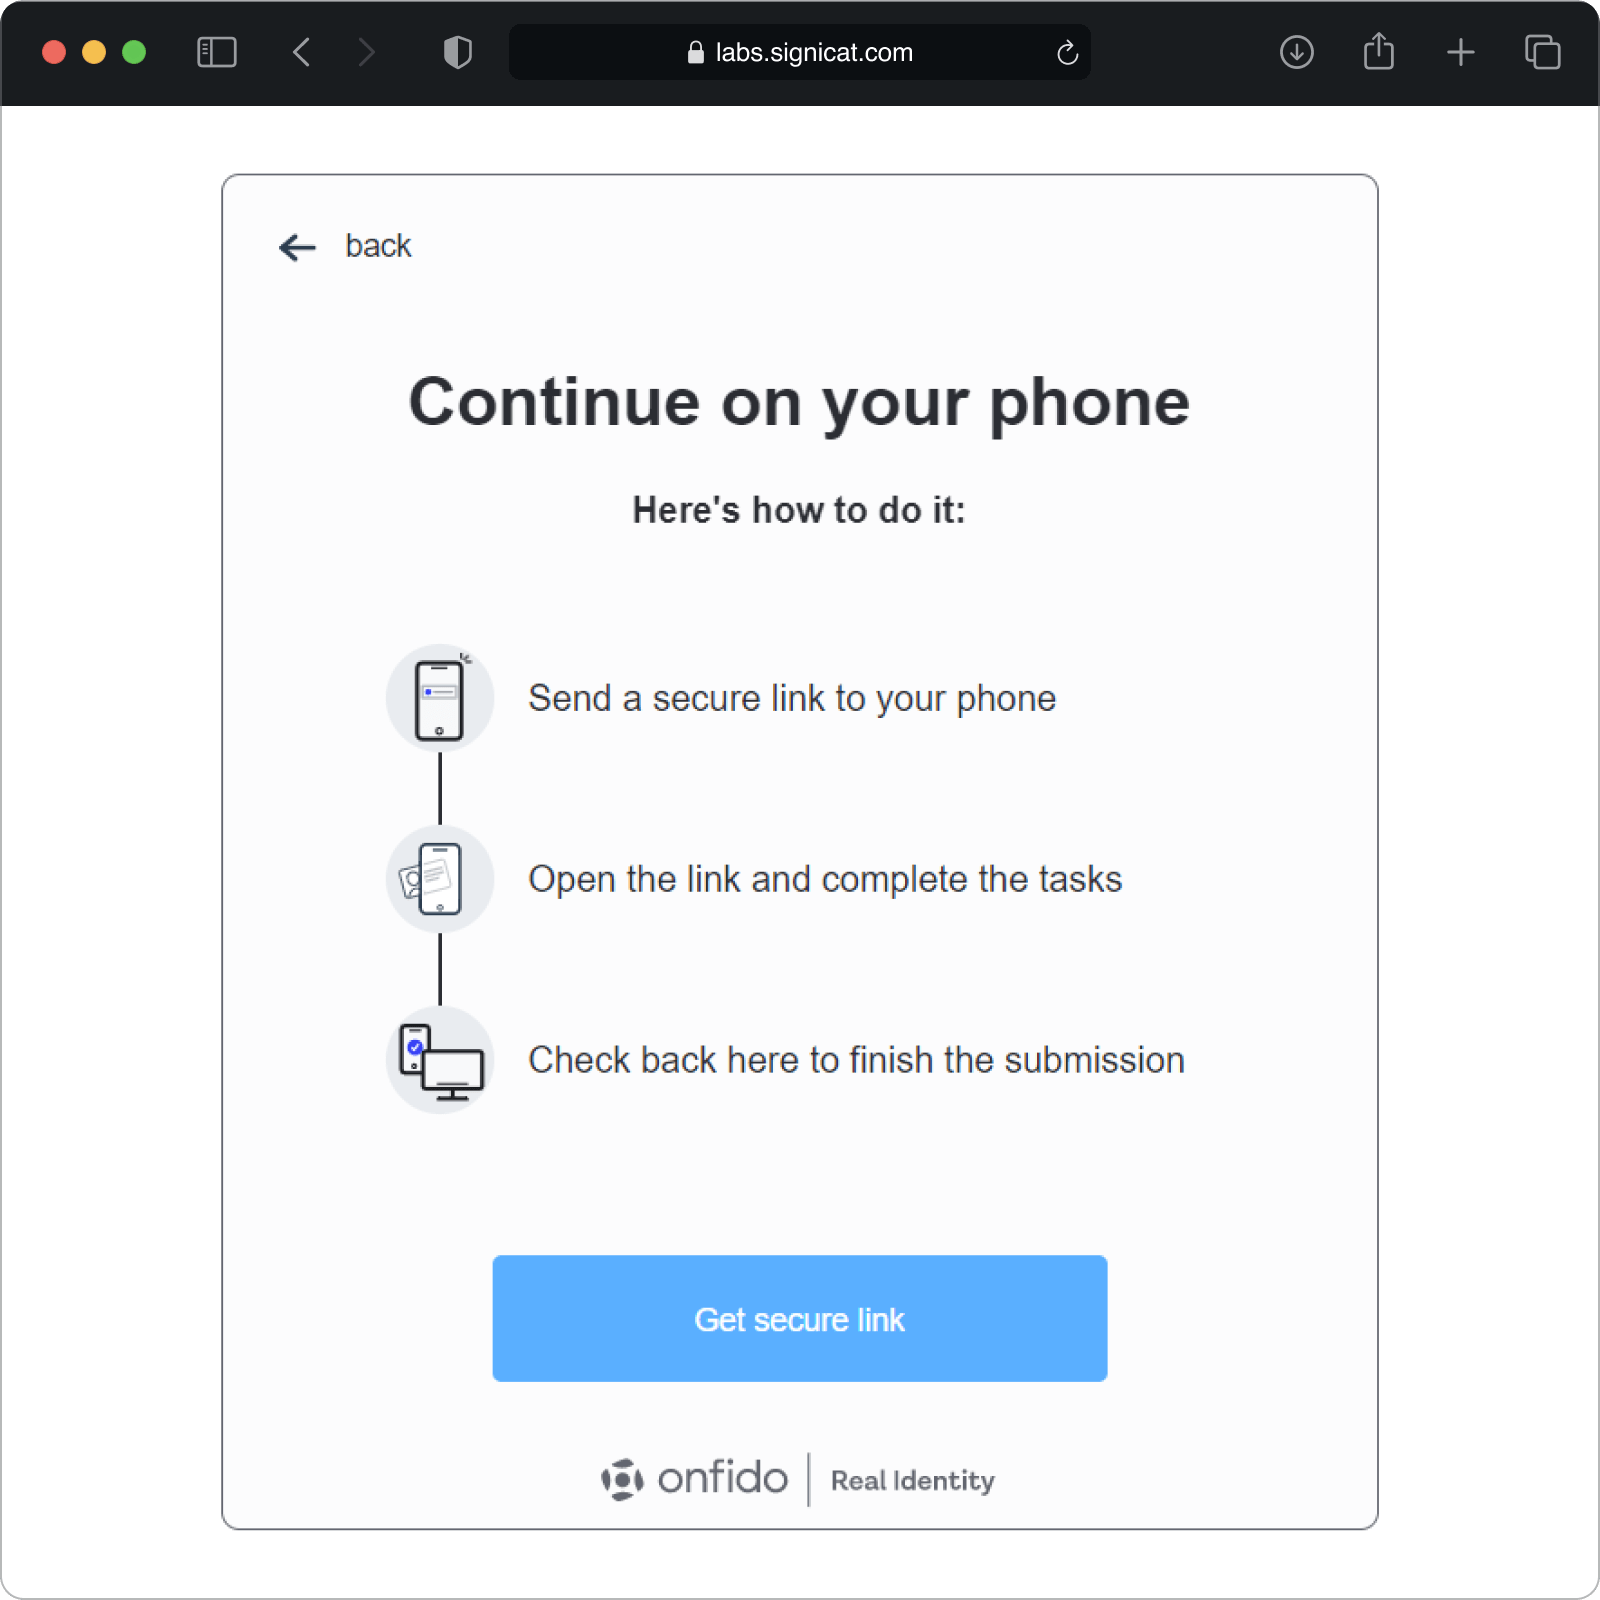
The following verification example shows a typical user flow where we use Onfido's native SDK to take a photo of an ID document and a selfie to match those images. The Assure API can be used either in a web or in a native (mobile) context. In this example, the images are from a web environment.
Note
This is just an example of how the verification flow could look like. The screens will probably look differently in your own implementation.
This example assumes you already have created a dossier and a process.
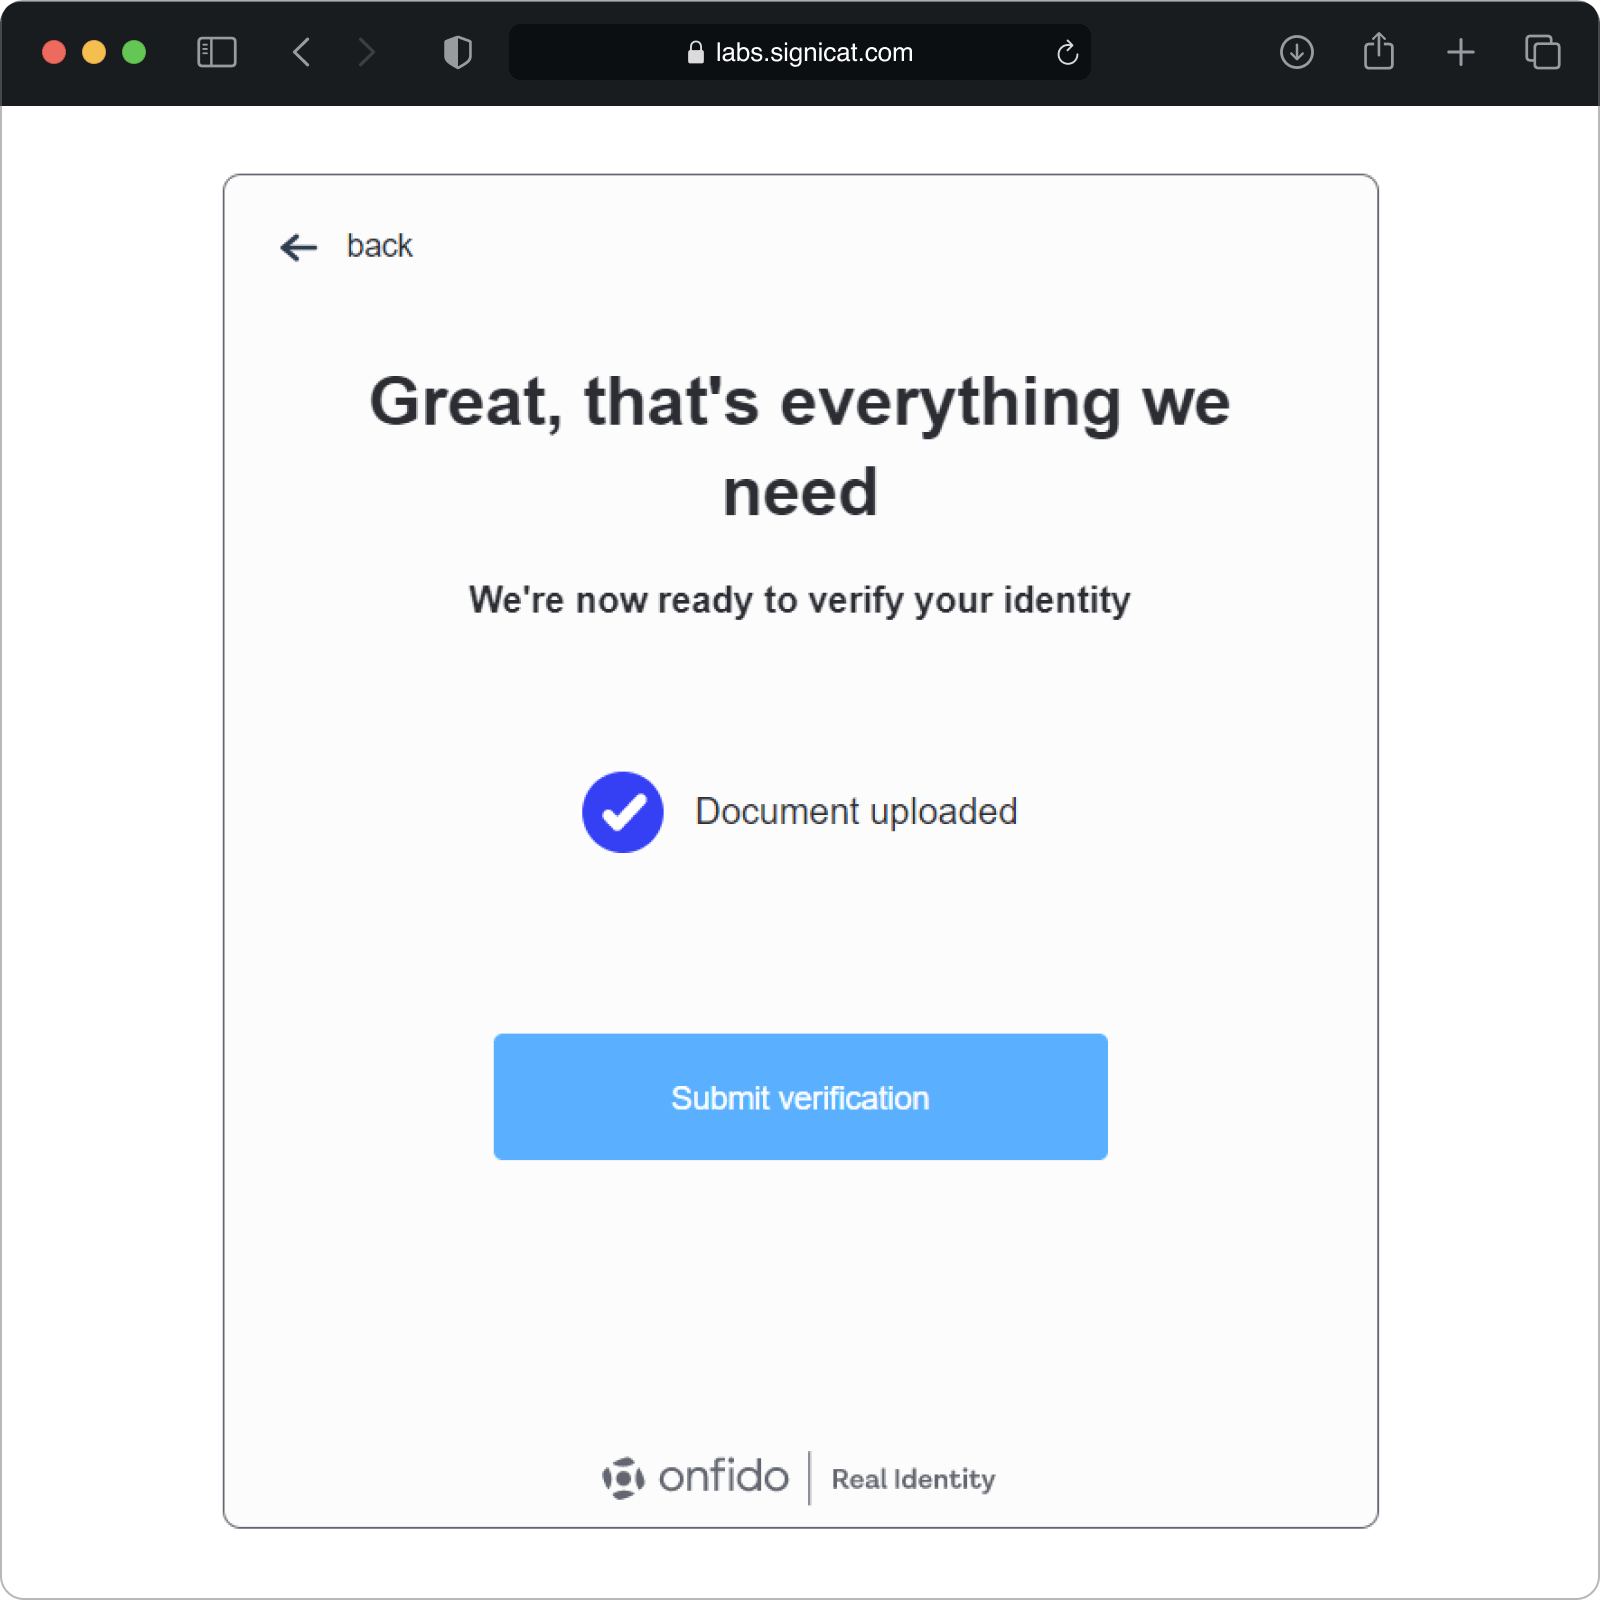
After the verification is finished, you can call the Get process (opens new window) endpoint to inspect the final result (see step F below). Inside the process, you can see the process details, like the final result status ( e.g. accepted) and also the provider specific information with the results from the analysis of the the document verification and facial similarity.
# Integration use cases for Onfido
This section assumes you already have done the initial integration steps with the Assure API, i.e. set up client credentials and access token.
In the following, we present the two most common use cases for Onfido:
Both options can be used either in a web or in a native (mobile) context. The steps in the two flows are quite similar, except for some smaller differences in the Create process and Upload images steps.
# UC 1: Use Onfido and integrate only with Assure API (web or mobile usage)
I want to use Onfido to verify the identity of an end-user using their identity document.
I want to be able to upload the ID images directly through the Assure API without having to integrate with Onfido’s SDK.
I want to be notified when a final result has been obtained (either successfully or not).
Note: This use case seamlessly fits both web (JS) and mobile (Android/iOS) applications.
The colour codes illustrate the flow decision:
- Green = Must
- Grey = Optional
- White = Not used
# Step A: Create dossier
- Use the Create dossier (opens new window) endpoint to create a placeholder for all of your end-user’s data.
- Save the
dossierIdyou get in the response to be used in the next requests.
Note:
Ensure you use one dossier per end-user.
# Step B: Get document types (optional)
This step is not required, but you may want to get the list of documents (opens new window) accepted by Onfido so you know which documentType Onfido supports (to be passed on to the next request).
In this use case, the document type is a passport (see example code in the next step).
# Step C: Create process
- Use the Create process (opens new window) endpoint to create an identity verification process in that dossier. Ensure you give it the
dossierIdyou got in the Create dossier response. Also, enter the Onfido provider in the request body. Here is an example JSON request body:
{
    "provider": "onfido",
    "processType": "documentSelfie",
    "documentType": "passport",
    "processParameters": {
        "location": {
            "countryOfResidence": "PRT"
        }
    }
}
In this example, you ask the end-user to perform an identity verification using their passport and a selfie image.
You must always send the end-user's location in an Onfido "Create process" request. For more details, see the Location section.
It is recommended to subscribe to Assure events to be notified when the result is available.
You must save the
processIdfrom the response to use on the next steps.
# Location
You must always send the end-user's location in an Onfido "Create process" request. Otherwise, you will get an error when you call the Start verification (opens new window) endpoint.
There are two ways you can set the location, either via countryOfResidence or ipAddress:
Location from country of residence:
{
    "processParameters": {
        "location": {
            "countryOfResidence": "PRT"
        }
    }
}
Location from IP address:
{
    "processParameters": {
        "location": {
            "ipAddress": "176.78.162.201
        }
    }
}
Important
If Onfido is unable to infer the country of residence from the IP address, you will get an error when you call the Start verification (opens new window) endpoint. For that reason, we strongly recommend you ask the end-user for their country of residence (as in the first example above).
You can find more information about the location field in the OpenAPI docs under Create process > processParameters (opens new window).
# Onfido privacy consent
If an end-user is a US resident, they must consent to the collection, use, and handling of biometric identifiers and information by Onfido.
Note
You only need to get the privacy consent from the end-user when the processType is documentSelfie or documentVideo and your end-user is a US resident.
In this case, you must:
- Explain to the end-user that you use a third-party provider, Onfido, to process their identity check.
- Present the end-user with the "Onfido Terms and condition" page to get their consent: "I have read, understand and accept Onfido Facial Scan Policy and Release (opens new window), Onfido Privacy Policy (opens new window) and Onfido Terms of Service (opens new window).” You may change the phrasing to be consistent with your user experience, as long as you obtain confirmation that the end user has read, understood and accepted Onfido's policies and terms of service. For example, "By continuing to use this service you confirm that you have read, understand and accept Onfido’s …" or "By clicking ‘accept’ you confirm you have read, understand and accept Onfido’s …". For standard example texts and screen images, see the Translations for Capture SDK section.
- Ensure you present this information and get the end-user’s consent within your application before you upload any images to Onfido.
After you have done the steps above, you can send the consents value in the Create process request. If the end-user does not provide their consent, you don’t even need to bother creating a process for them given that it will fail when you call the Start verification (opens new window) endpoint.
Important
Sending the privacy consent as true means that the end-user has read Onfido’s Privacy notices and consent (opens new window) and has agreed to them.
You are responsible for ensuring this is true before processing.
Here is an example of a Create process request where the end-user has given their consent:
{
    "provider": "onfido",
    "processType": "documentSelfie",
    "documentType": "passport",
    "processParameters":
    {
        "location":
        {
            "countryOfResidence": "USA"
        },
        "consents":
        {
            "privacy": true
        }
    }
}
You can find more information about the consents field in the OpenAPI docs under Create process > processParameters (opens new window).
# Step D2: Upload images
Use the Set images to the process (opens new window) endpoint to upload the images the end-user captured during the identity verification. This JSON example file contains specimen images of a Norwegian passport and a selfie: NOR_passport-specimen_and_selfie.json (opens new window)
Extra optional step: Check the images that were uploaded using the Get Image (opens new window) endpoint. You should only be able to retrieve “FRONT” and “SELFIE”. “BACK” will only be available if you used a 2-sided document and “PORTRAIT” is not made available by Onfido.
# Step E: Start verification
- Use the startVerification (opens new window) endpoint to perform a verification of the identity document that was uploaded.
- Extra optional step: Before requesting the verification to start, you may want to call Get process (opens new window) to get the following process info:
- The provider is”onfido”
- The status is “pending”
Important
If the end-user resides in the USA and they did not give consent in the Create process step, Start verification will fail. For more information, see the Onfido consent section.
# Step F: Get process
If you have subscribed to Assure events as recommended in step C, you know when the verification result is ready.
- Call the Get process (opens new window) endpoint: Then use the
dossierIdandprocessIdreceived in the Assure events notification.
The process now contains data about the process’ final result. For more details about this, see Service details for Onfido > Get process.
# UC 2: Use Onfido and integrate with Onfido's SDK (web or mobile usage)
I want to use Onfido to verify the identity of an end-user using their identity document.
I want the required ID images to be captured and uploaded using Onfido’s iOS SDK.
Note: This use case seamlessly fits both web (JS) and mobile (Android/iOS) applications.
The colour codes illustrate the flow decision:
- Green = Must
- Grey = Optional
- White = Not used
In this case, you will perform the same steps as in Use Case 1, except from some differences in the "Create process" and "Upload images" steps. For details, see the SDKs section.
# Mobile SDKs (Android and iOS)
The aim of this topic is to help a developer integrating with the Assure API using Onfido's mobile SDKs. This is a more detailed description of Use case 2 above.
Please, keep in mind that the following descriptions do not contain all the necessary steps for production mode. In addition, you must add validations, tests and error handling, which is outside the scope of this documentation.
Using the third-party SDKs means that the end-user will see Onfido's user interface when performing the identity verification on their mobile or desktop.
Main aim of Onfido's user interface:
- Check the end-user's ID document.
- Perform a face match between the ID document and selfie of the end-user.
- Perform a liveness check of the live video recording of the end-user.
Before you start the SDK integration, we recommend to familiarise yourself with the general steps for integrating with the Assure API.
# Requirements
Before you start the SDK integration, you should be aware of the following requirements for Onfido's SDKs:
- We advice you to always use the latest Onfido SDK version. For more information about the minimum required version, see Onfido Privacy notices and consent (US) (opens new window).
- Check the supported device versions in Onfido's official documentation (opens new window).
- The app needs camera and microphone permission.
- Your app must always communicate with your own server and never directly with the Assure API (see Usage recommendations).
- Since you are integrating with the Assure API in a native app context, you should choose the eIDV generic flow.
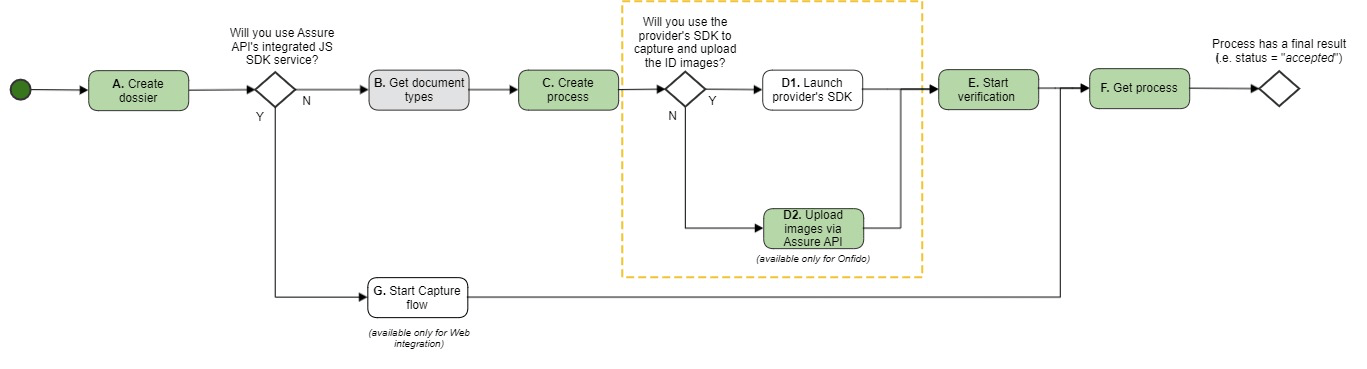
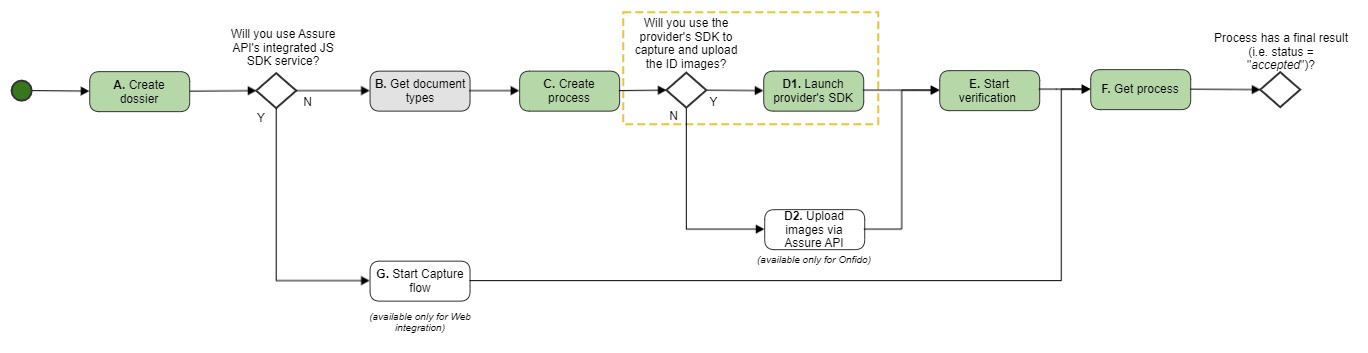
# Integration steps overview
This diagram provides an abstraction of the client-side implementation.
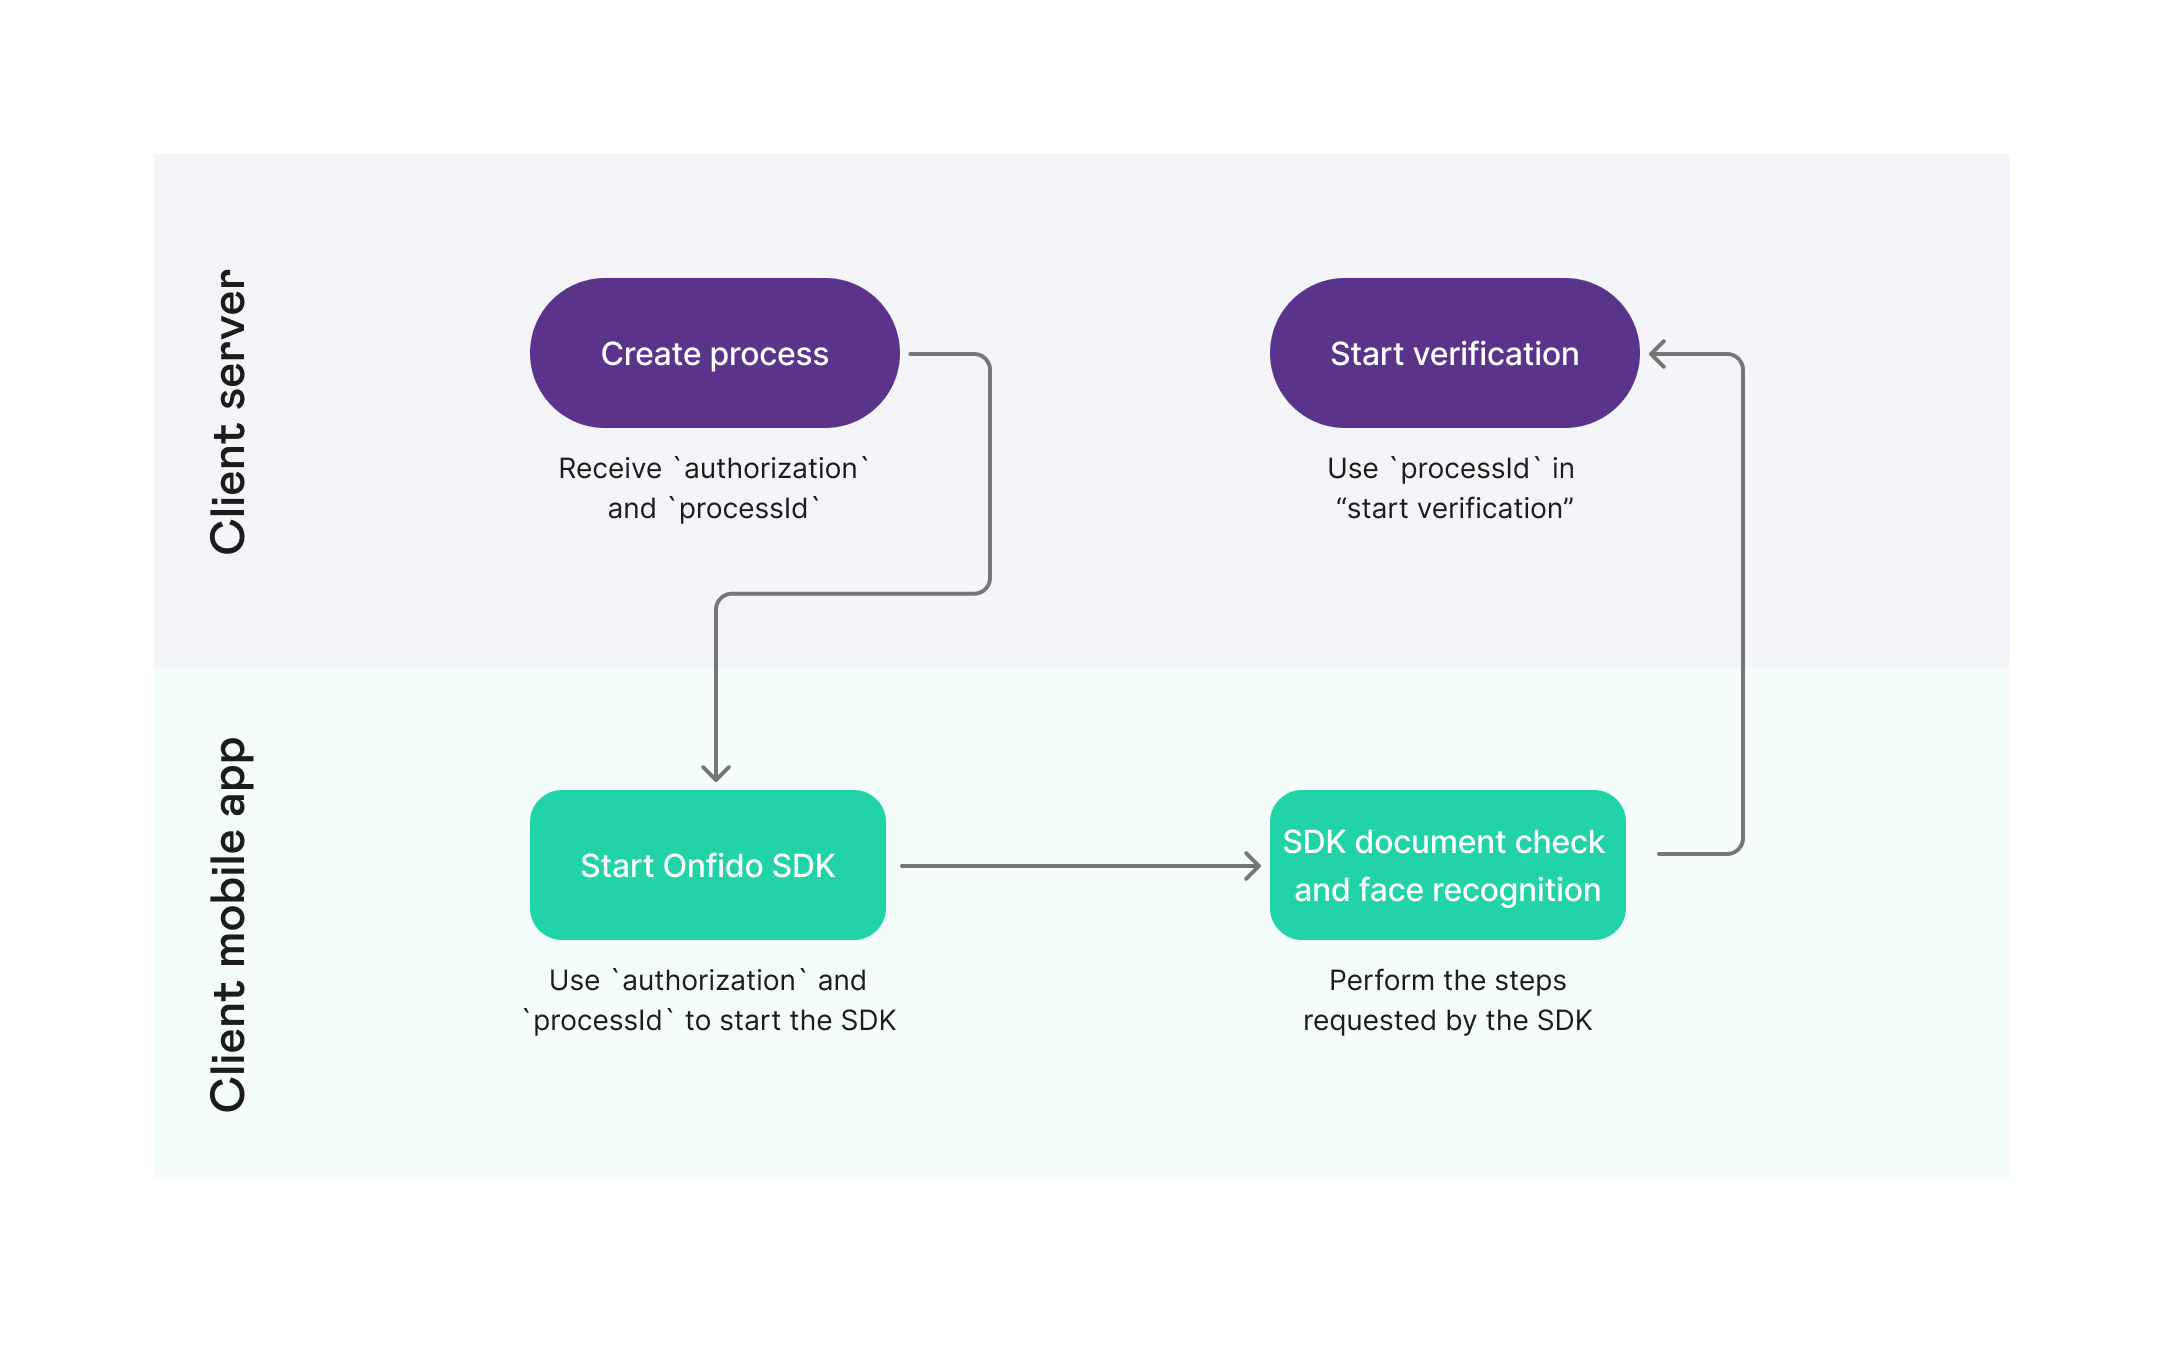
The next sections describe all the necessary steps, including the integration with Assure before and after the Onfido SDK integration in step 3:
- Create a dossier.
- Create a process.
- Integrate with the Onfido mobile SDK to check the ID document.
- Start verification.
- Get result.
Note:
All the steps are similar for iOS and Android except the SDK integration in step 3, which is described below in different tabs for iOS and Android.
# Create a dossier
- Use the Create dossier (opens new window) endpoint to create a placeholder for all of your end-user’s data.
- Save the
dossierIdyou get in the response.
Note:
Ensure you use one dossier per end-user.
# Create a process
To be able to create a process (opens new window), you need to get some information from your mobile app, send it to your backend server and afterwards to the Assure API.
Tips:
processType: The value depends on the check you are doing. If it is just a document check, you should usedocument. If you're using also face comparison, you should usedocumentSelfie(if using a photograph) ordocumentVideoif you are also checking for liveness.mobileAppId: This is a unique ID of the mobile app that will integrate with the provider's iOS/Android SDK. This is either a bundle ID for iOS or application ID for Android, e.g.com.example.mymobileapp.
Here is an example request:
{
    "provider": "onfido",
    "processType": "document",
    "processParameters": {
        "mobileAppId": "com.example.mymobileapp"
    }
}
Here is an example response:
{
    "processId": "710a4326-ef7f-4bed-85c4-aa523f742742",
    "status": "pending",
    "createdAt": "2019-04-12T09:35:19Z",
    "updatedAt": "2019-04-14T09:35:19Z",
    "authorization": "eyJhbGciOiJJ9.eyJwYXlsb2FYVjRGVhZU252alVsekNHaUMzR9.uW-2dEu_rYUyhF_E",
    "provider": "onfido",
    "processType": "document"
}
- Save the information from the response. You will need it in the next steps.
# Integrate with the Onfido mobile SDK to check the ID document
To check the ID document of the end-user, you must now integrate with the Onfido SDK for either Android or iOS:
# Start verification
Your server (backend) must request the Assure API to start performing the identity verification.
To do this, you just call the Start verification (opens new window) endpoint. No parameters are necessary.
# Get result
After Onfido has analysed the images/videos, Onfido will send a callback to Assure API with the result. It is recommended to subscribe to Assure events to be notified when the result is available. You can call the Get process (opens new window) endpoint to get the full information about the process.
For result examples, see Onfido results..
Download full result
You can also get a zip file with the packaged process by calling the Download full result (opens new window) endpoint. For more information, see Download full result.
# Service details for Onfido
This section goes more into detail about some useful endpoints when integrating with Onfido:
# Start Capture flow
# Capture SDK
More information will follow.
# Onfido native JS SDK configuration
The Capture configuration also includes specific configuration fields when using the Onfido native SDK. These configuration fields allow you to specify the workflow and the graphical user interface. This configuration applies when the sdk field in the "Start Capture flow" request is set to native and provider to onfido.
For more details, see the onfidoConfig element in the OpenAPI documentation for either Create (opens new window) or Update capture configuration (opens new window).
# Get process
This section describes the final result statuses for Onfido. For a more general description of how the "Get process" endpoint works, see Service details > Get process and the API reference (opens new window).
# Final result status
Onfido always performs a documentVerification. Depending on the process type you choose (see below), it can also perform a facialSimilarity verification between the picture/video of the end-user and the photo in the ID document.
Based on Onfido's results, the Assure API returns a final status for that process:
| Assure API's "final status" | Onfido result: documentVerification | Onfido result: facialSimilarity |
|---|---|---|
| accepted | The ID is valid. | The faces match. |
| rejected | The ID is not valid. | (any) |
| inconclusive | The ID is valid but suspicious. | (any) |
| inconclusive | (any) | At least one of the facialSimilarity verifications did not succeed. |
# Process types
Process types for Onfido are:
documentdocumentSelfiedocumentVideo
If the process type is documentSelfie or documentVideo, the final status depends on the result of both facialSimilarity and documentVerification. If the process type is document only, the final status depends exclusively on the result of documentVerification.
For detailed description of processType, see the OpenAPI docs (opens new window).
# accepted
The status is accepted when all underlying verifications have passed. This means there are no
indications the document is fraudulent.
This is a response example of an Onfido process that was accepted:
    {
        "provider": "onfido",
        "status": "accepted",
        "processId": "4e48363a-37cb-4cff-8f91-afc9e52271fc",
        "createdAt": "2019-09-19T22:10:56Z",
        "updatedAt": "2019-09-19T22:11:23Z",
        "finalResult": {
            "firstName": "MARIA PAULA",
            "lastName": "SANTOS MENDES",
            "dateOfExpiry": "2020-07-08",
            "gender": "F",
            "nationality": "PRT",
            "documentType": "identityCard",
            "documentNumber": "1234567890",
            "issuingCountry": "PRT",
            "dateOfBirth": "2002-04-29",
            "similarityScore": "high"
        },
        "providerSpecific": {
            "facialSimilarity": {
                "result": "clear",
                "imageIntegrity": "clear",
                "faceComparison": "clear",
                "visualAuthenticity": "clear",
                "similarityScore": "high"
            },
            "documentVerification": {
                "lastName": "SANTOS MENDES",
                "dateOfExpiry": "2020-07-08",
                "subResult": "clear",
                "dataConsistency": "clear",
                "gender": "F",
                "documentType": "identityCard",
                "documentNumber": "1234567890",
                "dateOfBirth": "2002-04-29",
                "ageValidation": "clear",
                "policeRecord": "clear",
                "dataValidation": "clear",
                "result": "clear",
                "firstName": "MARIA PAULA",
                "imageIntegrity": "clear",
                "nationality": "PRT",
                "issuingCountry": "PRT",
                "dataComparison": "clear",
                "visualAuthenticity": "clear",
                "compromisedDocument": "clear",
                "mrzLine1": "I<PRT122336694<ZY42<<<<<<<<<<<",
                "mrzLine2": "8302304F21207081PRT<<<<<<<<<<<6"
            }
        }
    }
In this example, clear is passed as value in the result and sub-result fields, which means all the underlying verifications have passed.
For more detailed field and value descriptions, see the providerSpecificelements for Onfido, i.e. facialSimilarity and documentVerification, in the Open API documentation > Get process (opens new window).
# inconclusive
A process can get the inconclusive status if one of the facial similarity verifications did not succeed or if the document is suspected to be fraudulent.
This is a response example of an Onfido process that was inconclusive:
    {
        "provider": "onfido",
        "status": "inconclusive",
        "processId": "85210241-4e70-4451-8ea3-7cd3c4d8843a",
        "createdAt": "2019-09-23T10:05:53Z",
        "updatedAt": "2019-09-23T10:09:49Z",
        "providerSpecific": {
            "facialSimilarity": {
                "result": "consider",
                "similarityScore": "high"
            },
            "documentVerification": {
                "lastName": "SPECIMEN",
                "dateOfExpiry": "2024-11-01",
                "subResult": "suspected",
                "gender": "F",
                "documentType": "passport",
                "documentNumber": "00000000",
                "dateOfBirth": "2002-04-29",
                "result": "consider",
                "firstName": "LAERKE OEYVOR AASE",
                "nationality": "NOR",
                "issuingCountry": "NOR",
                "mrzLine1": "PVNORSPECIMEN<<LAERKE<OEYVOR<AASE<<<<<<<<<<<",
                "mrzLine2": "00000000<0NOR7505319F24110154197505311234586"
            }
        }
    }
In this example some of the underlying verifications has passed the valuesconsider and suspected.
An inconclusive result does not contain a finalResult element but contains some data obtained from the document.
See the following sub-sections for more details about the inconclusive reasons.
# Facial similarity verification (inconclusive)
At least one of the facialSimilarity verifications did not succeed. Reasons for this can be:
- The quality and integrity of the uploaded files were not sufficient to perform a face comparison (
imageIntegrity). - The face in the document does not match the face in the selfie/video (
faceComparison). - The person in the selfie/video is not real, or no liveness was detected (
visualAuthenticity).
For more details, see Onfido's provider specific element, facialSimilarity in the OpenAPI documentation (opens new window).
# Suspected fraud (inconclusive)
It could also be that the document is suspected to be fraudulent, for example:
- One or more validatable elements are incorrect, e.g. date of birth, expiry date etc. (
dataValidation). - One or more visual elements are incorrect, e.g. it is a photo of a printed photo, the security features are not present etc. (
visualAuthenticity). - The document is registered in Onfido's database as a compromised document (
compromisedDocument). - The data in the document is not consistent, e.g. between the MRZ lines and the OCR extracted text on passport for expiry date, birth date etc. (
dataConsistency). - The document is reported as stolen etc. (
policeRecord).
For more detailed field and value descriptions, see Onfido's provider specific element, documentVerification, in the OpenAPI documentation (opens new window).
# rejected
The verification cannot be processed further. Reasons for this may for example be poor image quality (imageIntegrity), unknown document type (documentType), the end-user is below the minimum accepted age (ageValidation) etc.
This is a response example of an Onfido process that was rejected:
    {
        "provider": "onfido",
        "status": "rejected",
        "processId": "88d490a0-7184-4aba-804d-4dac400f5660",
        "createdAt": "2019-09-23T15:43:37Z",
        "updatedAt": "2019-09-23T15:46:30Z",
        "providerSpecific": {
            "facialSimilarity": {
                "result": "consider",
                "similarityScore": "medium"
            },
            "documentVerification": {
                "result": "consider",
                "subResult": "rejected",
                "documentType": "unknown"
            }
        }
    }
A rejected result does not contain a finalResult element. Also, the provider-specific elements are few since there will probably be little data obtained from the document.
For more details, see Onfido's provider specific elements, imageIntegrity, documentTypeand ageComparison in the OpenAPI documentation (opens new window).
# canceled
The verification was cancelled (by the end-user).
{
    "status": "canceled",
    "processId": "60ff4aff-90ab-4f99-bcb8-63553d243ff1",
    "provider": "onfido",
    "processType": "documentSelfie",
    "createdAt": "2022-02-14T14:18:38Z",
    "updatedAt": "2022-02-14T14:18:38Z",
    "providerSpecific": {}
}
# failed
A process gets the failed status if an error prevented the verification from completing. Examples could be time-out and server errors, expired tokens, validation errors etc.
This is a response example of an Onfido process that failed:
{
    "status": "failed",
    "processId": "47d4021c-2744-4491-b0a7-b433345bfc74",
    "provider": "onfido",
    "processType": "documentSelfie",
    "createdAt": "2022-02-14T14:04:58Z",
    "updatedAt": "2022-02-14T14:05:06Z",
    "failReason": {
        "type": "upload_failed",
        "message": "There was a validation error on this request (status code 422) | Field errors: {face_detection=[Multiple faces in image. Please note this validation can be disabled by setting the advanced_validation parameter to false.]}"
    }
}
In this case, the end-user has tried to upload an image with multiple faces instead of taking a selfie. You can find more information about the failReason field in the OpenAPI documentation (opens new window).
# Download full result
In the Get process response, you get the results for Onfido's breakdown listing (e.g. visualAuthenticity) in the provider-specific area. Information about the sub-breakdowns as they were obtained from the provider (e.g. "supported_document") is only returned in the provider's raw JSON result. This is available in a zip file obtained from the Download full result service.
# Data files
# document_verification.json
This "raw" file contains all information about the facial similarity report.
# facial_similarity.json
This "raw" file is only retrieved if processType is documentSelfie or documentVideo. It contains all information about the document report.
# Media files
| Type | File name/format | Comment |
|---|---|---|
| front | front.jpeg/png/pdf | |
| back | back.jpeg/png/pdf | Only retrieved if the ID document has a backside. |
| selfie | selfie.jpeg/png/pdf | |
| portrait | - | The provider does not extract the photo from the ID. |
| video | video.mp4 |