# CIBA (OIDC extension)
Page contents
# About CIBA
OpenID Connect CIBA (Client Initiated Backchannel Authentication (opens new window)) is an extension of the OpenID Connect protocol that allows the client application to initiate the authentication process and receive real-time updates on the authentication status.
# Differences between CIBA and the authorization code flow
The authorization code flow and the CIBA flow are two different authentication flows in the OpenID Connect protocol.
# Authorization code flow
In an authorization code flow:
- The client application redirects the user to the authorisation server, where the user logs in and provides consent.
- After successful authentication, the authorisation server redirects the user back to the client application with an authorization code.
- The client application then exchanges this code for an access token and a refresh token by making a direct request to the authorization server's token endpoint.
When to choose it
This flow is primarily designed for web applications and requires user interaction during the entire authentication process.
# CIBA flow
The CIBA flow introduces a more flexible and asynchronous approach to authentication.
In a CIBA flow:
- The client application initiates the authentication process by making a backchannel authentication request to the authorization server.
- The server responds with a unique authentication reference.
- The client can then receive real-time updates on the authentication status by polling the token endpoint.
When to choose it
This flow is particularly useful in scenarios when:
- The client application may not have a user interface, or
- The client application needs to authenticate the user on a different device, or
- You want to create a completely customised login flow with complete control over the UI in a web application or a mobile app (similar to the Authentication REST API headless flow).
# Application flow
A successful CIBA flow follows the following pattern:
- The client makes a call to the
backchannel_authentication_endpoint, indicating in theacr_valuesparameter which ID method is being used and possibly passing other parameters applicable for that ID method. - The client then proceeds to polling the
token_endpointwhich will answer withauthorization_pendinguntil the end-user has completed the authentication, at which point the usual token response is returned, containingid_tokenandaccess_token. - The client may then optionally use the
access_tokento call theUserInfoendpoint if needed, or skip this step if theid_tokenalready contains the required information.
More details in the OIDC official documentation
- Backchannel request parameters (opens new window) Note that not all parameters are supported by all ID methods.
- Possible responses from the token endpoint (opens new window).
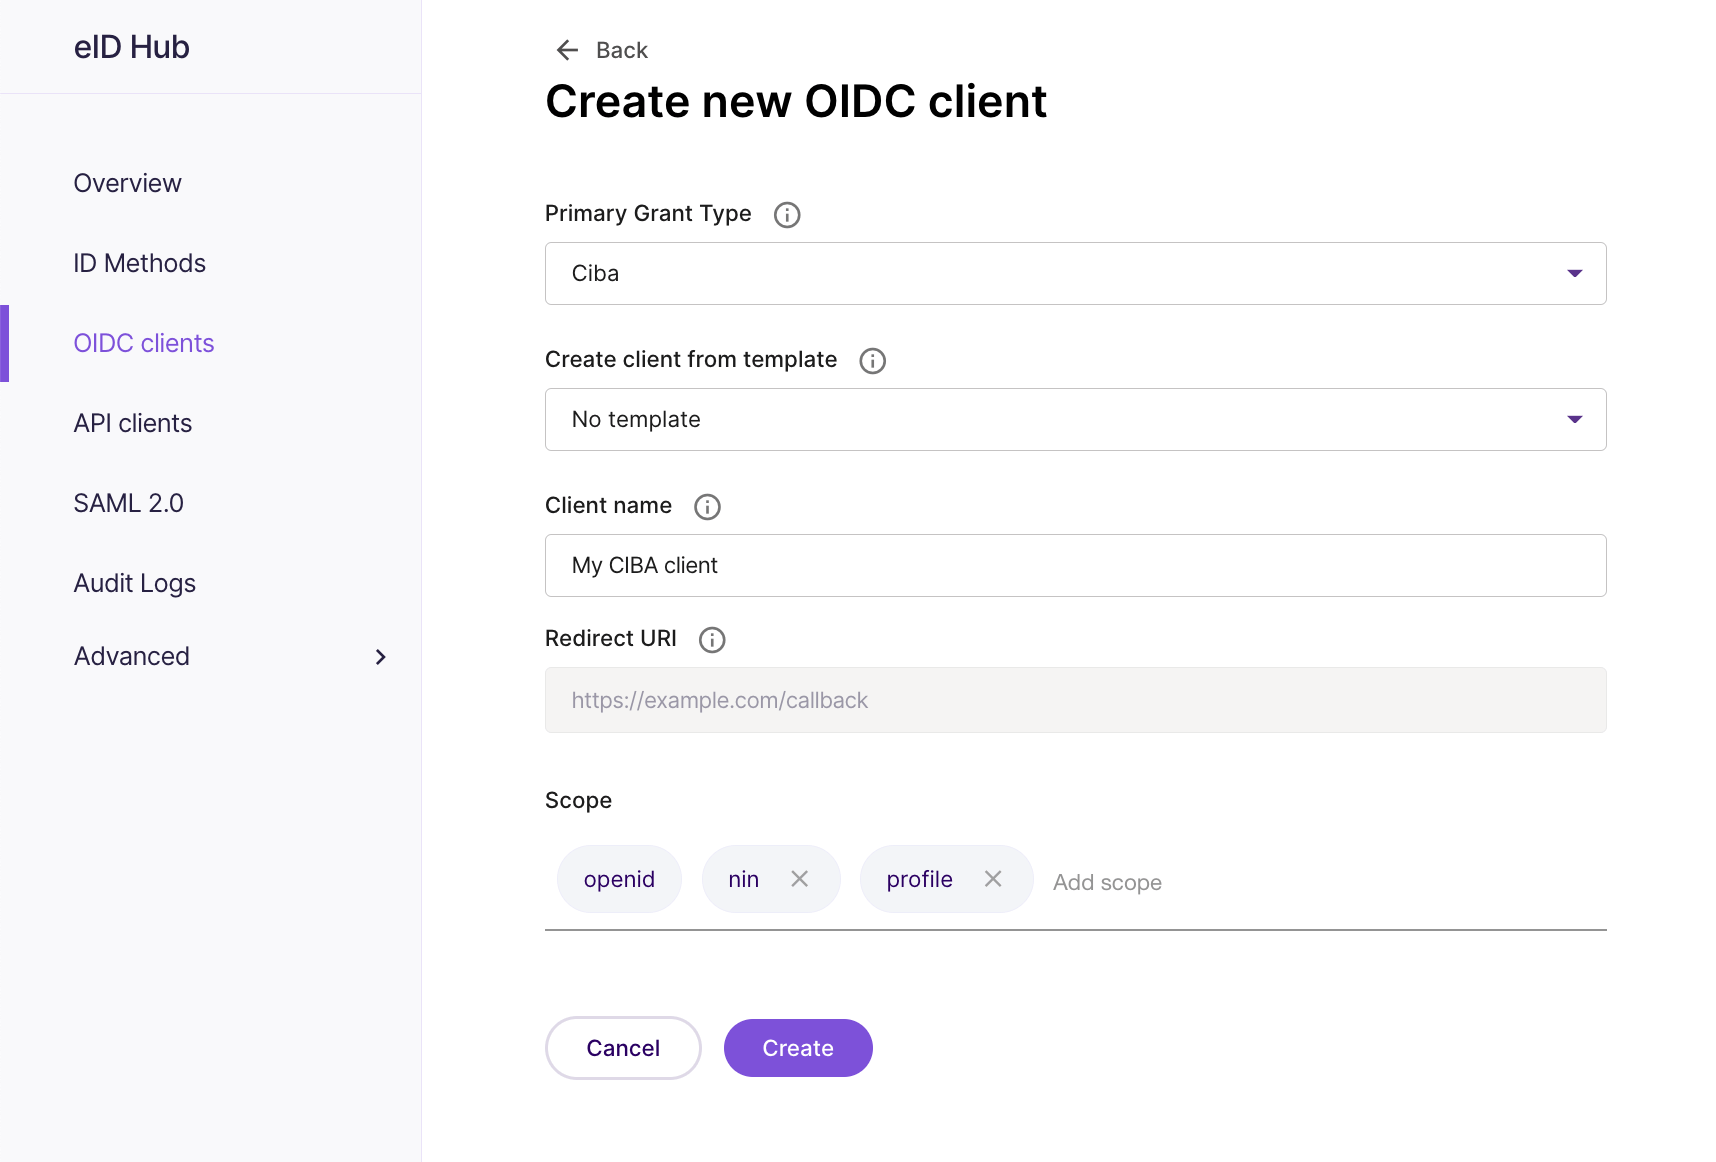
# Setting up an OIDC client for CIBA
To create an OIDC client for CIBA:
- In the Signicat Dashboard, go to eID Hub > OIDC clients (opens new window) and select Create/Add client.
- Set the Primary grant type to "Ciba".
- Enter a name for the client.
- Add the OIDC scopes specific for your integration.
After that, you add a secret to your client and then perform any additional configuration you would like to do.
# ID methods that support CIBA
You can use the buttons below to explore the current list of ID methods that support CIBA.
# Example using Swedish BankID
# The backchannel endpoint
The discovery metadata of your domain with Signicat contains the URL of the backchannel_authentication_endpoint. For example, if your domain with Signicat is yourdomain then the discovery metadata is available at https://yourdomain.signicat.com/auth/open/.well-known/openid-configuration where the backchannel_authentication_endpoint is https://yourdomain.signicat.com/auth/open/connect/ciba.
The call to the CIBA endpoint should be an HTTP POST request with content-type application/x-www-form-urlencoded. Make sure to authenticate the request with Basic authentication and the following parameters:
login_hint = endUserIp:127.0.0.1 flow:QR(127.0.0.1is an example. Replace it with the actual public IP address of the end-user.)acr_values = idp:sbidscope = openid profile nin
The HTTP request could look like this:
POST /auth/open/connect/ciba HTTP/1.1
Authorization: Basic ZGV2LW...CamdraTd2
Host: yourdomain.signicat.com
Content-Type: application/x-www-form-urlencoded
Content-Length: 100

login_hint=endUserIp%3A127.0.0.1%20flow%3AQR&acr_values=idp%3Asbid&scope=openid%20profile%20nin
And the response would look like (some headers omitted for brevity):
HTTP/1.1 200 OK
content-type: application/json; charset=UTF-8

{
    "auth_req_id": "5ddc7357-abe0-6940-b4a3-fd6eb3277830",
    "expires_in": 120,
    "interval": 1
}
To obtain the autoStartToken for APP_LAUNCH or the data for the QR code flow, your application must request it from the token endpoint as described in the following section.
# The token endpoint
From this point on, the flow consists of polling the token endpoint. To do that, we perform HTTP POST calls to the token endpoint with the following parameters
auth_req_id = 5ddc7357-abe0-6940-b4a3-fd6eb3277830(Theauth_req_idreceived in the previous response.)grant_type = urn:openid:params:grant-type:ciba
An example of HTTP request would look like this:
POST /auth/open/connect/token HTTP/1.1
Authorization: Basic ZGV2LW...CamdraTd2
Host: yourdomain.signicat.com
Content-Type: application/x-www-form-urlencoded
Content-Length: 101

auth_req_id=8c65e7e5-f5cc-1b4c-a3f5-9f81985ccc83&grant_type=urn%3Aopenid%3Aparams%3Agrant-type%3Aciba
And the response would be (some headers omitted for brevity):
HTTP/1.1 400 Bad Request
content-type: application/json; charset=UTF-8

{
    "error": "authorization_pending",
    "error_description": "bankid.584e5929-0d9e-4dc7-9890-921f...f252b",
    "error_uri": "https://yourdomain.signicat.com/auth/open/config/errors/authorization_pending"
}
- In the
APP_LAUNCHflow, theerror_descriptioncontains anautoStartToken. You can use this to construct the app launch URL. TheautoStartTokenwill remain the same for the duration of the session. - In the
QRcode flow, theerror_descriptioncontains the data you need to generate a QR code for the user to scan.
Animated QR code
Swedish BankID uses an “animated QR code” security feature, which means that a QR code is only valid for a short time (seconds). This means your application must generate a new QR code for each call to the token endpoint and continuously update the QR code displayed to the end-user. In such scenarios, a polling interval of 1-2 seconds is recommended.
Your client should continue to poll the endpoint as long as the response is an HTTP 400 with error equal to authorization_pending. The token endpoint will respond like this:
- If the user cancels the process, the response will be an HTTP 400 with error
access_denied. - If the user takes too long to complete the process, the response will be an HTTP 400 with error
expired_token. - If the user has still not fully completed the authentication, the response will be an HTTP 400 with error
authorization_pending. - And when the user has successfully completed the process, the response will be an HTTP 200 with the usual token response, including
id_tokenandaccess_token.
# Code example
The following is a simplistic Python example of a function that first calls the backchannel endpoint and then makes one call to the token endpoint:
def ciba(end_user_ip, flow='QR'):
    # First the backchannel call
    url = base_url + '/auth/open/connect/ciba'
    headers = {
        'Authorization': 'Basic ZGV2LWNs...amdraTd2',
        'Content-Type': 'application/x-www-form-urlencoded'
    }
    data = {
        'login_hint': 'endUserIp:' + end_user_ip + ' flow:' + flow,
        'acr_values': 'idp:sbid',
        'scope': 'openid profile'
    }
    http_response = requests.post(url, headers=headers, data=data)
    ciba_response = json.loads(http_response.content)
    print(json.dumps(ciba_response, indent=4))

    # And then the token endpoint call
    url = base_url + '/auth/open/connect/token'
    data = {
        'auth_req_id': ciba_response['auth_req_id'],
        'grant_type': 'urn:openid:params:grant-type:ciba'
    }

    http_response = requests.post(url, headers=headers, data=data)
    token_response = json.loads(http_response.content)
    print(json.dumps(token_response, indent=4))
Running the function produces the following output:
{
    "auth_req_id": "9761e8e8-a38b-2e40-a7bd-730805ef9e70",
    "expires_in": 120,
    "interval": 1
}

{
    "error": "authorization_pending",
    "error_description": "bankid.3a047f6a-5e7b-41...8faf1db5e892",
    "error_uri": "https://yourdomain.signicat.com/auth/open/config/errors/authorization_pending"
}
# A note about the flow options
In the example above, we exclusively used the QR flow. The other option is the APP_LAUNCH flow which – instead of the BankID QR code data - returns the autostarttoken from Swedish BankID that you can use to launch the BankID app in “same-device” scenarios.
For more information, visit https://www.bankid.com/en/utvecklare/guider/teknisk-integrationsguide/programstart (opens new window).