# Code examples
Page contents
This guide is designed to get you started quickly with authentication. It doesn't cover everything that can be done. The guide is written for .NET using C#.
Note
Java examples coming soon. Examples for other languages will be added at a later stage.
OpenID Connect is an identity layer on top of the OAuth 2.0 protocol. It enables service providers to verify the identity of an end-user based on the authentication performed by an authorisation server, as well as to obtain basic profile information about the end-user in an interoperable and REST-like manner.
Signicat's authorisation server supports the following grant types (often also called flows - or protocol flows) defined on OpenID Connect and OAuth 2.0 specifications:
- Authorisation code
- Hybrid
- Client-Initiated Backchannel Authentication (CIBA)
Grant types specify how a client can interact with the token service.
This guide shows an example of integration using the Authorisation code flow. Learn more about OIDC grant types in the OIDC implementation documentation.

# Prerequisites
- Sign up with Signicat for free on the Signicat Dashboard (opens new window).
- In the Signicat Dashboard, set up an organisation and an account. Additionally, to use the eID Hub product you need to set up a domain.
This quick start guide assumes you already have installed and properly configured the following in your local machine:
- .NET Core SDK (opens new window).
- A code editor, such as Visual Studio Code (opens new window), Visual Studio (opens new window), Visual Studio for Mac (opens new window) or Rider (opens new window).
- A command-line interface, such as PowerShell (opens new window). All commands in this guide were tested with PowerShell.
Additionally, we strongly recommend you use a library or framework for the implementation, such as the ones provided by JWT (opens new window).
# Authorisation code flow (Basic)
The below tabs show how to set up a basic authentication code flow. It doesn't cover everything that can be done.
Make sure your OIDC client has been properly created and configured on the eID Hub > OIDC clients (opens new window) in the Dashboard. You can find the required client settings below.
Client settings on the Dashboard
- Information
- Name: filled
- URI: empty
- Logo URI: empty
- URIs
- Redirect URI: filled with 1 (one) URI
- For example: https://localhost:5001/account/callback
- Post logout redirect URI: empty
- Front channel logout URI: empty
- Front channel logout session required: false
- Redirect URI: filled with 1 (one) URI
- Security
- Primary grant type: Authorisation code
- Require secret: true
- Require PKCE: true
- Allow access token via browser: false
- User reference access tokens: false
- Allowed CORS origins: empty
- Encrypt ID tokens: false
- User info response type: empty (or default)
- Content encryption algorithm: empty (or default)
- Accesses
- Allowed scopes: filled with, at least,
openidandprofile - Identity provider restrictions: empty
- Allowed scopes: filled with, at least,
- Lifetimes
- All fields with default values
After saving your client, generate a new secret as it'll be required.
# 1. Initialise your project
Start your solution:
mkdir SignicatQuickStartGuide
cd .\SignicatQuickStartGuide\
dotnet new sln
Add an empty web project:
dotnet new web --name AuthorizationCodeFlowGuide
dotnet sln .\SignicatQuickStartGuide.sln add .\AuthorizationCodeFlowGuide\
# 2. Install dependencies
Add support to OpenID Connect authentication workflow by including the following package in your project:
dotnet add .\AuthorizationCodeFlowGuide\ package Microsoft.AspNetCore.Authentication.OpenIdConnect --version 3.1.7
# 3. Startup settings
Under the Startup class, do the following.
Set using statements:
using System;
using System.Net.Http;
using System.Net.Http.Headers;
using System.Text;
using System.Threading;
using System.Threading.Tasks;
using Microsoft.AspNetCore.Authentication.OpenIdConnect;
using Microsoft.AspNetCore.Builder;
using Microsoft.AspNetCore.Hosting;
using Microsoft.Extensions.DependencyInjection;
using Microsoft.Extensions.Hosting;
using Microsoft.IdentityModel.Protocols.OpenIdConnect;
Create an asynchronous method to redeem the authorisation code for tokens at token endpoint:
protected virtual async Task RedeemAuthorizationCodeAsync(AuthorizationCodeReceivedContext context)
{
    var configuration = await context.Options.ConfigurationManager.GetConfigurationAsync(CancellationToken.None);
    var requestMessage = new HttpRequestMessage(HttpMethod.Post, configuration.TokenEndpoint);
    var authInfo = $"{context.TokenEndpointRequest.ClientId}:{context.TokenEndpointRequest.ClientSecret}";
    authInfo = Convert.ToBase64String(Encoding.Default.GetBytes(authInfo));
    requestMessage.Headers.Authorization = new AuthenticationHeaderValue("Basic", authInfo);
    var tokenEndpointRequest = context.TokenEndpointRequest.Clone();
    tokenEndpointRequest.ClientSecret = null;
    requestMessage.Content = new FormUrlEncodedContent(tokenEndpointRequest.Parameters);

    var responseMessage = await context.Backchannel.SendAsync(requestMessage);
    if (!responseMessage.IsSuccessStatusCode)
    {
        Console.WriteLine(await responseMessage.Content.ReadAsStringAsync());
        return;
    }

    try
    {
        var responseContent = await responseMessage.Content.ReadAsStringAsync();
        var message = new OpenIdConnectMessage(responseContent);
        context.HandleCodeRedemption(message);
    }
    catch (Exception exc)
    {
        Console.WriteLine($"An error occurred: {exc.Message}");
    }
}
Register authentication and controller with views services in the ConfigureServices method:
Value for config.Authority
Your value for config.Authority will vary depending on your configuration.
- If you haven't configured a custom domain: in the code sample below, replace
chosen-namewith the name you have chosen for your account. - If you have configured your own custom domain, change the value of
config.Authoritytohttps://your.domain.com/auth/open.
public void ConfigureServices(IServiceCollection services)
{
    // omitted for brevity

    services.AddAuthentication(config =>
    {
        config.DefaultAuthenticateScheme = "AuthorizationCodeClientAppCookie";
        config.DefaultSignInScheme = "AuthorizationCodeClientAppCookie";
        config.DefaultChallengeScheme = "Signicat";
    })
        .AddCookie("AuthorizationCodeClientAppCookie")
        .AddOpenIdConnect("Signicat", config =>
        {
            config.Events.OnAuthorizationCodeReceived = RedeemAuthorizationCodeAsync;

            config.Authority = "https://chosen-name.app.signicat.dev/auth/open";

            config.ClientId = "YOUR_CLIENT_ID_HERE";
            config.ClientSecret = "YOUR_CLIENT_SECRET_HERE";

            config.CallbackPath = "/account/callback";

            config.UsePkce = true;

            config.ResponseType = "code";

            config.Scope.Add("openid");
            config.Scope.Add("profile");

            config.GetClaimsFromUserInfoEndpoint = true;

            config.SaveTokens = true;
        });

    services.AddControllersWithViews();

    // omitted for brevity
}
Add authentication and authorisation middlewares to the pipeline and change endpoint mappings to default in the Configure method:
public void Configure(IApplicationBuilder app, IWebHostEnvironment env)
{
    // omitted for brevity

    app.UseAuthentication();
    app.UseAuthorization();

    app.UseEndpoints(endpoints =>
    {
        endpoints.MapDefaultControllerRoute();
    });

    // omitted for brevity
}
# 4. Protected resource
To check if everything is working as expected, create a basic controller (HomeController) with an Index action and a simple View to it.
The folder and file structure will be similar to this:
.
├─ SignicatQuickStartGuide.sln
├─ AuthorizationCodeFlowGuide
│  ├─ AuthorizationCodeFlowGuide.csproj
│  ├─ Controllers
│  │  └─ HomeController.cs
│  └─ Views
│  │  └─ Home
│  │     └─ Index.cshtml
│  └─ ...
└─ ...
NOTE
Other folders and files omitted for brevity.
Your Home controller could be similar to:
using Microsoft.AspNetCore.Authorization;
using Microsoft.AspNetCore.Mvc;

namespace AuthorizationCodeFlowGuide.Controllers
{
    public class HomeController : Controller
    {
        [Authorize]
        public IActionResult Index()
        {
            return View();
        }
    }
}
Your Index view could be similar to:
<h1>Index</h1>
<p>This is a protected resource! Only visible after authentication.</p>
# 5. Run
Execute your project:
dotnet run --project .\AuthorizationCodeFlowGuide\
Open https://localhost:5001/ (opens new window) in a browser.
Secure
We strongly recommend using HTTPS.
PORT NUMBER
Change your port number, if necessary. It's the same host you set on your client's redirect URI.
# 6. Test end-user
Choose Norwegian BankID and sign with a test user as follows:
| National identity number | One time password | Password |
|---|---|---|
01100844350 | otp | qwer1234 |
# Signed and encrypted tokens (Advanced)
This end-to-end tutorial shows how to set up and use signing and encryption for request objects, ID tokens and userinfo. The programming language is C# in an ASP.NET web application.
We assume that you already have set up an organisation, account and domain in the Signicat Dashboard (opens new window).
In the below code examples, we will use the domain name docs.sandbox.signicat.com.
Note
This is a low-level tutorial. Most middleware or abstractions for OIDC integrations will allow you to send and consume encrypted and signed objects and tokens using configuration options rather than writing the type of code that you will see in this tutorial.
# Basic setup
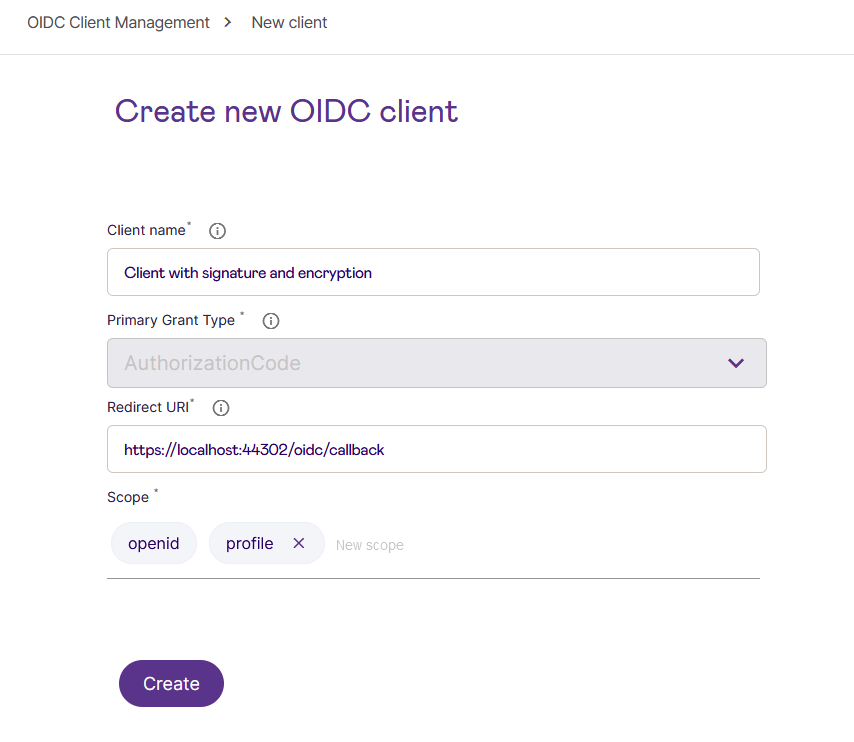
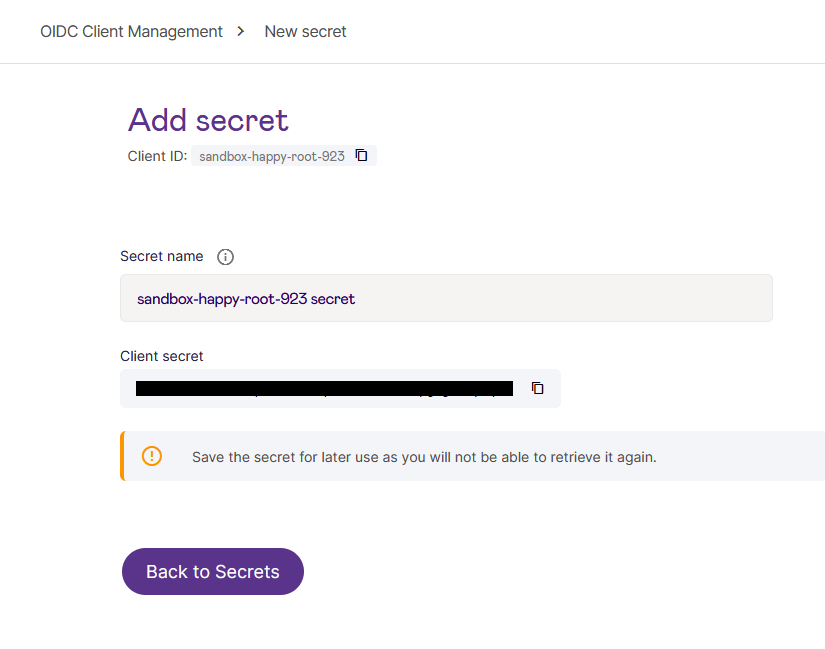
- Create a new OIDC client and a secret for it, as illustrated in the following screenshots.
Create a new OIDC client:
Add a secret:
- To be able to test it, add the redirect URI
https://oauth.tools/callback/codeto your client. This enables the Try out this client on oauth.tools! button on the OIDC Client Management overview page. So far, this is without any signing and encryption. This will redirect the end-user tohttps://docs.sandbox.signicat.com/auth/open/connect/authorize?&client_id=sandbox-happy-root-923&response_type=code&redirect_uri=https://oauth.tools/callback/code&scope=openid%20profile&prompt=loginand then (using the Dashboard Simulator, e.g. with iDIN) back to the redirect URI where you can redeem the authorization code for a token response withid_tokenandaccess_token, and using theaccess_tokento fetchuserinforeturns:
{
  "idp_id": "FANTASYBANK1234567890",
  "gender": "0",
  "sub": "JDAonVZOyWR-iQExci3RTHkWerjTK8DvhLa6yOr2CVc=",
  "idp_issuer": "simulator"
}
# Code example for the basic, non-signed and non-encrypted flow
Redirecting the user in a .NET web application could be done as follows:
public async Task<ActionResult> Plain()
{
    JObject wellknown = await GetWellknown();
    string authorizeUrl = wellknown["authorization_endpoint"]?.ToString() +
        $"?client_id={Properties.Settings.Default.ClientID}" +
        $"&redirect_uri={Url.Encode(RedirectUri)}" +
        $"&response_type=code&scope=openid%20profile&prompt=login";
    return Redirect(authorizeUrl);
}
GetWellknown is the utility method:
private async Task<JObject> GetWellknown()
{
    if (_wellknown == null)
    {
        string metadata = await _client.GetStringAsync(Properties.Settings.Default.DiscoveryEndpoint);
        _wellknown = JObject.Parse(metadata);
    }
    return _wellknown;
}
The user would then be sent to the authorizeUrl for authentication, eventually returning to the RedirectUri where the following would take place:
public async Task<ActionResult> Callback(string code)
{
    string accessToken;
    JObject wellknown = await GetWellknown();
    using (var httpRequest = new HttpRequestMessage(HttpMethod.Post, wellknown["token_endpoint"]?.ToString()))
    {
        httpRequest.Headers.Authorization = new AuthenticationHeaderValue("Basic", BasicAuth);
        httpRequest.Content = new FormUrlEncodedContent(new Dictionary<string, string>
        {
            { "grant_type", "authorization_code" },
            { "redirect_uri", RedirectUri },
            { "code", code }
        });
        HttpResponseMessage httpResponse = await _client.SendAsync(httpRequest);
        string responseContent = await httpResponse.Content.ReadAsStringAsync();
        dynamic tokenResponse = JObject.Parse(responseContent);

        accessToken = tokenResponse.access_token;
    }

    using (var httpRequest = new HttpRequestMessage(HttpMethod.Post, wellknown["userinfo_endpoint"]?.ToString()))
    {
        httpRequest.Headers.Authorization = new AuthenticationHeaderValue("Bearer", accessToken);
        HttpResponseMessage httpResponse = await _client.SendAsync(httpRequest);
        string responseContent = await httpResponse.Content.ReadAsStringAsync();
        return Content(responseContent, "application/json");
    }
}
The final output could be like this:
{
  "idp_id": "FANTASYBANK1234567890",
  "gender": "0",
  "sub": "JDAonVZOyWR-iQExci3RTHkWerjTK8DvhLa6yOr2CVc=",
  "idp_issuer": "simulator"
}
# Setting up the client for message-level signing and encryption
# Signing the request object
The purpose of sending signed request objects to the authorization endpoint is to ensure the integrity of the data sent with the end-user browser. To accomplish this, you must craft a request object signed with your own private key, and register the public counterpart of that key in the Signicat Dashboard so that it can be verified that the request is, in fact, signed by you.
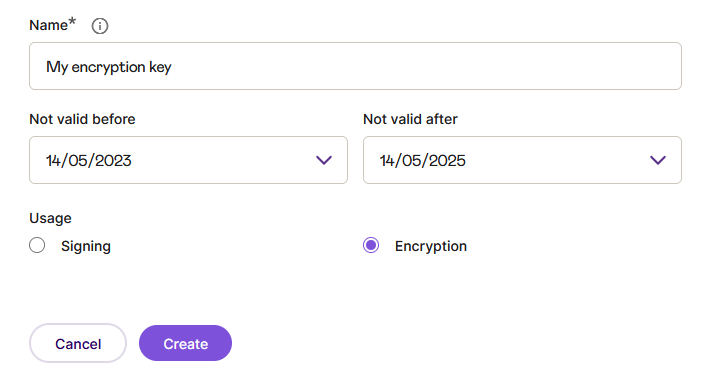
- Generate a key pair (public and private): You can generate your own key pair, or use the Signicat Dashboard to generate it for you. To do the latter, open the Advanced tab of your client, choose Public keys > Add public key. Enter your key name and a validity time, choose Signing as the purpose and click Create.
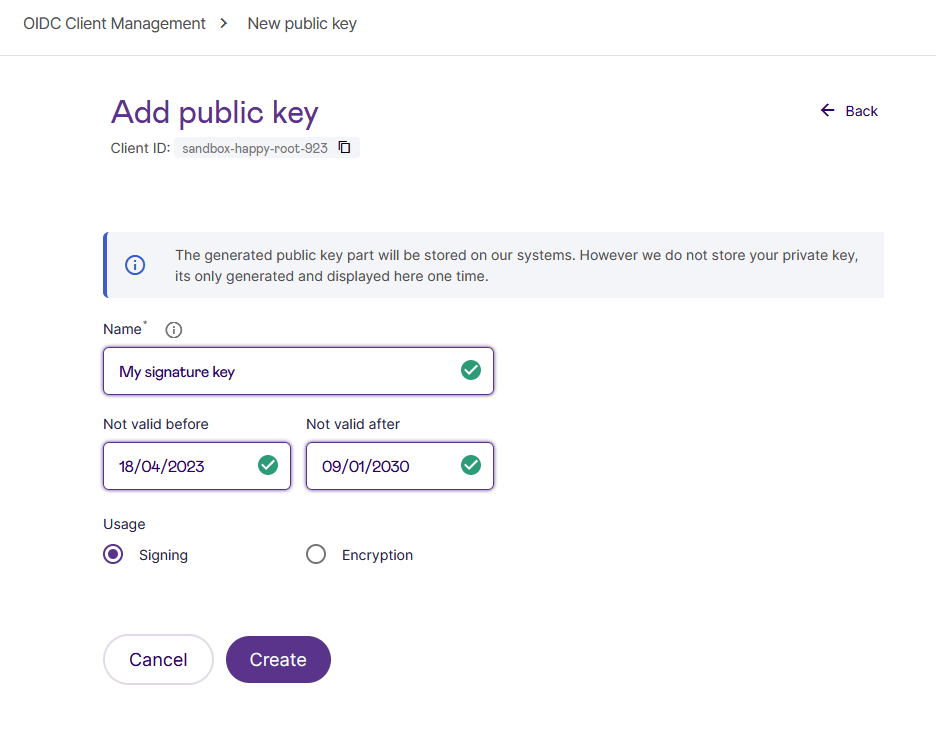
Signicat will then generate the key, store the public part of the key, and also display the private key for you to copy. Signicat does not store the private key, it is generated for you, for your convenience.
- You must copy this private key and include it in your application. In the example below, the private key is placed in Settings. Here is an example on how you can create and sign the request object:
public async Task<ActionResult> Signed()
{
    // We need some info from the .well-known/openid-configuration
    JObject wellknown = await GetWellknown();

    // We create a dictionary to hold the parameters that we would previously
    // put in the query string but will now go into the request object.
    Dictionary<string, object> requestObjectParameters = new Dictionary<string, object>
    {
        { "client_id", Properties.Settings.Default.ClientID },
        { "redirect_uri", RedirectUri },
        { "response_type", "code" },
        { "scope", "openid profile" },
        { "prompt", "login" },
        // For a proper JWT structure, we need to include the following four claims in our JWTs
        { "iss", Properties.Settings.Default.ClientID },
        { "aud", wellknown["issuer"]?.ToString() },
        { "iat", DateTimeOffset.UtcNow.ToUnixTimeSeconds() },
        { "exp", DateTimeOffset.UtcNow.AddHours(1).ToUnixTimeSeconds() },
    };

    // Here, we use https://github.com/dvsekhvalnov/jose-jwt for the key operations
    // Let's first get our private sigKey from Settings
    Jose.Jwk sigKey = Jose.Jwk.FromJson(
        Properties.Settings.Default.JwkSigPrivateKey,
        Jose.JWT.DefaultSettings.JsonMapper
    );
    Jose.JwsAlgorithm sigAlg = (Jose.JwsAlgorithm) Enum.Parse(typeof(Jose.JwsAlgorithm), sigKey.Alg);

    // We turn the dictionary into JSON, and then sign it using jose-jwt and our private key
    string requestObject = JsonConvert.SerializeObject(requestObjectParameters);
    string signedRequestObject = Jose.JWT.Encode(requestObject, sigKey, sigAlg);

    // And finally append client_id and our request object to the authorise URL, then redirect the end user
    string authorizeUrl =
            wellknown["authorization_endpoint"]?.ToString()
        + $"?client_id={Properties.Settings.Default.ClientID}&request={signedRequestObject}";
    return Redirect(authorizeUrl);
}
The above will trigger the authentication flow and expected result for the end-user when redirected.
# Encrypting the request object
You are now ready to add encryption, for example to encrypt the signed request object in order to maintain the confidentiality of the message. This means that the message you are now sending through the end-user’s browser will be both signed (so that the authorization server knows that it comes from you) and encrypted (so that no one except Signicat can decrypt and see the actual message that you’re sending).
- You can use the same code as you used for signing, but with an extra step to add encryption to it. This means you should use the
jwks_uriin the.well-known/openid-configurationmetadata to download the public set of keys (JWKs), and then choose one of the keys intended for encryption which you then use to encrypt the request object. Here is an example:
public async Task<ActionResult> SignedAndEncrypted()
{
    // We need some info from the .well-known/openid-configuration
    JObject wellknown = await GetWellknown();

    // We create a dictionary to hold the parameters that we would previously
    // put in the query string but will now go into the request object.
    Dictionary<string, object> requestObjectParameters = new Dictionary<string, object>
    {
        { "client_id", Properties.Settings.Default.ClientID },
        { "redirect_uri", RedirectUri },
        { "response_type", "code" },
        { "scope", "openid profile" },
        { "prompt", "login" },
        // For a proper JWT structure, we need to include the following four claims in our JWTs
        { "iss", Properties.Settings.Default.ClientID },
        { "aud", wellknown["issuer"]?.ToString() },
        { "iat", DateTimeOffset.UtcNow.ToUnixTimeSeconds() },
        { "exp", DateTimeOffset.UtcNow.AddHours(1).ToUnixTimeSeconds() },
    };

    // Below, we use https://github.com/dvsekhvalnov/jose-jwt for the key operations

    // Let's first get our private sigKey from Settings
    Jose.Jwk sigKey = Jose.Jwk.FromJson(
        Properties.Settings.Default.JwkSigPrivateKey,
        Jose.JWT.DefaultSettings.JsonMapper
    );
    Jose.JwsAlgorithm sigAlg = (Jose.JwsAlgorithm) Enum.Parse(typeof(Jose.JwsAlgorithm), sigKey.Alg);

    // Now let's fetch the JWKSet and then find a public encryption key in it
    string jwksJson = await _client.GetStringAsync(wellknown["jwks_uri"]?.ToString());
    JObject jwks = JObject.Parse(jwksJson);
    JToken encKeyEntry = jwks["keys"].FirstOrDefault(k => k["use"]?.ToString() == "enc");
    Jose.Jwk encKey = Jose.Jwk.FromJson(
        encKeyEntry?.ToString(), Jose.JWT.DefaultSettings.JsonMapper
    );
    Jose.JweAlgorithm encAlg =
        (Jose.JweAlgorithm) Enum.Parse(typeof(Jose.JweAlgorithm), encKey.Alg?.Replace("-", "_"));

    // Reflects the value set for "Content Encryption Algorithm"
    // on the client, in the Signicat Dashboard
    Jose.JweEncryption contentEncAlg = Jose.JweEncryption.A128CBC_HS256;

    // Using the jose-jwt library, we must also explicitly add the kid header
    var extraHeaders = new Dictionary<string, object>() { { "kid", encKey.KeyId } };

    // We turn the dictionary into JSON, and then sign it using our private key
    // and then encrypt it using the public enc key from the JWKSet
    string requestObject = JsonConvert.SerializeObject(requestObjectParameters);
    string signedRequestObject = Jose.JWT.Encode(requestObject, sigKey, sigAlg);
    string encryptedRequestObject = Jose.JWT.Encode(
        signedRequestObject, encKey, encAlg, contentEncAlg, extraHeaders: extraHeaders
    );

    // And finally append client_id and our request object to the authorise URL, then redirect the end user
    string authorizeUrl =
        wellknown["authorization_endpoint"]?.ToString()
        + $"?client_id={Properties.Settings.Default.ClientID}&request={encryptedRequestObject}";
    return Redirect(authorizeUrl);
}
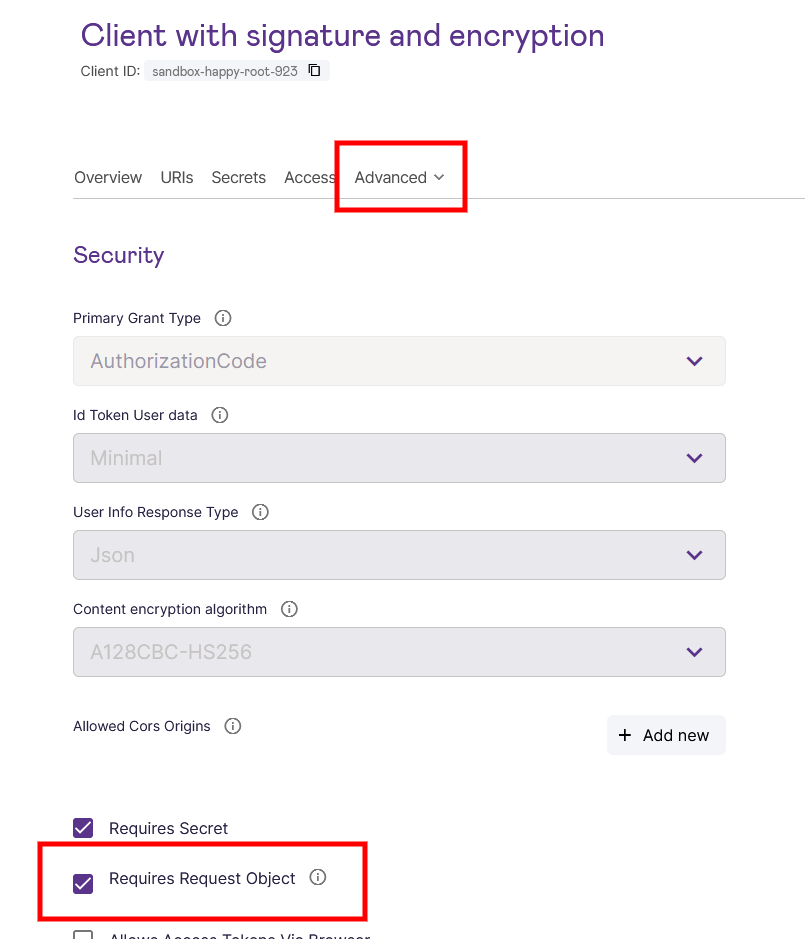
- If you would like to require the use of request objects to make sure that the client will not be sending plain authorization requests, then you may optionally choose to add that as a restriction on the client in the Signicat dashboard (client > Advanced > Security):

You can now continue to ensure that the sensitive data you receive from Signicat is also encrypted (and, in the case of userinfo, also signed).
# Enabling encrypted ID tokens
In the basic setup example, the callback method looks as follows:
public async Task<ActionResult> Callback(string code)
{
    string accessToken;
    JObject wellknown = await GetWellknown();
    using (var httpRequest = new HttpRequestMessage(HttpMethod.Post, wellknown["token_endpoint"]?.ToString()))
    {
        httpRequest.Headers.Authorization = new AuthenticationHeaderValue("Basic", BasicAuth);
        httpRequest.Content = new FormUrlEncodedContent(new Dictionary<string, string>
        {
            { "grant_type", "authorization_code" },
            { "redirect_uri", RedirectUri },
            { "code", code }
        });
        HttpResponseMessage httpResponse = await _client.SendAsync(httpRequest);
        string responseContent = await httpResponse.Content.ReadAsStringAsync();
        JObject tokenResponse = JObject.Parse(responseContent);
        accessToken = tokenResponse["access_token"]?.ToString();
    }

    using (var httpRequest = new HttpRequestMessage(HttpMethod.Post, wellknown["userinfo_endpoint"]?.ToString()))
    {
        httpRequest.Headers.Authorization = new AuthenticationHeaderValue("Bearer", accessToken);
        HttpResponseMessage httpResponse = await _client.SendAsync(httpRequest);
        string responseContent = await httpResponse.Content.ReadAsStringAsync();
        return Content(responseContent, "application/json");
    }
}
There are two parts of the above callback method: The first takes the code you receive when the user returns to your application after authentication and sends it to the token_endpoint, and in returns gets a token response which looks like this:
{
  "id_token": "eyJhbGciOiJSUzI1NiWW...JA_xuK8tWEentQ",
  "access_token": "eyJhbGciOiJSUzI1NiI...kaY5bPnEcF5xJQ",
  "expires_in": 600,
  "token_type": "Bearer",
  "scope": "openid profile"
}
In the callback method, you grab the access_token and use that as the bearer token to call the userinfo_endpoint to retrieve all the claims for the user. However, it is not required to call the userinfo_endpoint, since the id_token in the token response will return the relevant claims and there is typically little to gain by requesting the user info.
In the default setup, the id_token is signed (JWS) but not encrypted, so if you would base64 decode the JWS body then you would see the claims, e.g.:
{
  "iss": "https://docs.sandbox.signicat.com/auth/open",
  "nbf": 1684145090,
  "iat": 1684145090,
  "exp": 1684145690,
  "aud": "sandbox-happy-root-923",
  "amr": [
    "external"
  ],
  "at_hash": "mE1Zbc6dFdRkGe2N0MnvmQ",
  "sid": "8BD83A26394C6C6EFFBD7A0112CEBC71",
  "sub": "JDAonVZOyWR-iQExci3RTHkWerjTK8DvhLa6yOr2CVc=",
  "auth_time": 1684145089,
  "idp": "idin-simulator",
  "idp_issuer": "simulator",
  "sandbox": true
}
In some scenarios, you would rather have the id_token encrypted as well, for confidentiality reasons. To achieve this, you simply enable the Encrypt ID Tokens option on the client, under Advanced > Security.
By doing so, the id_tokens you receive will be both signed and encrypted (JWE). To use this feature, you must first upload the public encryption key to the client (Advanced > Public keys). You may also use the Add public key feature instead, in which case you let Signicat generate a private-public key pair for you, for convenience:
Signicat will not store the private key, so when the key has been generated, you must copy it and include it in your application. Now, you should be ready to decrypt the ID tokens. To do this, modify your callback method accordingly:
public async Task<ActionResult> CallbackForEncryptedIdTokens(string code)
{
    JObject wellknown = await GetWellknown();
    using (var httpRequest = new HttpRequestMessage(HttpMethod.Post, wellknown["token_endpoint"]?.ToString()))
    {
        httpRequest.Headers.Authorization = new AuthenticationHeaderValue("Basic", BasicAuth);
        httpRequest.Content = new FormUrlEncodedContent(new Dictionary<string, string>
        {
            { "grant_type", "authorization_code" },
            { "redirect_uri", RedirectUriForEncryptedIdTokens },
            { "code", code }
        });
        HttpResponseMessage httpResponse = await _client.SendAsync(httpRequest);
        string responseContent = await httpResponse.Content.ReadAsStringAsync();
        JObject tokenResponse = JObject.Parse(responseContent);

        // The above is the same as previously,
        // and the relevant changes are the ones below:
        string encryptedIdToken = tokenResponse["id_token"]?.ToString();
        Jose.Jwk encKey = Jose.Jwk.FromJson(
            Properties.Settings.Default.JwkEncPrivateKey,
            Jose.JWT.DefaultSettings.JsonMapper
        );
        // The header of the incoming encrypted id token will
        // tell me both the alg and the enc used. Additionally,
        // the enc is configured in the Signicat dashboard
        // where it is called "Content encryption algorithm".
        string decryptedIdToken = Jose.JWT.Decode(
            encryptedIdToken,
            encKey,
            Jose.JweAlgorithm.RSA_OAEP,
            Jose.JweEncryption.A128CBC_HS256
        );
        return Content(decryptedIdToken, "text/plain");
    }
}
In this particular case and with the described setup example, there is only one encryption key associated with the client, so you can assume that the ID token will always be encrypted using that key. If there are multiple encryption keys on a client, then it would be necessary to check the kid in the header of the incoming encrypted ID token and then select the corresponding private key for decryption.
# Verifying the ID token signature
Regardless of using unencrypted or encrypted ID tokens, you must always be careful to validate the signature of the ID token to verify its authenticity. For that purpose, we introduce a helper method:
public async Task<string> VerifySignature(string jws)
{
    JObject wellknown = await GetWellknown();

    // First we fetch the key id, kid, from the header
    IDictionary<string, object> headers = Jose.JWT.Headers(
      jws, Jose.JWT.DefaultSettings
    );
    string kid = headers.First(h => h.Key == "kid").Value.ToString();

    // Now let's fetch the key from the JWKSet published by the authorization server
    string jwksJson =
      await _client.GetStringAsync(wellknown["jwks_uri"]?.ToString());
    JObject jwks = JObject.Parse(jwksJson);
    JToken sigKeyEntry =
      jwks["keys"].FirstOrDefault(k => k["kid"]?.ToString() == kid);
    Jose.Jwk sigKey = Jose.Jwk.FromJson(
        sigKeyEntry?.ToString(), Jose.JWT.DefaultSettings.JsonMapper
    );

    // And finally we verify the signature
    return Jose.JWT.Decode(
      jws,
      sigKey,
      Jose.JwsAlgorithm.RS256,
    Jose.JWT.DefaultSettings);
}
Basically, once you’ve decrypted the ID token (see the previous section), you are left with a signed JWT (JWS). The header of the JWS tells you which key was used to sign it, so you fetch that key from the jwks_uri endpoint and feed it into the Jose.JWT.Decode method which will verify the signature and then return the plain claims. You modify your callback method to include this verification at the end:
string verifiedIdToken = await VerifySignature(decryptedIdToken);
And this yields the following result:
{
  "nbf": 1684156135,
  "exp": 1684156735,
  "iss": "https://docs.sandbox.signicat.com/auth/open",
  "aud": "sandbox-happy-root-923",
  "at_hash": "A-5ERuKcv5zh1VHPVCu54g",
  "sid": "8BD83A26394C6C6EFFBD7A0112CEBC71",
  "sub": "JDAonVZOyWR-iQExci3RTHkWerjTK8DvhLa6yOr2CVc=",
  "auth_time": 1684156135,
  "idp": "idin-simulator",
  "idp_issuer": "simulator",
  "sandbox": true,
  "amr": [
    "external"
  ]
}
# Signed and encrypted userInfo responses
This section completes the equivalent exercise for the userInfo as well (even though we stated above that it is usually not required to interact with the user_info endpoint since the ID token will be sufficient).
- Open your client in the Signicat Dashboard, select Advanced > Security and then choose to have your userInfo signed and encrypted:

- Since you will be decrypting JWTs again as described in the ID token section, you should refactor the decryption to a separate method:
public string Decrypt(string jwt)
{
    Jose.Jwk encKey = Jose.Jwk.FromJson(
        Properties.Settings.Default.JwkEncPrivateKey,
        Jose.JWT.DefaultSettings.JsonMapper
    );

    return Jose.JWT.Decode(
        jwt,
        encKey,
        Jose.JweAlgorithm.RSA_OAEP, Jose.JweEncryption.A128CBC_HS256
    );
}
- Go back to your callback method again to modify your previous handling of the userInfo response to the following:
using (var httpRequest = new HttpRequestMessage(HttpMethod.Post, wellknown["userinfo_endpoint"]?.ToString()))
{
    httpRequest.Headers.Authorization = new AuthenticationHeaderValue("Bearer", accessToken);
    HttpResponseMessage httpResponse = await _client.SendAsync(httpRequest);

    string encryptedUserInfo = await httpResponse.Content.ReadAsStringAsync();
    string decryptedUserInfo = Decrypt(encryptedUserInfo);
    string verifiedUserInfo = await VerifySignature(decryptedUserInfo);

    return Content(verifiedUserInfo, "application/json");
}
Executing this final code, you should end up with the following set of decrypted and authentic (in terms of the verified signature) claims:
{
  "idp_id": "FANTASYBANK1234567890",
  "gender": "0",
  "sub": "JDAonVZOyWR-iQExci3RTHkWerjTK8DvhLa6yOr2CVc=",
  "idp_issuer": "simulator",
  "iss": "https://docs.sandbox.signicat.com/auth/open",
  "aud": "sandbox-happy-root-923"
}
To summarise, your code and integration should now use signed and encrypted request objects, ID tokens and userInfo responses, verifying both integrity and authenticity of all exchanged messages.