# Setup of SPID
Integration with SPID is done similarly to other Signicat's eID methods. This page describes the process of setting up your integration with SPID through Signicat eID Hub.
For more general information on how to integrate with Signicat eID Hub, see the Quick start guide.
# Initial preparations
This setup guide assumes you have completed the following initial preparations:
- Sign up to the Signicat Dashboard (opens new window).
- In the Signicat Dashboard, set up an organisation, an account and a domain.
Sandbox account
We recommend you create a sandbox account to test our services before implementing them in production. Note that you must set up the sandbox and production accounts separately.
# Add SPID
Production account: Sign an agreement
Before you can start integrating in production, you need to configure access to SPID with an onboarding manager. To get help with this, follow the steps in Sign agreements and metadata or contact us (opens new window).
Once your profile is configured, you need to add SPID to the list of supported ID methods:
- In the Signicat Dashboard, go to eID Hub > ID Methods (opens new window).
- Select Add new.
- Select Sistema Pubblico di Identità Digitale from the list of available ID methods.
- In the SPID configuration page, enter your organisation's:
- VAT identification number
- Fiscal code (Codice Fiscale). Optional, applies if your organisation is (also) registered in Italy.
- Click Save to complete the configuration.
Congratulations! You have just configured SPID. You will now view SPID listed as an active ID method.
To connect to SPID, you need to integrate with an authentication protocol. Find out how in the Integrate with an authentication protocol section.
See it in action
To try out SPID in a sandbox environment, go to the Test ID method section.
Note that you can test SPID without integrating with a protocol.
# Integrate with an authentication protocol
This section describes how to select and connect with an authentication protocol. You need an authentication protocol to integrate with SPID through Signicat.
OIDC and SAML 2.0 are official identity protocols, while the Authentication REST API is a solution developed and maintained by Signicat.
We recommend using OIDC, since SAML 2.0 is much more complex to implement on your side and usually requires a federation agent already in place.
You can find more information about the different types in the Authentication protocols section.
# Test ID method
In your sandbox account, you can preview your SPID integration with a SPID Test environment:
# 1. Prerequisites
- In the Dashboard, go to eID Hub > ID Methods (opens new window).
- Ensure SPID is listed and enabled with status "Active", as shown in Add SPID.
# 2. Discover your metadata URL
When you activate SPID, a SAML metadata document gets generated and associated to your domain automatically.
The metadata can be accessed at the following URL: <YOUR SIGNICAT DOMAIN>/idps/spid/metadata.
For example, if your sandbox domain is https://verybigcorp.sandbox.signicat.com, your metadata URL is https://verybigcorp.sandbox.signicat.com/idps/spid/metadata.
# 3. Register your metadata URL
To use the official SPID demo environment, you need to register your metadata URL on the SPID demo validator website:
- Go to https://demo.spid.gov.it/#/login (opens new window), and click Registra Metadata Service Provider.
- Insert your metadata URL in the "Metadata URL" box.
- Click Download to register your domain with SPID. On the screen, you should see the same XML (SAML 2.0) metadata document as the one hosted at your Signicat metadata URL.
You have now registered your metadata on the SPID demo environment. Return to the Signicat Dashboard to test SPID.
Register metadata
We recommend registering your metadata URL with AgID every time you test your connection to SPID.
# 4. Test SPID
- In the Dashboard, go to eID Hub > ID Methods (opens new window) and select Test ID methods to start the demo.
- (Optional) Choose SPID, if you activated other ID methods. In production, your end-users will be able to choose between as many ID methods as you activate in your account. You can control this behaviour in the protocol configuration.
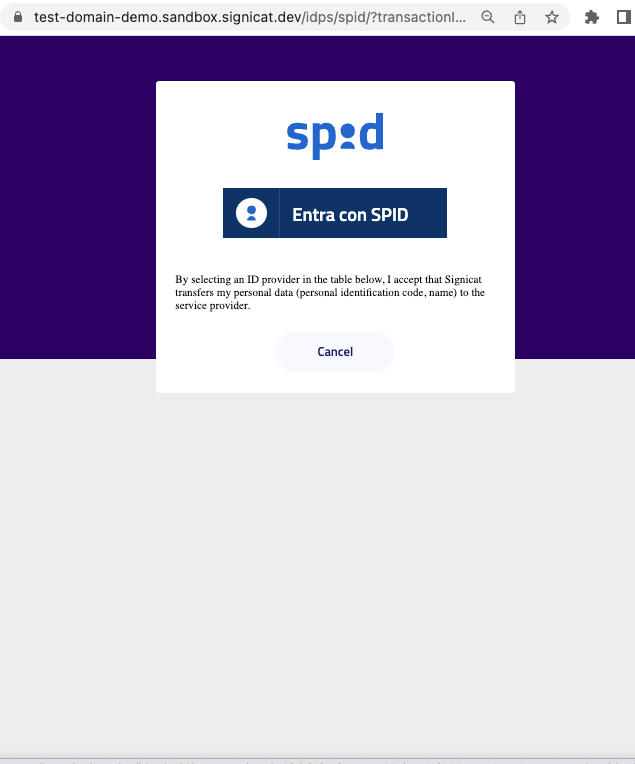
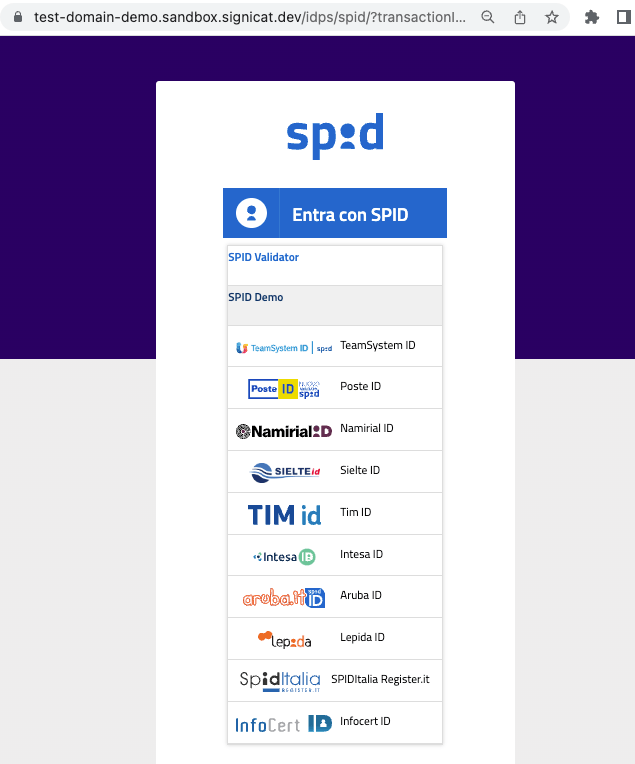
- Select the Entra con SPID ("Login with SPID") button to expand the list of supported identity providers. Select SPID Demo from the list.
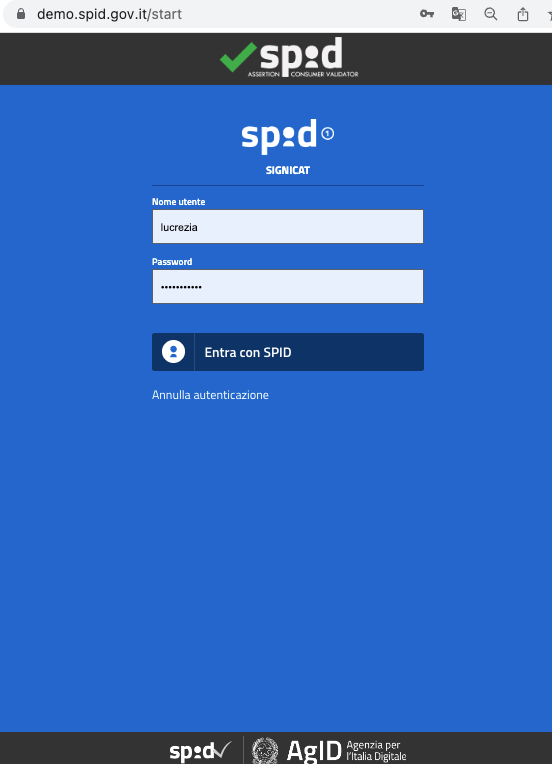
- In the SPID demo environment, enter the credentials of a test user. For example, use:
- Nome utente (username):
lucrezia - Password:
password123
- Nome utente (username):
- Select Entra con SPID to proceed. On the next page, select Conferma to give consent to the processing of the personal data fields displayed on screen.
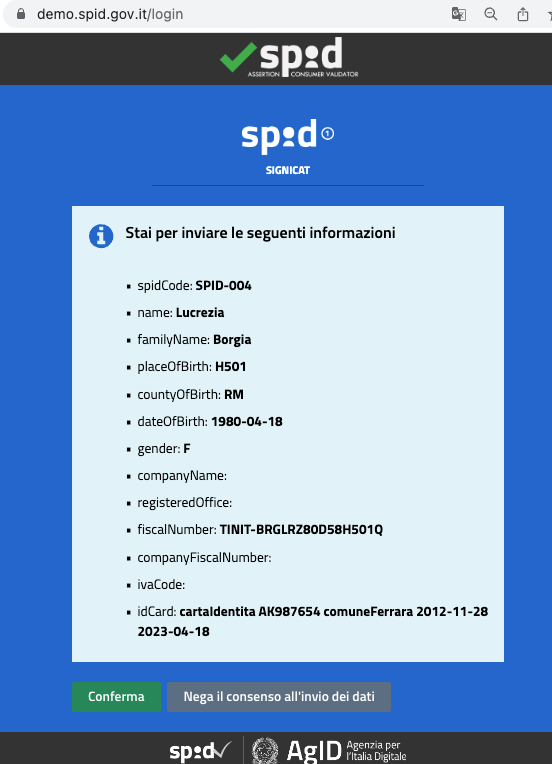

You logged in successfully! At this stage, an end-user completed the authentication with SPID.
In production, end-users will be redirected to the redirect URL you configured in your preferred authentication protocol. Learn how to integrate with a protocol in the Integrate with an authentication protocol section.