Step-up
In this integration guide, you will learn how to implement ReuseID step-up in your mobile app.
About ReuseID step-up
In a ReuseID step-up flow, there are two required processes to be executed with your app:
- A MobileID authentication.
- A VideoID ID document scanning and liveness check.
What does it look like?
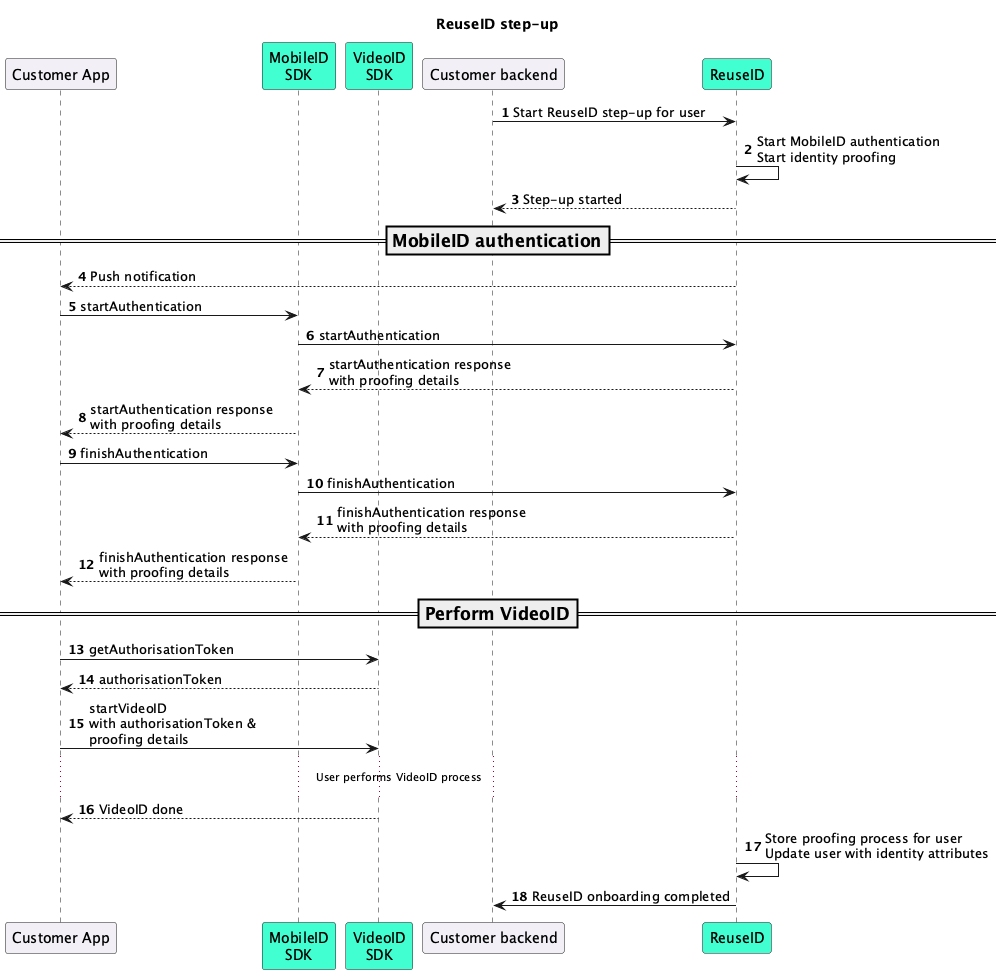
In the sequence diagram below, you can see what a ReuseID step-up looks like.

Sequence diagram showing a ReuseID step-up
MobileID authentication
The first operation you need to execute is the MobileID authentication.
To learn how to implement the authentication process for Android and iOS, use the panel buttons below.
Operation context
Operation context is a MobileID feature that allows you to send data over an end-to-end encrypted channel between the backend and the mobile app.
In ReuseID, we use this feature to send data related to the ReuseID operation to the app.
In the step-up operation, we use both the pre-operation and post-operation context to share information.
Pre-operation context
After the startAuthentication request, you will get a startAuthenticationResult object. This object contains a pre-operation context.
Response
You can find an example of the response below:
{
  "pre_operation_context" : {
    "context_content_b64": <signicatOperation>,
    "context_mime": "application/json"
  }
}
Response object description
You can find a table of descriptions for the response object parameters below:
This parameter can be helpful for designing the end-user flow. For example, the operation parameter can be used to know that this is a ReuseID step-up operation and not a normal MobileID authentication.
Post-operation context
Once the authentication is complete, you will get a finishAuthenticationResult object. This object contains a post-operation context.
Response
You can find an example of the response below:
{
  "post_operation_context" : {
    "context_content_b64": <signicatOperation>,
    "context_mime": "application/json"
  }
}
Response object description
You can find a table of descriptions for the response object parameters below:
Signicat operation object
The Signicat operation object (signicatOperation) is used to pass information related to the ReuseID process to the mobile app.
Object
You can find an example of the object below:
 {
   "signicatOperation": {
       "version": "1",
       "operation": "authentication",
       "provider": "eid",
       "token": <TOKEN>,
       "url": "https://etrust-sandbox.electronicid.eu/v2",
       "processType": "substantial",
       "eidProviderOptions": {
          "docType": 1,
          "docTypes": [1,2,3],
          "defaultId": 1
       }
   }
}
Object description
You can find a table of descriptions for the object parameters below:
eID provider options object
The eID provider options object (eidProviderOptions) contains ElectronicID (eid) provider-specific configuration options.
You can find a table of descriptions for the object parameters below:
Perform VideoID
Once you have completed the MobileID authentication, you then need to start the ViedeoID process in your app.
1. VideoID authorisation
Before starting the VideoID activity, you need to get an authorisation token for VideoID. You can do this by making a request to the videoid.request API:
- Obtain the following parameters from the Signicat operation object:
urltoken
- Input this data into the following example:
Example: Request to get Video ID authorisation token
curl -X POST <URL>/videoid.request \
-H 'Authorization: Bearer <TOKEN>' \
-H 'content-type: application/json' \
-d '{
    "process": "Unattended"
}'
What doesUnattendedmean?In the SDK, the process that you are starting for VideoID is called
Unattended. In other parts of the documentation, you will see us refer to this operation asSubstantial. - After a successful request , you will receive the following response:
Example: Response with VideoID authorisation token
{
"id": "87a819bd-9419-417a-9e55-cab8789d4115",
"authorization": "<authorisationToken>"
}NoteThe
authorizationfrom this request is required in the next step when you start a VideoID activity.
2. Start VideoID activity
Next, you need to start the VideoID activity in your app. You should consider the following when starting the activity:
Code examples
- iOS
- Android
func makeUIViewController(context: Context) -> VideoIDSDK.VideoIDSDKViewController {
  let environment: VideoIDSDK.SDKEnvironment = VideoIDSDK.SDKEnvironment(
    url: <<url>>,
    authorization: <<token>>
  )
  let viewController = VideoIDSDKViewController(
    environment: environment,
    docType: <<DocType - Optional>>,
    docTypes: <<DocTypes - Optional>>,
    idDefault: <<DefaultId - Optional>>,
  )
  viewController.delegate = self
  return viewController
}

// Error Handling
func onComplete(videoID: String) {
  // VideoID process succeeded - Handle the next steps here
}
func onError(_ error: VideoIDError) {
  // VideoID process failed - Handle the error here
}
val startForResult: ActivityResultLauncher<Intent> = registerForActivityResult(ActivityResultContracts.StartActivityForResult()) { result ->
  when (result.resultCode) {
    Activity.RESULT_OK -> {
      // VideoID scan successful, continue app flow
    }
    Activity.RESULT_CANCELED -> {
      // VideoID failure, handle the error
      result.data?.run {
        val errorId = getStringExtra(VideoIdServiceActivity.RESULT_ERROR_CODE)
        val errorMsg = getStringExtra(VideoIdServiceActivity.RESULT_ERROR_MESSAGE)
      }
    }
  }
}

private fun launchVideoIdActivity(
url: String, authToken: String, defaultId: Int? = null, docType: Int? = null, docTypes: IntArray? = null){
  startForResult.launch(Intent(this, VideoIDActivity::class.java).apply {
    putExtra(VideoIDActivity.ENVIRONMENT, Environment(URL(url), authToken))
    defaultId?.let { putExtra(VideoIDActivity.ID_DEFAULT, it) }
    docType?.let { putExtra(VideoIDActivity.ID_DOCUMENT, it) }
    docTypes?.let { putExtra(VideoIDActivity.IDS_DOCUMENT, it) }
  })
}
To learn more about about VideoID and the available customisation options, you can navigate to the SDK documentation available in the ElectronicID dashboard.