Start Capture flow
Use the Start Capture flow service to create an identity verification process in a web context. From the end-user's perspective, this service helps them capture and upload ID images.
- Recommended for web: This service encapsulates the providers' web SDKs. This means you do not have to integrate directly with those SDKs since they are already integrated into this service. Also, integrating with the Assure API using the Capture service (eIDV alternative flow) is simpler than integrating using the provider SDKs directly (eIDV generic flow).
- Supported devices: You can use this service with all the providers that run in a web environment (currently Signicat VideoID, Signicat PictureID, Signicat Paper and Onfido).
For security reasons, Capture will only successfully load inside <iframe>, <frame>, <object> or <embed> on domains in an allowlist. If you plan to use Capture inside one of these elements, please request your domain to be allowed by creating a support ticket in the Signicat Dashboard. Other domains will be blocked by Signicat's CSP (content security policy).
Request
In the Start capture flow request, ensure you:
- Use the
dossierIdfrom the "Create dossier" response. - Specify the
redirectUrlto redirect the user to the required page after the verification is finished.
Here is an example of a basic "Start Capture flow" request using Onfido as provider:
curl --location 'https://api.signicat.com/assure/dossiers/<DOSSIER_ID>/capture' \
--header 'Authorization: Bearer <OIDC_TOKEN>' \
--header 'Accept: application/json' \
--header 'Content-Type: application/json' \
--data '{
  "providers": [
    {
      "provider": "onfido",
      "processType": "documentSelfie"
    }
  ],
  "redirectUrl": "https://my-website.com/"
}
For more code examples and detailed descriptions of the "Start Capture flow" parameters, see the API Reference.
Response
In the the "Start Capture Flow" response you will get a URL. You should now redirect the end-user to this URL so they can start their identity verification.
Example URL:
{
    "url": "https://assure-demo.sandbox.signicat.com/capture/#/artifact=67fylnrx975e2jvbk8d410vknfnz122lllhclumxuvo6z5man2"
}
Final redirect
After the end-user has finished capturing and uploading the ID images, they are redirected to the redirectUrl (defined in the request). When the redirect happens, this URL is appended with information about the dossierId, the processId and the process' status.
Example URL:
https://myredirecturl.com/?dossierId=c03e66c7-8230-4020-a084-5a34a925d5fe&processId=8a303665-c94a-47c1-be8d-5df65f64a0ad&status=processing
Verification
At this point, Assure API requests the provider to start performing the verification.
It is recommended to subscribe to Assure Events to be notified when the result is available (either successfully or not). For more information, see Assure Events.
When the verification is done, you can use the dossierId and processId in the Get Process service to obtain information about the verification result.
Using the SDKs available in the Capture service
The Capture service embeds the Signicat VideoID and Onfido providers' JS SDKs. It also includes a Signicat “capture” SDK that is used with the Signicat Paper provider but can also be used with some of the other providers as long as the provider and processType combination allows direct upload of images through the Assure API .
The table below indicates which SDKs are available to be used with each provider and, for each, which is the default value if sdk is not explicitly set in the request body:
Signicat takes measures to make our products as accessible as possible for all users. For more information, see the Accessibility statement for Signicat Capture.
Capture configurations (uiProfile)
The configuration options allow you to specify the workflow and the graphical user interface.
The "Start Capture flow" service may receive a parameter named uiProfile. You must create this uiProfile using the Create capture configuration endpoint. You can later download or update that configuration.
Capture SDK configurations
To specify the configuration for Capture SDK, you must set the value of the sdk parameter in the "Start Capture flow" request to capture.
For more details about each configuration field (description, type, default value and code example), see the API Reference for either Create capture configuration or Update capture configuration.
Translations for Capture SDK
Signicat currently provides translations in the following languages in the Capture SDK:
- Croatian (hr)
- Czech (cs)
- Danish (da)
- Dutch (nl)
- English (en)
- Estonian (et)
- Finnish (fi)
- German (de)
- Greek (el)
- Hebrew (he)
- Hungarian (hu)
- Icelandic (is)
- Latvian (lv)
- Lithuanian (lt)
- Maltese (mt)
- Norwegian (nb)
- Polish (pl)
- Romanian (ro)
- Slovak (sk)
- Slovenian (sl)
- Swedish (sv)
However, you can provide your own translations for any given language. You define which languages the end-user can choose between in the languages field and your translations in the translations field.
In this code example, languages is set to English (en), Dutch (nl) and Danish (da) and the translations field provides a translated value of the header title for these three languages (see further down for a full overview of text fields you may translate):
{
    "languages": [
        "en",
        "nl",
        "da"
    ],
  "translations": {
    "en": {
      "mainHeaderGenericTitle": "Identity Verification"
    },
    "nl": {
      "mainHeaderGenericTitle": "Controle identiteit"
    },
    "da": {
      "mainHeaderGenericTitle": "Identitetsverificering"
    }
  }
}
This looks as follows in the English version of the user interface:
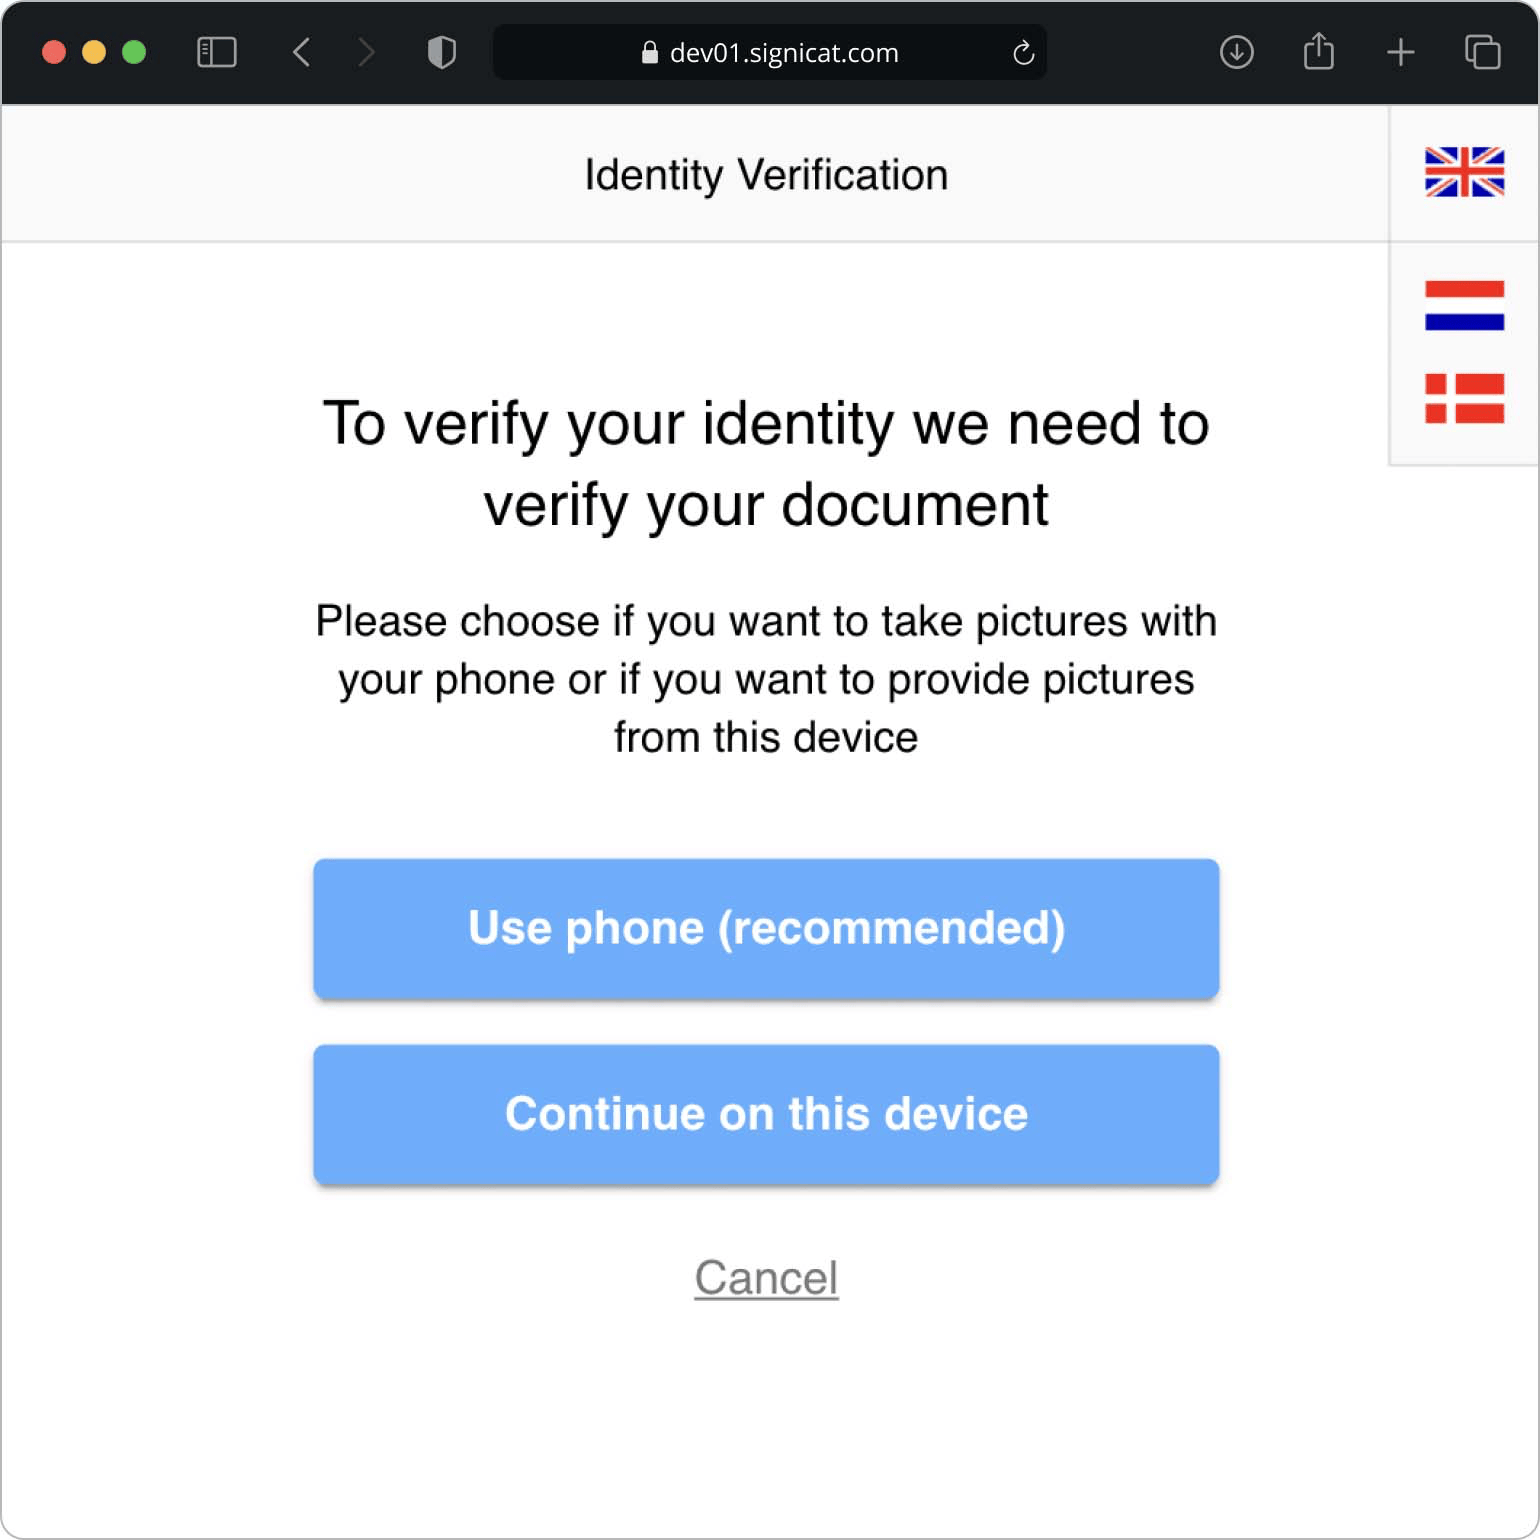
Languages and translations
In the upper right corner, the end-user can choose between the different languages as defined in the languages field.
Capture will only override the values of the translation strings you specify in the configuration, meaning all other strings will remain untouched.
All strings without a translation will default to English.
Translation strings
You can translate the following text fields (click on the arrow to expand):
Onfido terms and conditions
Onfido requires that you show US residents a consent page before they can start the identity verification. If the end-user does not consent or if the screen is not enabled, the process will end with a failed status.
This page only applies for the onfido provider when the sdk is captureand the processType is documentSelfie or documentVideo.
You can use/translate the following default strings or rephrase them as you wish:
onfidoConsentHeader=Onfido terms and conditions
onfidoConsentDialog=<p>Before you can start the identity verification, you must accept Onfido's terms and conditions.</p>
onfidoConsentTermsAgreements=I have read, understand and accept <a class\='onfido-links' target\='_blank' href\='https\://onfido.com/facial-scan-policy-and-release/'>Onfido's Facial Scan Policy and Release</a>, <a class\='onfido-links' target\='_blank' href\='https\://onfido.com/privacy/'>Privacy Policy</a> and <a class\='onfido-links' target\='_blank' href\='https\://onfido.com/terms-of-service/'>Terms of Service</a>.
onfidoConsentSubmitButton=Accept
onfidoRejectConsent=I do not accept the terms
onfidoRejectConsentPopUpTitle=Are you sure?
onfidoRejectConsentPopUpDescription=If you do not accept Onfido's terms, you will not be able to use this service.
onfidoRejectConsentPopUpFirstButton=No, review terms
onfidoRejectConsentPopUpSecondButton=Yes, exit the identity verification
(...)
The Onfido terms and conditions page could look as follows in the English version of the user interface:
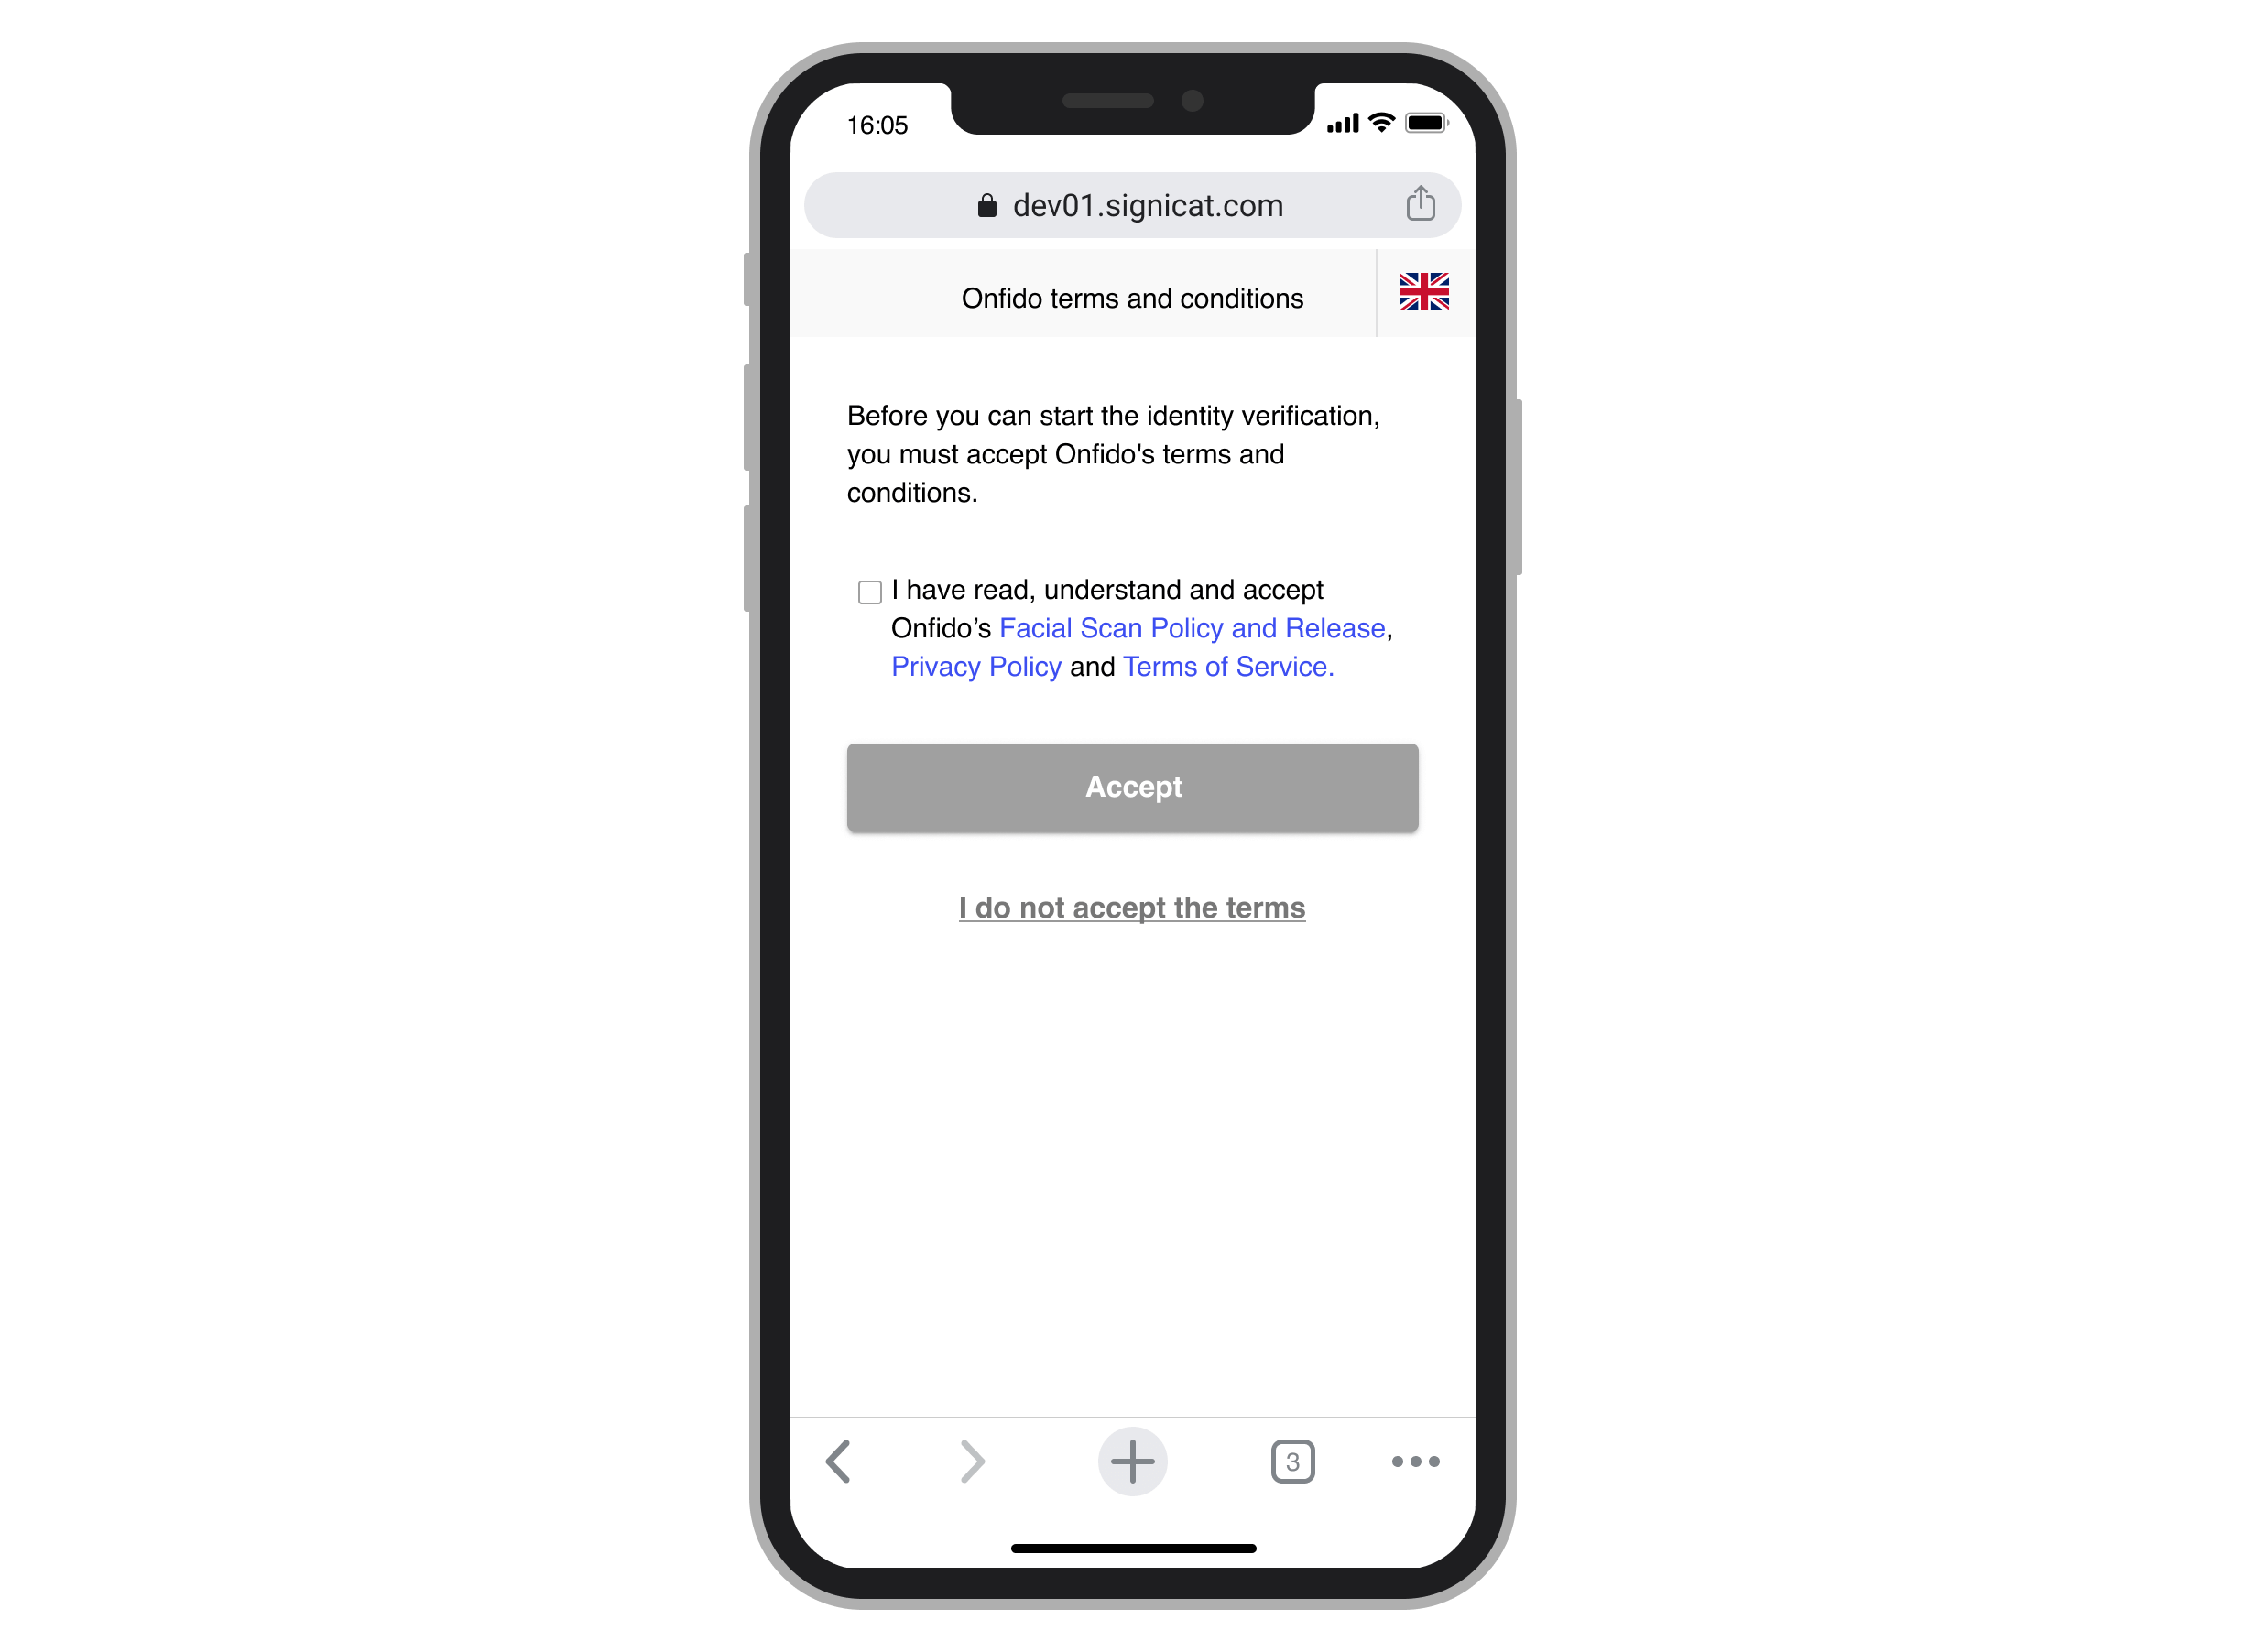
Onfido consent page
If the user does not accept the terms, a confirmation popup is displayed to check if they really want to exit the process:
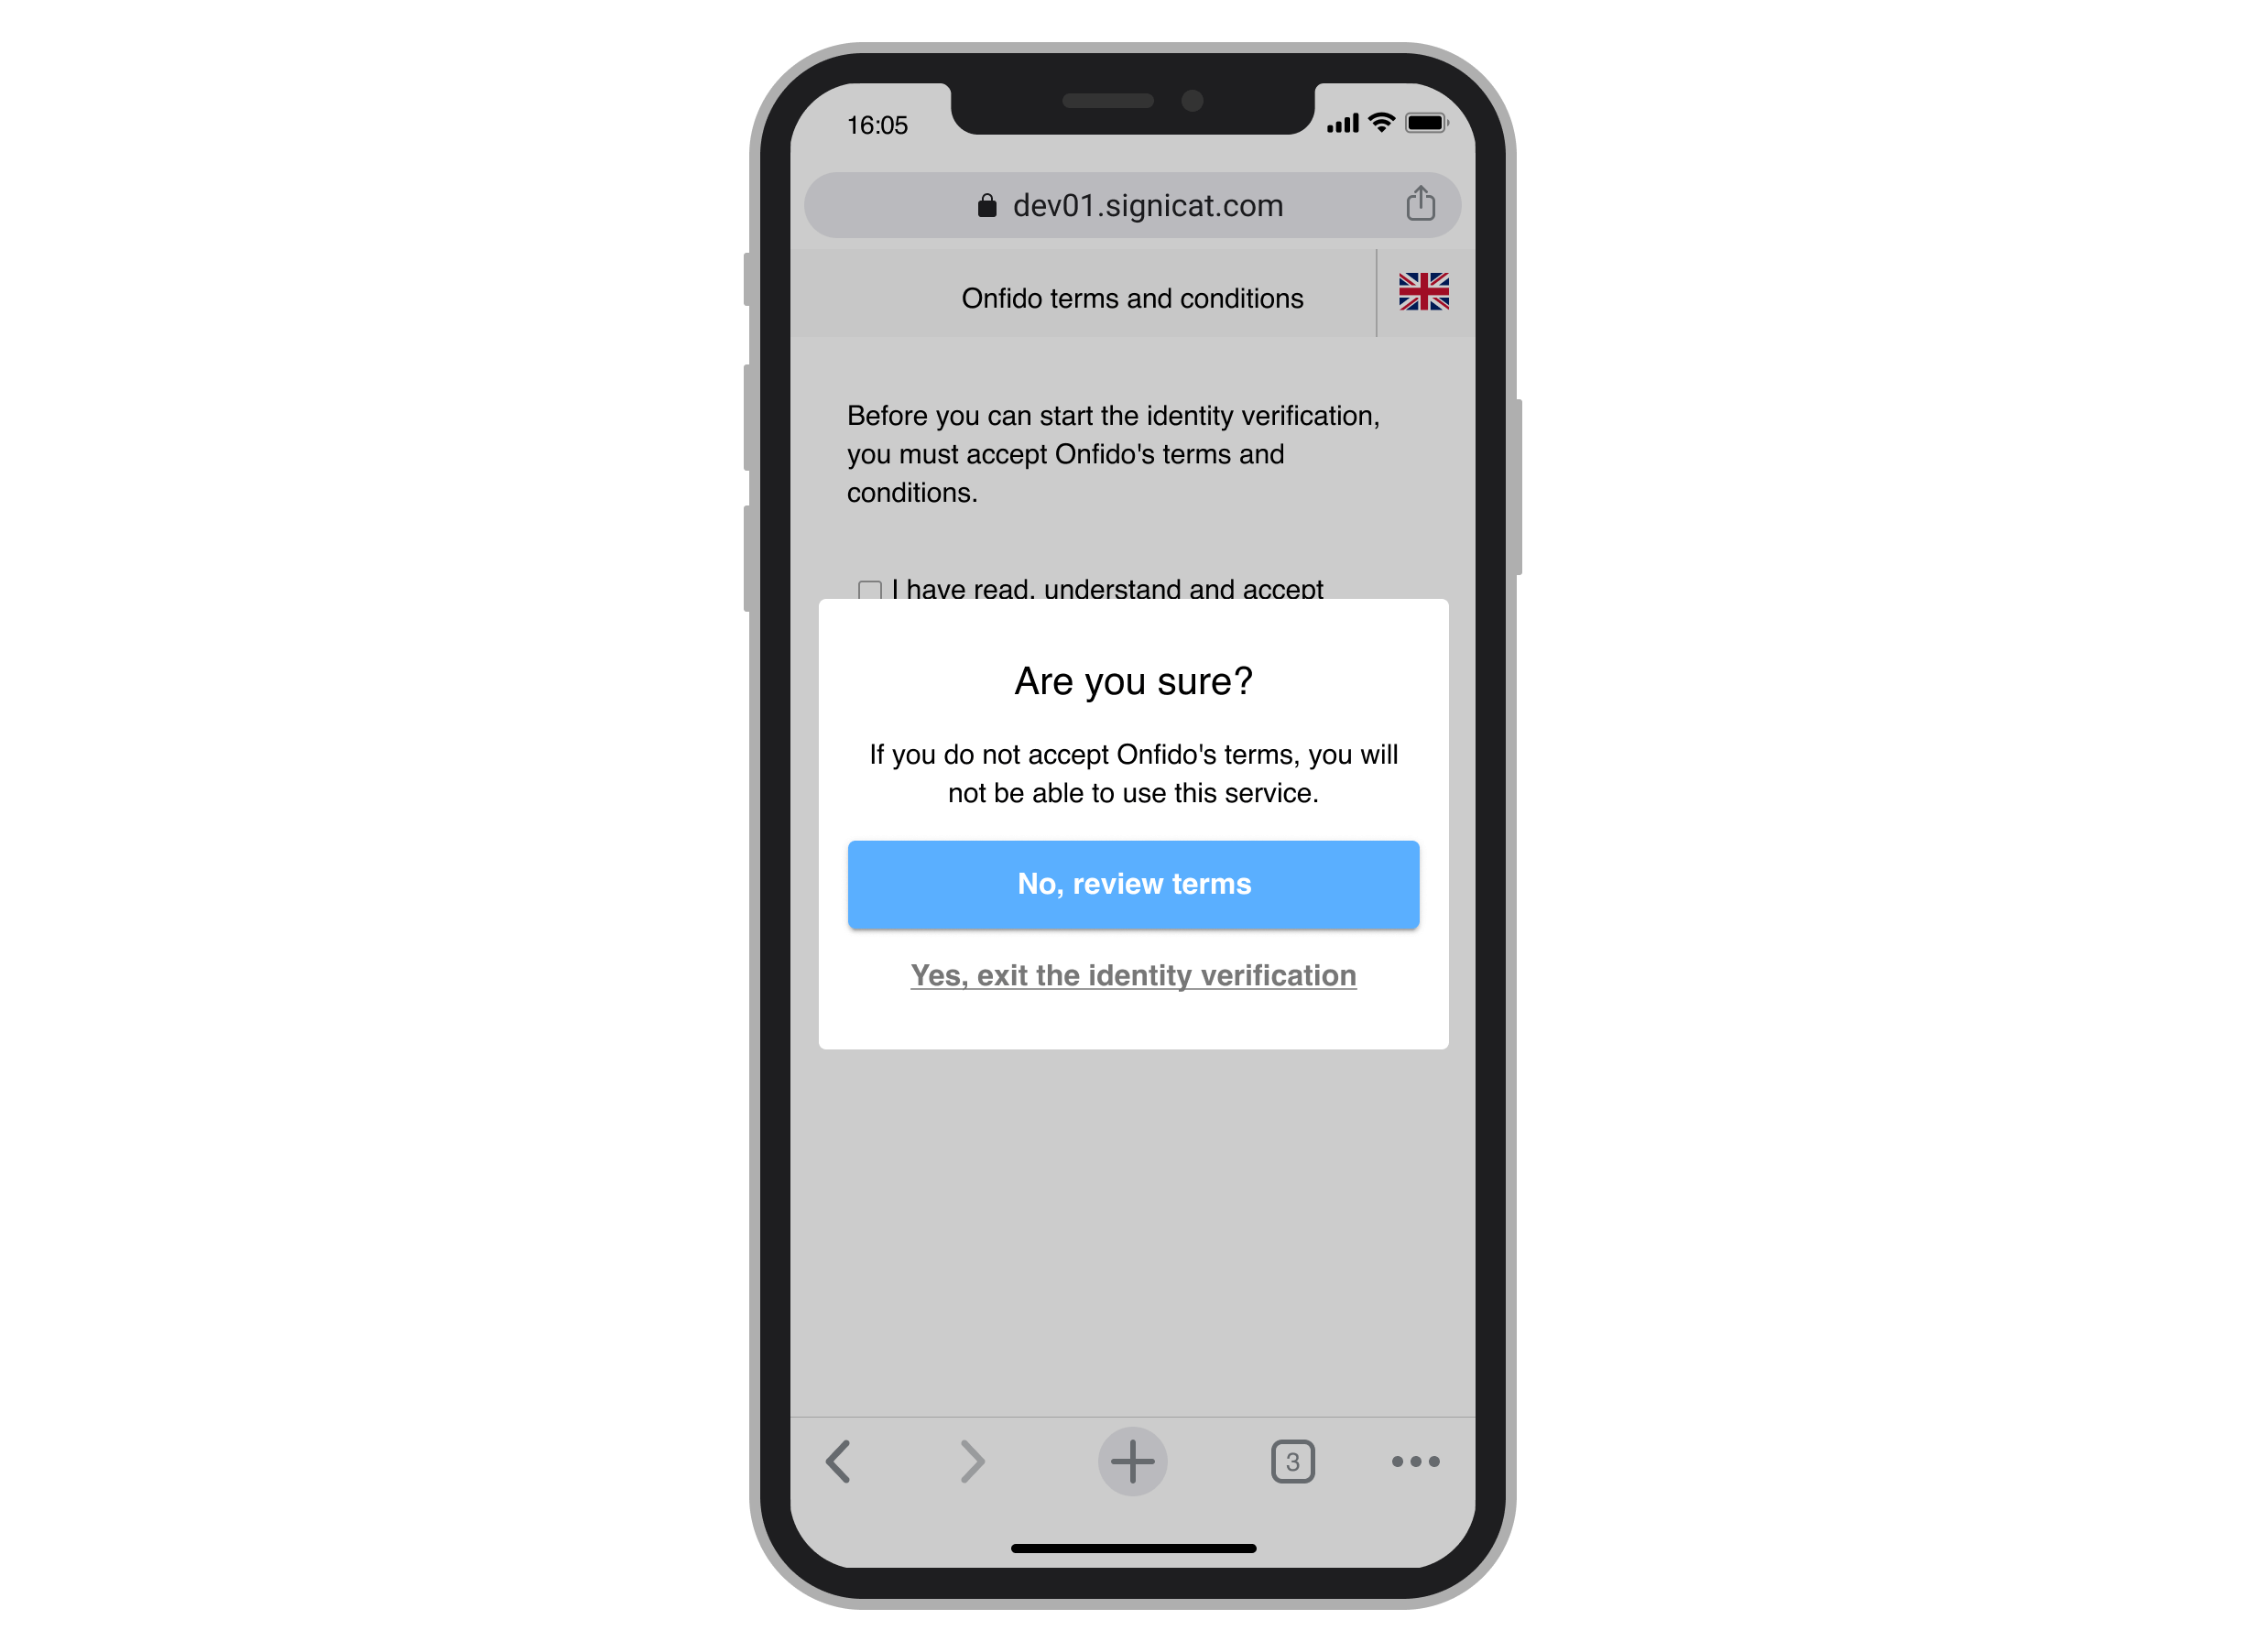
Onfido consent popup
See also the description of the showPrivacyConsentScreen field in the API Reference.
Prerequisites screen
Before the end-users start the identity verification, you can set up an information screen with useful preparation tips. This could be, for example, tips about having their ID document ready, sit in a well-lit place, allow access to the web camera etc. Better prepared end-users, may reduce the number of cancelled processes.
If you want to use this screen, you must set showPrerequisitesScreen to true (the default value is false). You can use/translate the following default strings or rephrase them as you wish:
prerequisitesScreenHeaderTitle=Before you start
prerequisitesScreenDescription=Please have the following ready:
prerequisitesScreenItem1Title=Identity document
prerequisitesScreenItem1Description=Your original, valid identity document
prerequisitesScreenItem2Title=Lightning
prerequisitesScreenItem2Description=A well-lit place
prerequisitesScreenItem3Title=Internet
prerequisitesScreenItem3Description=Stable Wi-Fi or mobile connection
prerequisitesScreenItem4Title=Camera and microphone
prerequisitesScreenItem4Description=Allow access and ensure no other apps are using them
prerequisitesScreenButtonText=I'm ready
The prerequisites screen could look as follows in the English version of the user interface:
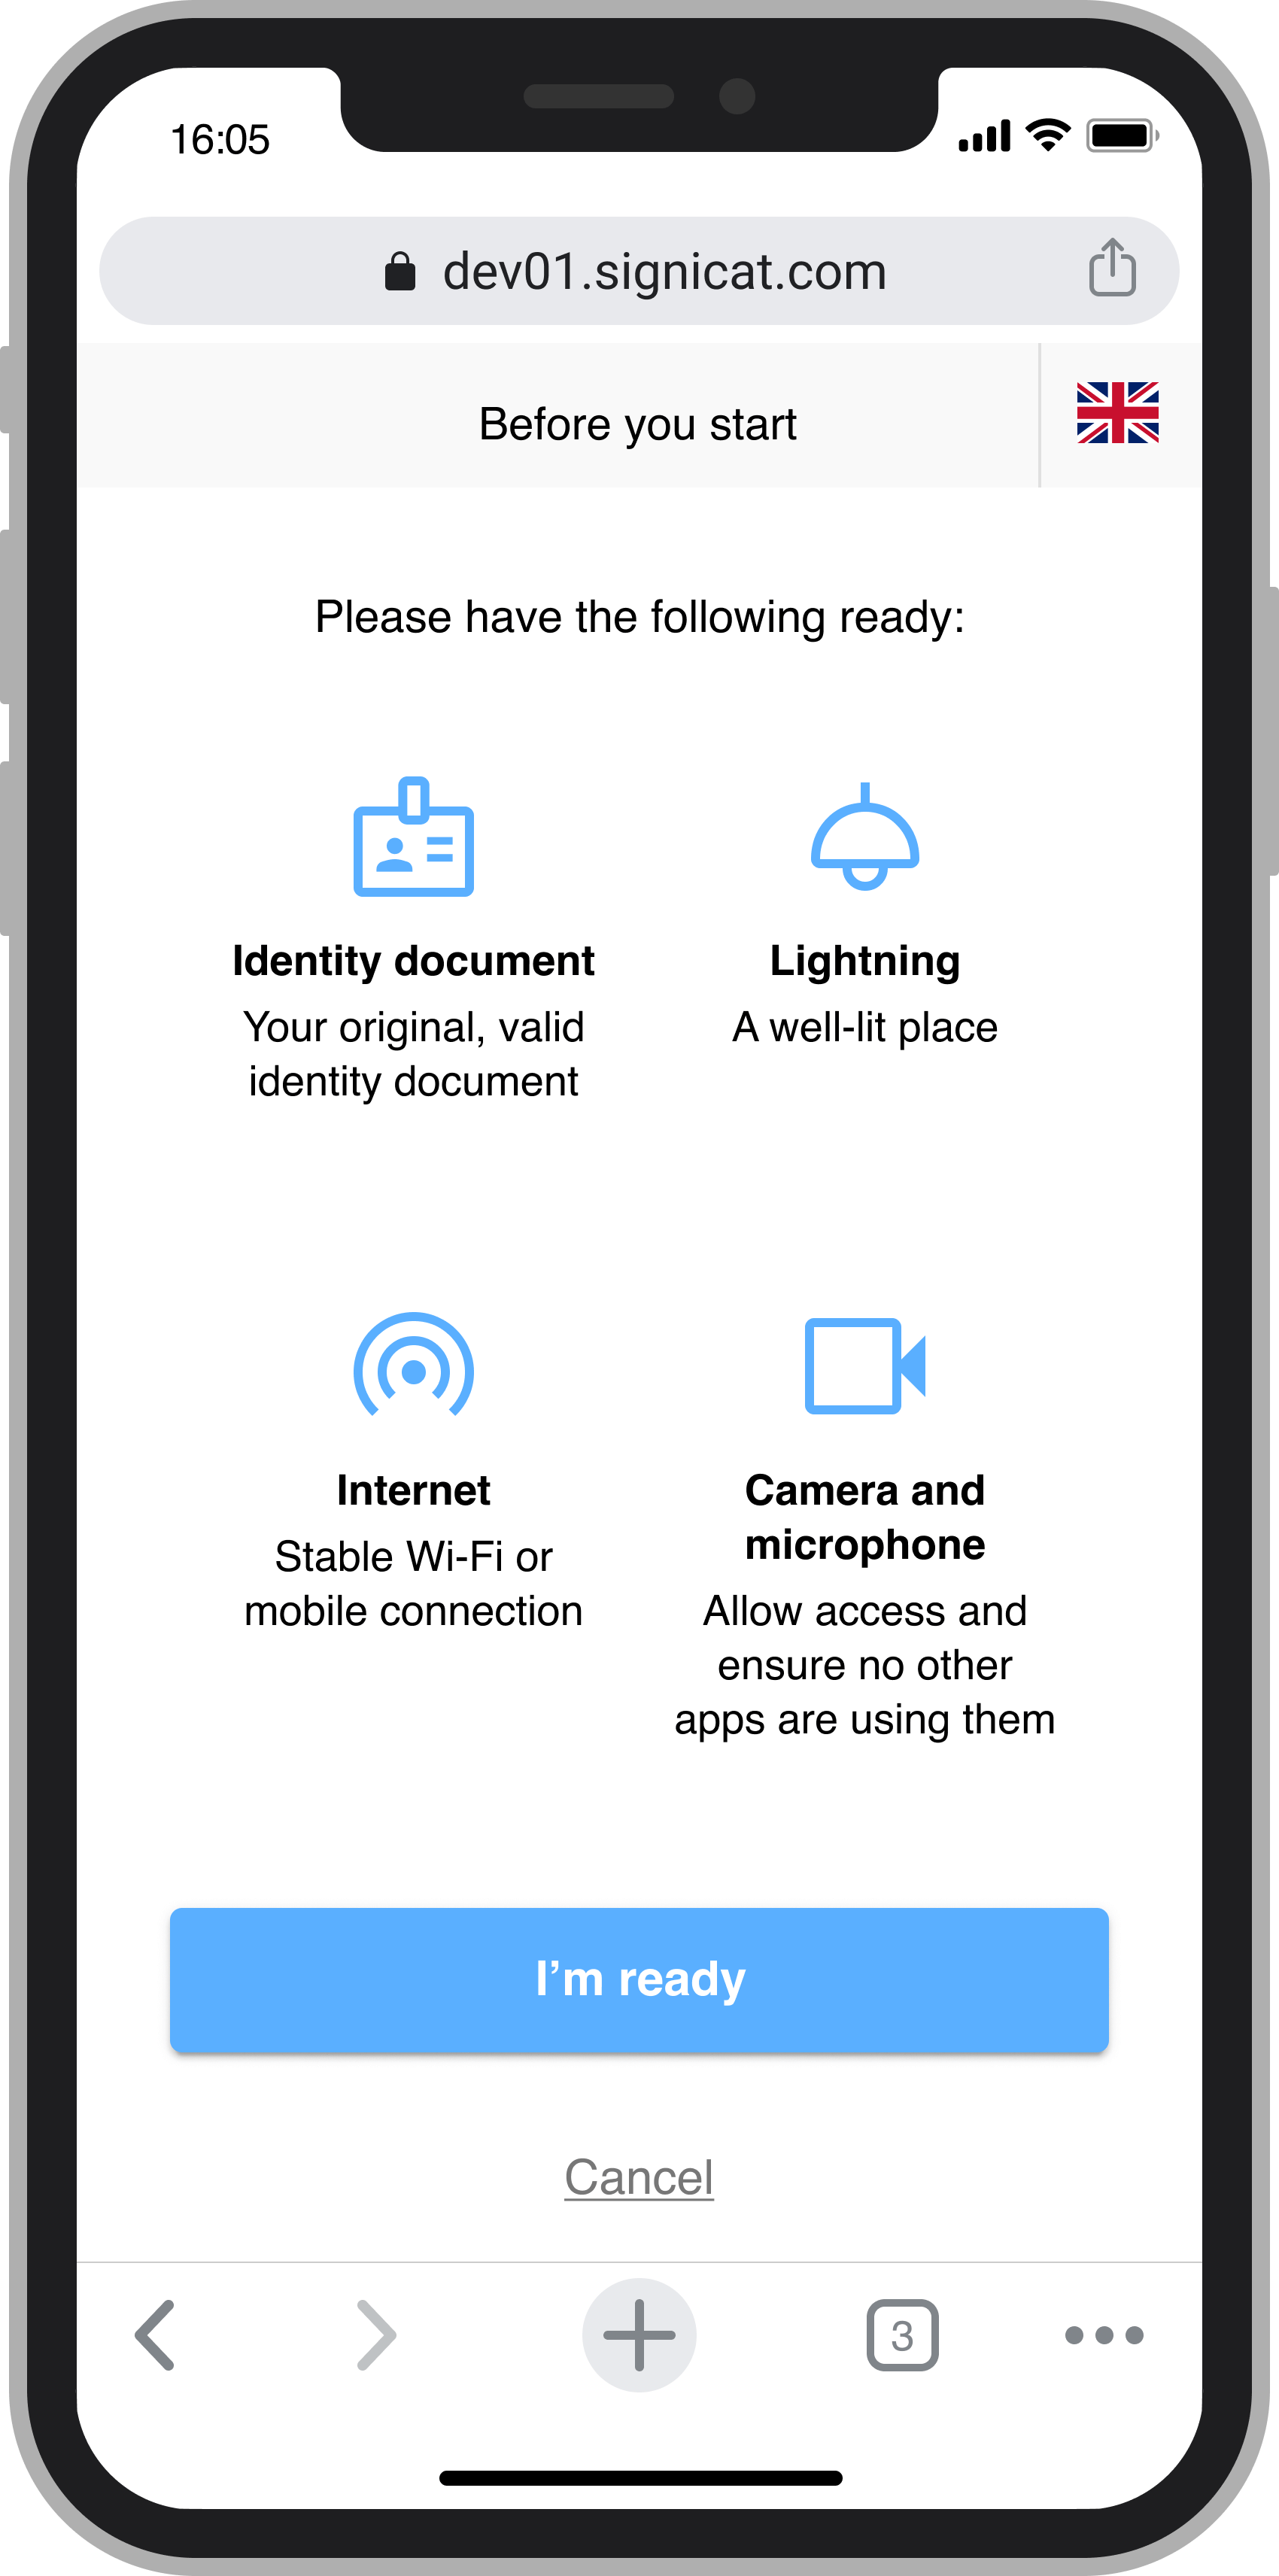
Prerequisites screen
See also the description of the showPrerequisitesScreen field in the API Reference (under Translations).
Consent page
You can set up a consent page where the end-users have to accept some terms and conditions to be able to use this service.
If you want to use this page, you must set showConsentPage to true (the default value is false). You can use/translate the following default strings or rephrase them as you wish:
consentHeader=Identity verification
consentDialog=<p>In the following steps, you will be requested to identify yourself in a recorded session that will be reviewed by our agent. Please make sure that you have a valid identity document at hand.</p><p>Your personal data is protected during the identification process. For more information, please refer to <a target="privacy-policy" href="https://www.signicat.com/about/privacy-statement-assure">our privacy policy</a>.</p>
consentTermsAgreements=I accept that my data can be used for the purpose of this identity verification.
consentSubmitButton=Start verification
The Consent page could look as follows in the English version of the user interface:
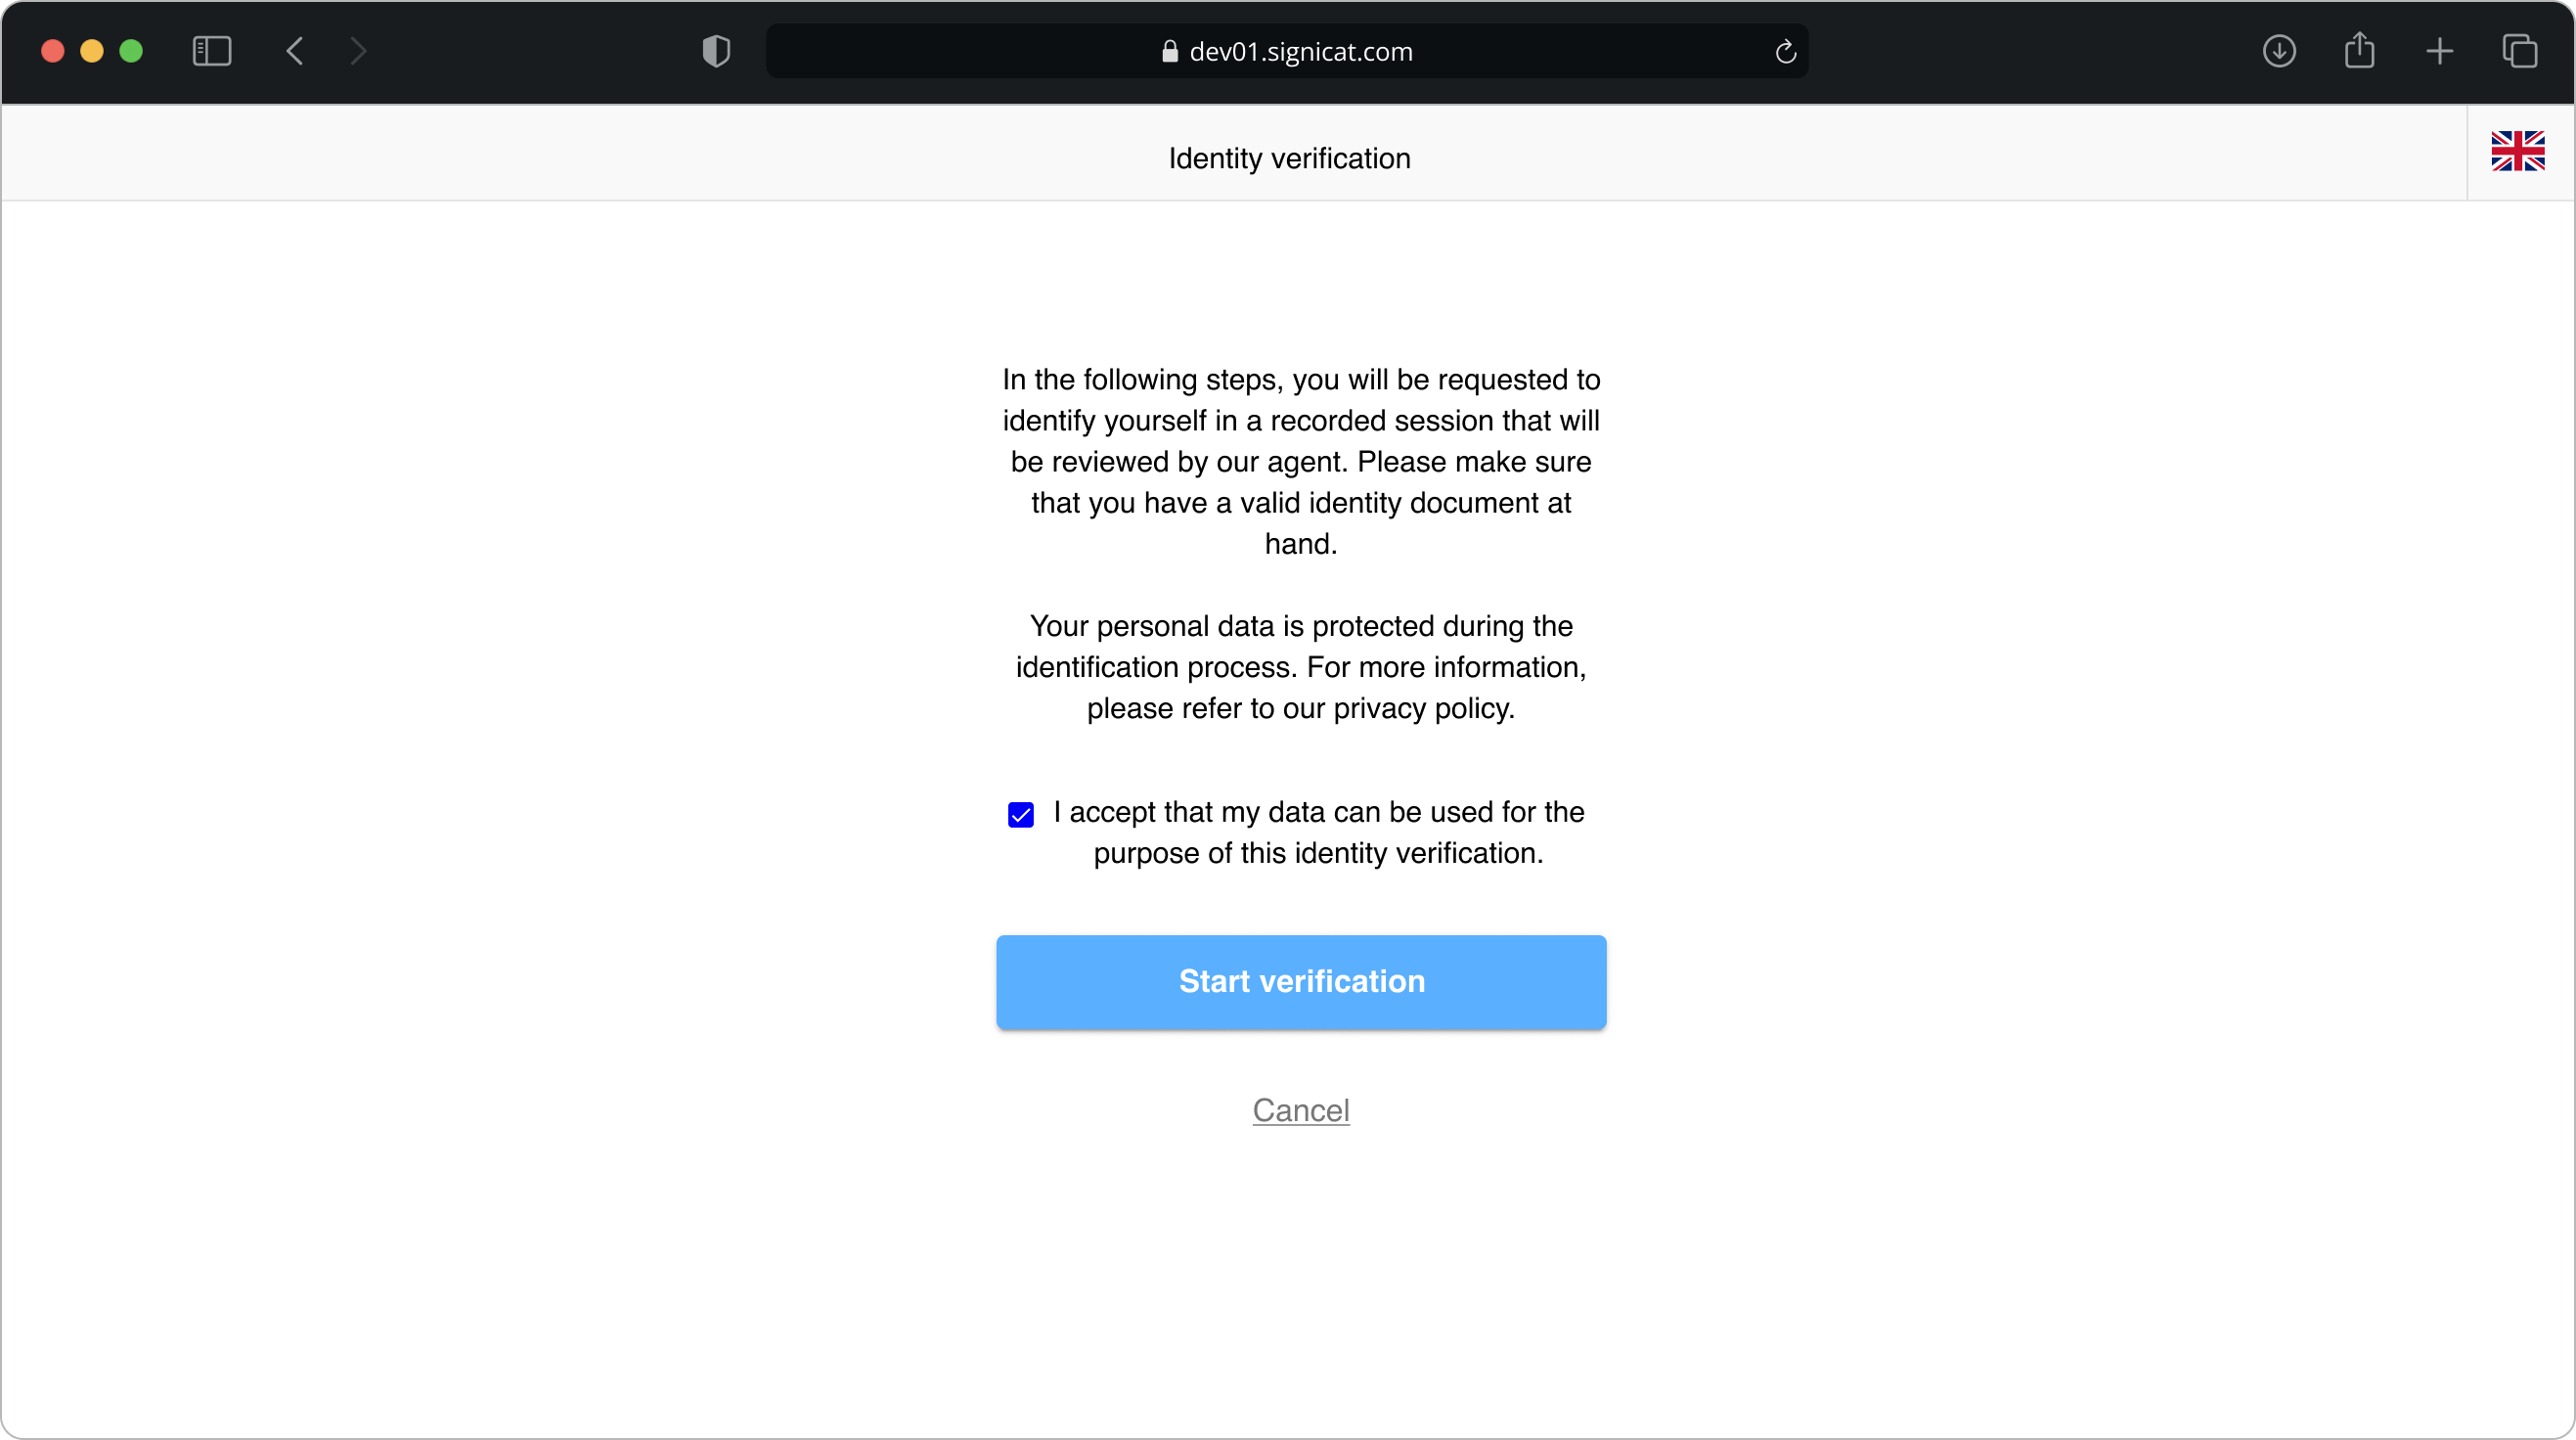
Consent page
See also the description of the showConsentPage field in the API Reference.
Main header
mainHeaderGoBackButton=Back
mainHeaderGenericTitle=Identity verification
passportMainHeaderTitle=Verify passport
identityCardMainHeaderTitle=Verify identity card
driversLicenseMainHeaderTitle=Verify drivers license
Screen text fields
chooseDocumentType=Choose the document you wish to verify
chooseCountry=Select your nationality below
searchCountries=Search countries
uploadPicture=Upload an image
retakePhoto=Re-take photo
chooseFile=Choose file
reuploadFile=Re-upload file
confirm=Confirm
cancel=Cancel
accessibilityLinkText=Accessibility statement
cancelDialogTitle=Cancel
cancelDialogDescription=Are you sure you want to exit the process?
cancelDialogNoButton=No, I do not want to exit
cancelDialogYesButton=Yes, I want to exit
cancellingDialogTitle=Cancelling
cancellingDialogDescription=We are cancelling your process, you will be redirected back automatically
successDialogTitle=Success
successDialogDescription=Your pictures were successfully uploaded. You will be redirected back automatically
cameraPermissionDenied=We were unable to access your camera
frontPhotoInfo=Place the <u>front</u> of your document roughly inside the frame below
backPhotoInfo=Place the <u>back</u> of your document roughly inside the frame below
selfieInfo=Align your face in the center of the circle below
glareWarning=There's too much glare
takePhoto=Take photo
scanningTitle=Scanning
scanningSubtitle=That's great, just stay in that position
selfieTakePhotoHelperTextTop=Position your face within the frame, then take the photo.
selfieTakePhotoHelperTextBottom=Keep your face neutral
confirmPhotoTitle=Is the photo clear?
confirmPhotoSubtitle=Make sure the photo is clear without any glare or blur
confirmPhotoYesButton=Yes, use this one
confirmPhotoNoButton=Retake photo
frontImageTab=Front side
backImageTab=Back side
selfieTab=Selfie
uploadPhotoHelperTextSingular=Upload a photo (jpg or png) of your ID below. Make sure the photo is legible and does not contain any glare.
uploadPhotoHelperTextPlural=Upload photos (jpg or png) of your ID below. Make sure the photos are legible and do not contain any glare.
chooseToTakePhoto=Take photo
chooseToUploadPhoto=Upload photo
showCountryBeforeDocumentTypeDocumentCountryNextButton=Next
selectMethodInfoText=Choose how to add an image of your identity document:
signicatvideoidCheckingRequirementsLoader=Checking your browser...
confirmPhotoSubtitlehas some optional fields. Using these fields will override 'confirmPhotoSubtitle' in the Capture front/back/selfie screens. The fields are empty by default. The values below are suggested examples:
frontImageConfirmPhotoSubtitle=Make sure the photo is clear without any glare or blur
backImageConfirmPhotoSubtitle=Make sure the photo is clear without any glare or blur
selfieConfirmPhotoSubtitle=After taking this photo, all photos will be sent and checked. It may take up to one minute before you will be redirected to another page.
Photo instruction screen
To help the end-user taking a good photo of their ID document, you can use the following default instructions. You can change the default instructions and add more than these four sets (title + description):
documentInstructionsScreenHeaderTitle=Photo instructions
documentInstructionsScreenDescription=Please follow the photo guidelines below.<br />Photocopies and scans are not allowed.
documentInstructionsScreenItem1Title=Missing data
documentInstructionsScreenItem1Description=Capture the entire document.
documentInstructionsScreenItem2Title=Unclear photo
documentInstructionsScreenItem2Description=Hold the camera steady.
documentInstructionsScreenItem3Title=Glare
documentInstructionsScreenItem3Description=Move away from direct light.
documentInstructionsScreenItem4Title=Ready
documentInstructionsScreenItem4Description=The photo is good!
documentInstructionsScreenButtonText=Next
The photo instruction screen could look as follows in the English version of the user interface:
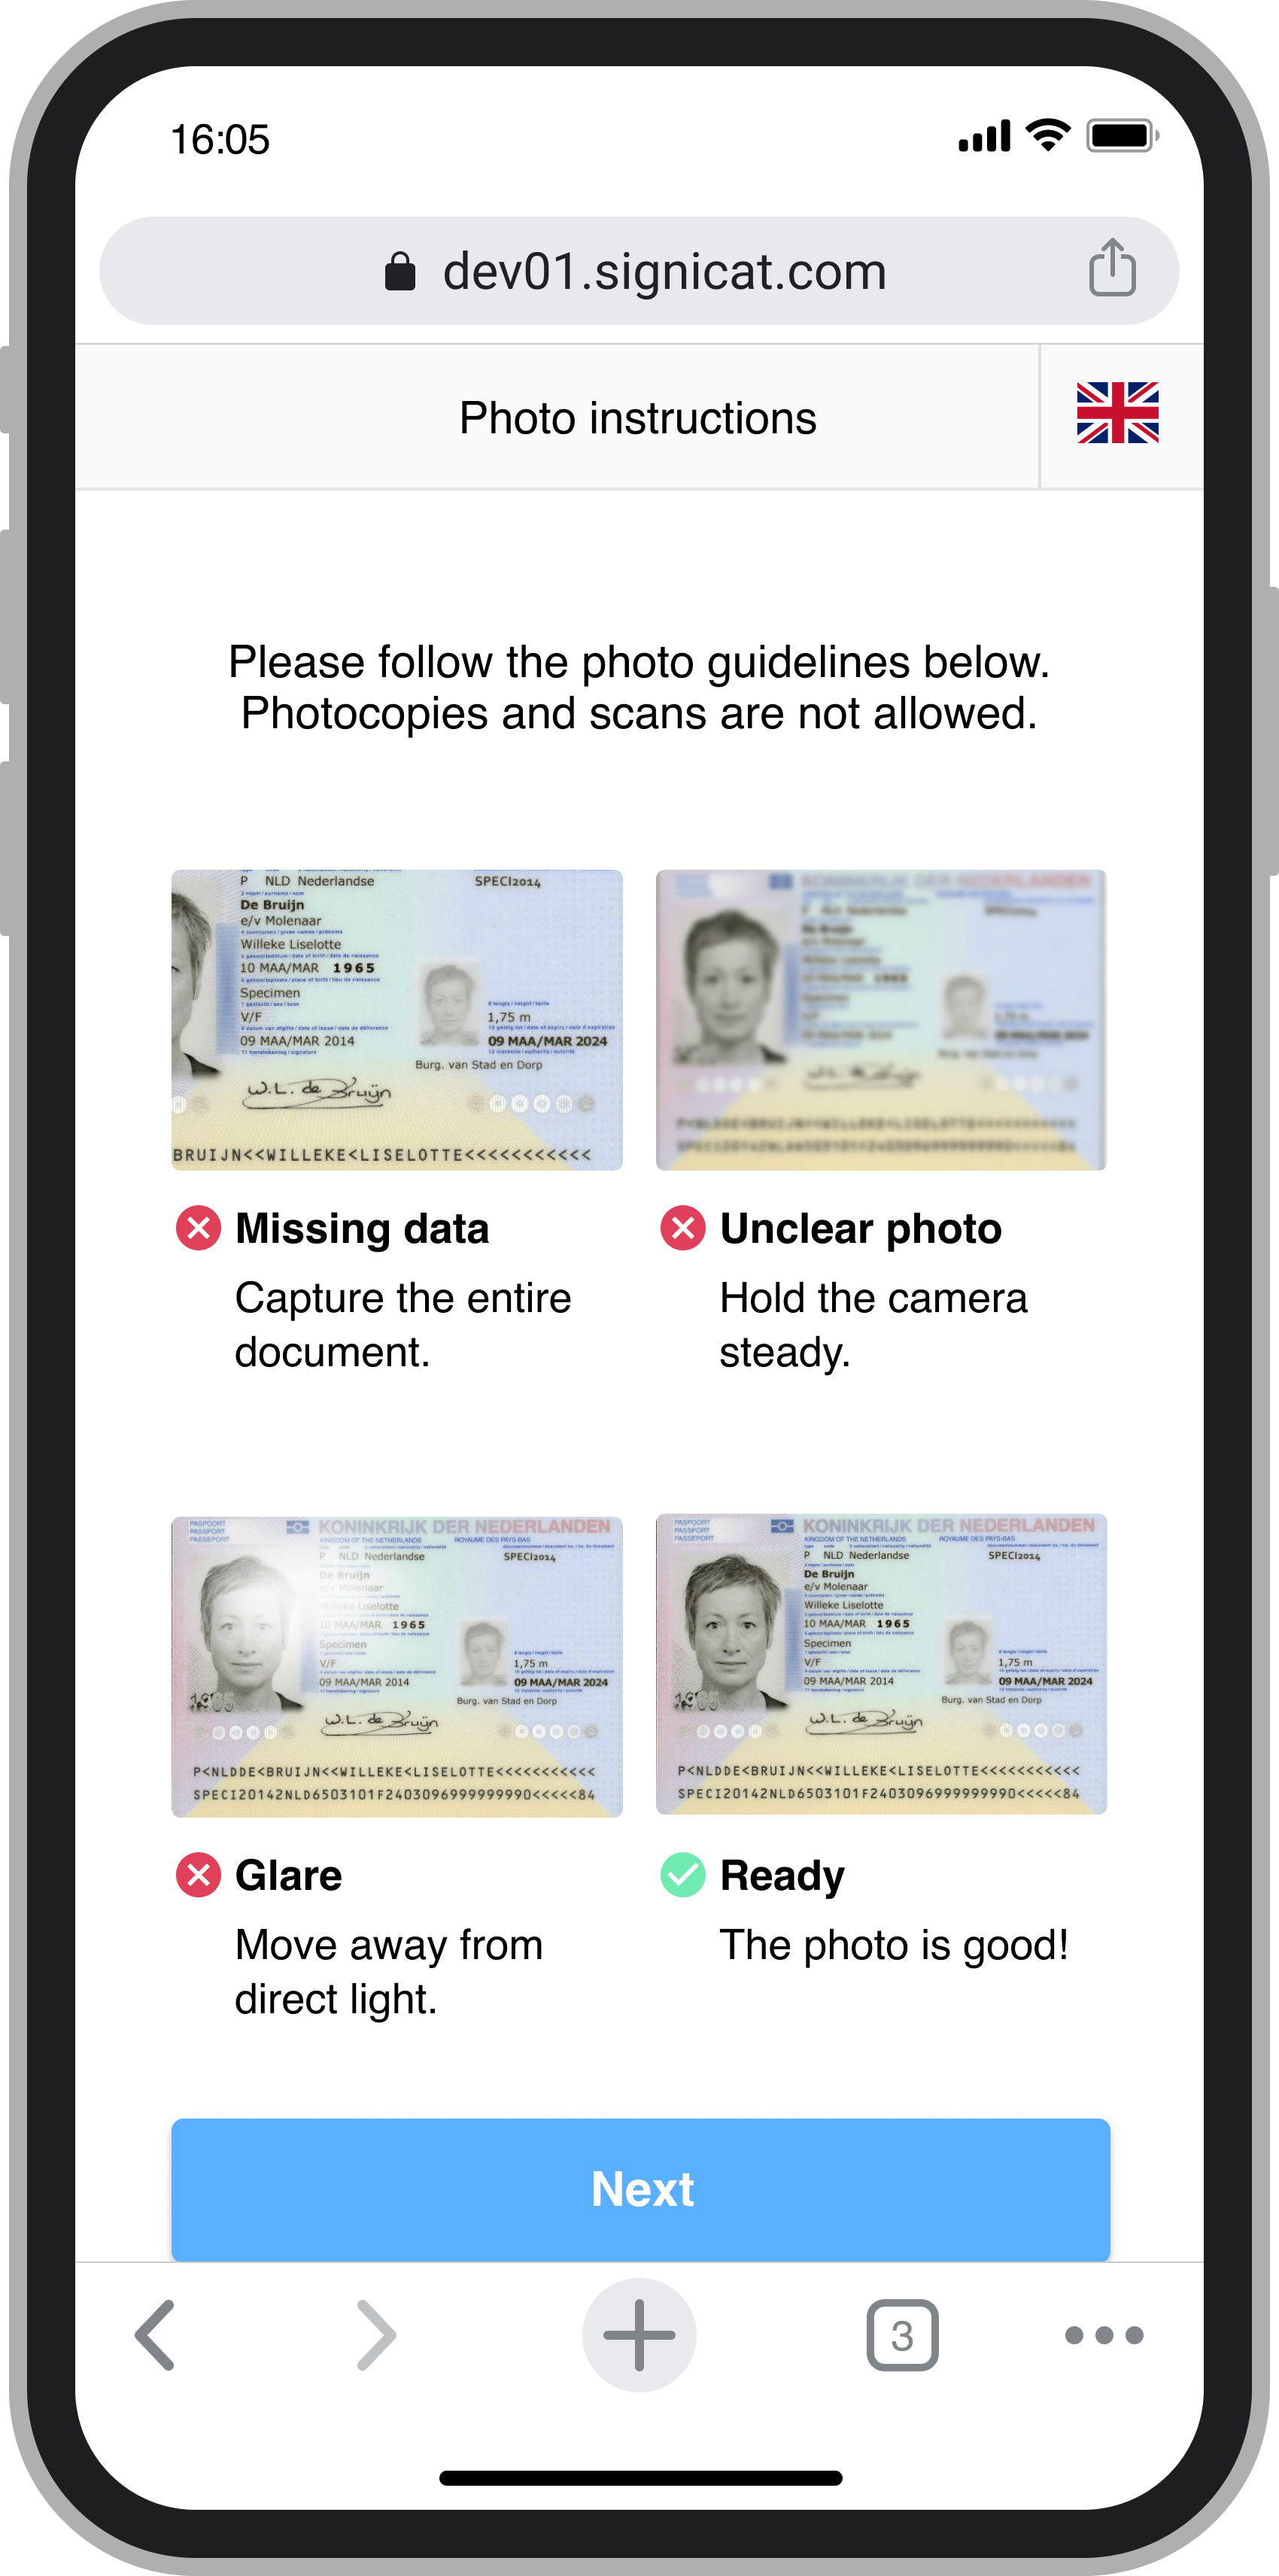
Photo instruction screen
See also the description of the documentInstructionsScreenItems field in the API Reference.
Mobile handover
mobileHandoverTitle=To verify your identity we need to verify your document
mobileHandoverDescription=Please choose if you want to take pictures with your phone or if you want to provide pictures from this device
mobileHandoverUsePhoneButton=Use phone (recommended)
mobileHandoverUseDesktopButton=Continue on this device
mobileHandoverPopUpTitle=Enter your phone number
mobileHandoverInvalidPhoneNumberError=Invalid phone number
searchPrefix=Search indicatives
mobileHandoverPopUpDescription=We will send you an SMS link. Please open the link on your phone and continue. Do not close this window; the process continues on this device afterwards.
mobileHandoverPopUpButton=Send SMS link
mobileHandoverPopUpWaitingTitle=Link successfully sent to
mobileHandoverPopUpWaitingDescription=Please open the link and take a picture of your identity paper with your phone. <br/><br/> Do not close this window
mobileHandoverPopUpWaitingLoadingText=Waiting for pictures
mobileHandoverPopUpWaitingResendLink=Resend SMS link
mobileHandoverSuccessPageTitleLine1=Identity document checked
mobileHandoverSuccessPageTitleLine2=Continue on the device where you started the process.
mobileHandoverSuccessPageDescription=You can now close this window
mobileHandoverErrorPageTitleLine1=Something went wrong
mobileHandoverErrorPageTitleLine2=There was a problem checking your identity document.
mobileHandoverErrorPageDescription=You can now close this window
customRedactionErrorMobileHandoverPageTitleLine1=Identity verification pending.
customRedactionErrorMobileHandoverPageTitleLine2=Continue on the device where you started the process.
customRedactionErrorMobileHandoverPageDescription=You can now close this window
mobileHandoverChangeToSMS=Get a link via SMS
mobileHandoverChangeToQrCode=Scan QR code
mobileHandoverQrCodeTitle=Scan QR code
mobileHandoverQrCodeDescription=Scan the QR code with your phone. Point your phone's camera at the QR code below. If it doesn't work, download a QR code scanner from Google Play or the App Store.
Native camera in the mobile flow
The useNativeCamera fields are for when Capture uses the native camera app instead of web RTC. They are only displayed on mobile phones. The following fields are default:
useNativeCameraButton=Take photo
frontImage.useNativeCameraText=Click the button below to take a picture of the front side of your identity document
backImage.useNativeCameraText=Click the button below to take a picture of the back side of your identity document
selfie.useNativeCameraText=Click the button below to take a selfie
If you want to be more specific, you can add optional translation strings for each type of document. If you define these instead, they will override the default fields described above. These optional fields are empty by default, and the values below are suggested examples:
passport.frontImage.useNativeCameraText=Click the button below to take a picture of the photo page of your passport
passport.backImage.useNativeCameraText=Click the button below to take a picture of the back of your passport
passport.selfie.useNativeCameraText=Click the button below to take a selfie to compare it with the photo in your passport
identityCard.frontImage.useNativeCameraText=Click the button below to take a picture of the front of your identity card
identityCard.backImage.useNativeCameraText=Click the button below to take a picture of the back of your identity card
identityCard.selfie.useNativeCameraText=Click the button below to take a selfie to compare it with the photo on your identity card
driversLicense.frontImage.useNativeCameraText=Click the button below to take a picture of the front of your driver's licence
driversLicense.backImage.useNativeCameraText=Click the button below to take a picture of the back of your driver's licence
driversLicense.selfie.useNativeCameraText=Click the button below to take a selfie to compare it with the picture on your driver's licence
Verify orientation
verifyingOrientationHintPlural=Are the provided identity papers oriented as shown in the illustrations above?
verifyingOrientationHintSingular=Is the provided identity paper oriented as shown in the illustrations above?
verifyingOrientationYesButtonPlural=Yes, they are correctly oriented
verifyingOrientationYesButtonSingular=Yes, it's correctly oriented
verifyingOrientationNoButtonPlural=No, I need to rotate the images
verifyingOrientationNoButtonSingular=No, I need to rotate the image
Overlay
passportBackOverlayTitle=Back side
passportBackOverlaySubtitle=Back side of the passport
identityCardFrontOverlayTitle=Front side
identityCardFrontOverlaySubtitle=Front side of the identity card
identityCardBackOverlayTitle=Back side
identityCardBackOverlaySubtitle=Back side of the identity card
driversLicenseFrontOverlayTitle=Front side
driversLicenseFrontOverlaySubtitle=Front side of the drivers license
driversLicenseBackOverlayTitle=Back side
driversLicenseBackOverlaySubtitle=Back side of the drivers license
ReadID Ready
readIdQrCodePageTitle=Scan QR code
readIdQrCodePageDescription=<ol><li>Download the ReadID Ready App from Google Play or the App Store</li><li>Scan the QR code below using the app.</li></ol>
readIdMobilePageTitle=Identity verification
readIdMobilePageDescription=Ensure you have the ReadID Ready app installed before continuing.
readIdMobileButtonText=Start ReadID Ready
readIdMobileInstallAppLink=Install the ReadID Ready app
readIdMobileAfterButtonClickText=You can now close this window
Error messages (generic)
genericErrorTitle=Something went wrong
genericErrorDescription=Your session has expired.
usedUrlErrorTitle=Expired URL
usedUrlErrorDescription=This URL has already expired. Please use another one.
noArtifactErrorTitle=Something went wrong
noArtifactErrorDescription=This URL is no longer valid.
getArtifactInfoErrorTitle=Something went wrong
getArtifactInfoErrorDescription=We could not process your request.
getTranslationsErrorTitle=Something went wrong
getTranslationsErrorDescription=Error fetching translations.
getDocumentTypesErrorTitle=Something went wrong
getDocumentTypesErrorDescription=Error fetching document types
retryDialogTitle=Something went wrong
retryDialogDescription=Please try again
retryDialogButton=Try again
errorRetriesExceededTitle=Verification Failed
errorRetriesExceededDescription=You have exceeded the number of permitted retries
errorVerificationFailedTitle=Verification Failed
errorVerificationFailedDescription=Something went wrong with the verification process
mediaPermissionDenied=Access to the camera and microphone is required. Please go to your browser settings and enable the access. After that please click the button below to continue.
mediaPermissionDeniedContinueButton=Continue
Fail reasons (providers)
onfidoFailReasonPopupTitle=The following problem was detected in your process:
onfidoFailReasonField_facedetection=Face detection
onfidoFailReasonMessage_multiplefacesinimage=There are multiple faces in the picture.
onfidoFailReasonMessage_facenotdetectedinimage=No faces were detected in the sent picture.
onfidoFailReasonMessage_fallbackMessage=A problem occurred and the verification could not be done.
signicatvideoidCheckRequirementsFailed_browser=Browser version not supported
signicatvideoidCheckRequirementsFailed_os=Operating system version not supported
signicatvideoidCheckRequirementsFailed_camera=Camera not available
signicatvideoidCheckRequirementsFailed_microphone=Microphone not available
signicatvideoidCheckRequirementsFailed_bandwidth=Unstable network connection
signicatvideoidCheckRequirementsFailed_unexpected=Unexpected error
Document
passport=Passport
identityCard=Identity Card
driversLicense=Drivers License
residencePermit=Residence Permit
panCard=Pan Card
passportCard=Passport Card
voterId=Voter Id
stateId=State Id
visa=Visa
workPermit=Work Permit
postalIdentityCard=Postal Identity Card
professionalQualificationCard=Professional Qualification Card
asylumRegistrationCard=Asylum Registration Card
nationalHealthInsuranceCard=National Health Insurance Card
socialSecurityCard=Social Security Card
aadharCard=Aadhar Card
unknown=Unknown
Country
countryAFG=Afghanistan
countryALA=Åland Islands
countryALB=Albania
countryDZA=Algeria
countryASM=American Samoa
countryAND=Andorra
countryAGO=Angola
countryAIA=Anguilla
countryATA=Antarctica
countryATG=Antigua and Barbuda
countryARG=Argentina
countryARM=Armenia
countryABW=Aruba
countryAUS=Australia
countryAUT=Austria
countryAZE=Azerbaijan
countryBHS=Bahamas
countryBHR=Bahrain
countryBGD=Bangladesh
countryBRB=Barbados
countryBLR=Belarus
countryBEL=Belgium
countryBLZ=Belize
countryBEN=Benin
countryBMU=Bermuda
countryBTN=Bhutan
countryBOL=Bolivia
countryBES=Bonaire, Sint Eustatius and Saba
countryBIH=Bosnia and Herzegovina
countryBWA=Botswana
countryBVT=Bouvet Island
countryBRA=Brazil
countryIOT=British Indian Ocean Territory
countryBRN=Brunei Darussalam
countryBGR=Bulgaria
countryBFA=Burkina Faso
countryBDI=Burundi
countryCPV=Cabo Verde
countryKHM=Cambodia
countryCMR=Cameroon
countryCAN=Canada
countryCYM=Cayman Islands
countryCAF=Central African Republic
countryTCD=Chad
countryCHL=Chile
countryCHN=China
countryCXR=Christmas Island
countryCCK=Cocos (Keeling) Islands
countryCOL=Colombia
countryCOM=Comoros
countryCOD=Democratic Republic of the Congo
countryCOG=Congo
countryCOK=Cook Islands
countryCRI=Costa Rica
countryHRV=Croatia
countryCUB=Cuba
countryCUW=Curaçao
countryCYP=Cyprus
countryCZE=Czechia
countryCIV=Côte d Ivoire
countryDNK=Denmark
countryDJI=Djibouti
countryDMA=Dominica
countryDOM=Dominican Republic
countryECU=Ecuador
countryEGY=Egypt
countrySLV=El Salvador
countryGNQ=Equatorial Guinea
countryERI=Eritrea
countryEST=Estonia
countrySWZ=Eswatini
countryETH=Ethiopia
countryFLK=Falkland Islands
countryFRO=Faroe Islands
countryFJI=Fiji
countryFIN=Finland
countryFRA=France
countryGUF=French Guiana
countryPYF=French Polynesia
countryATF=French Southern Territories
countryGAB=Gabon
countryGMB=Gambia
countryGEO=Georgia
countryDEU=Germany
countryGHA=Ghana
countryGIB=Gibraltar
countryGRC=Greece
countryGRL=Greenland
countryGRD=Grenada
countryGLP=Guadeloupe
countryGUM=Guam
countryGTM=Guatemala
countryGGY=Guernsey
countryGIN=Guinea
countryGNB=Guinea-Bissau
countryGUY=Guyana
countryHTI=Haiti
countryHMD=Heard Island and McDonald Islands
countryVAT=Holy See
countryHND=Honduras
countryHKG=Hong Kong
countryHUN=Hungary
countryISL=Iceland
countryIND=India
countryIDN=Indonesia
countryIRN=Iran
countryIRQ=Iraq
countryIRL=Ireland
countryIMN=Isle of Man
countryISR=Israel
countryITA=Italy
countryJAM=Jamaica
countryJPN=Japan
countryJEY=Jersey
countryJOR=Jordan
countryKAZ=Kazakhstan
countryKEN=Kenya
countryKIR=Kiribati
countryPRK=Korea
countryKOR=Korea
countryKWT=Kuwait
countryKGZ=Kyrgyzstan
countryLAO=Lao
countryLVA=Latvia
countryLBN=Lebanon
countryLSO=Lesotho
countryLBR=Liberia
countryLBY=Libya
countryLIE=Liechtenstein
countryLTU=Lithuania
countryLUX=Luxembourg
countryMAC=Macao
countryMDG=Madagascar
countryMWI=Malawi
countryMYS=Malaysia
countryMDV=Maldives
countryMLI=Mali
countryMLT=Malta
countryMHL=Marshall Islands
countryMTQ=Martinique
countryMRT=Mauritania
countryMUS=Mauritius
countryMYT=Mayotte
countryMEX=Mexico
countryFSM=Micronesia
countryMDA=Moldova
countryMCO=Monaco
countryMNG=Mongolia
countryMNE=Montenegro
countryMSR=Montserrat
countryMAR=Morocco
countryMOZ=Mozambique
countryMMR=Myanmar
countryNAM=Namibia
countryNRU=Nauru
countryNPL=Nepal
countryNLD=Netherlands
countryNCL=New Caledonia
countryNZL=New Zealand
countryNIC=Nicaragua
countryNER=Niger
countryNGA=Nigeria
countryNIU=Niue
countryNFK=Norfolk Island
countryMNP=Northern Mariana Islands
countryNOR=Norway
countryOMN=Oman
countryPAK=Pakistan
countryPLW=Palau
countryPSE=Palestine
countryPAN=Panama
countryPNG=Papua New Guinea
countryPRY=Paraguay
countryPER=Peru
countryPHL=Philippines
countryPCN=Pitcairn
countryPOL=Poland
countryPRT=Portugal
countryPRI=Puerto Rico
countryQAT=Qatar
countryMKD=Republic of North Macedonia
countryROU=Romania
countryRUS=Russian Federation
countryRWA=Rwanda
countryREU=Réunion
countryBLM=Saint Barthélemy
countrySHN=Saint Helena, Ascension and Tristan da Cunha
countryKNA=Saint Kitts and Nevis
countryLCA=Saint Lucia
countryMAF=Saint Martin
countrySPM=Saint Pierre and Miquelon
countryVCT=Saint Vincent and the Grenadines
countryWSM=Samoa
countrySMR=San Marino
countrySTP=Sao Tome and Principe
countrySAU=Saudi Arabia
countrySEN=Senegal
countrySRB=Serbia
countrySYC=Seychelles
countrySLE=Sierra Leone
countrySGP=Singapore
countrySXM=Sint Maarten
countrySVK=Slovakia
countrySVN=Slovenia
countrySLB=Solomon Islands
countrySOM=Somalia
countryZAF=South Africa
countrySGS=South Georgia and the South Sandwich Islands
countrySSD=South Sudan
countryESP=Spain
countryLKA=Sri Lanka
countrySDN=Sudan
countrySUR=Suriname
countrySJM=Svalbard and Jan Mayen
countrySWE=Sweden
countryCHE=Switzerland
countrySYR=Syrian Arab Republic
countryTWN=Taiwan
countryTJK=Tajikistan
countryTZA=Tanzania
countryTHA=Thailand
countryTLS=Timor-Leste
countryTGO=Togo
countryTKL=Tokelau
countryTON=Tonga
countryTTO=Trinidad and Tobago
countryTUN=Tunisia
countryTUR=Turkey
countryTKM=Turkmenistan
countryTCA=Turks and Caicos Islands
countryTUV=Tuvalu
countryUGA=Uganda
countryUKR=Ukraine
countryARE=United Arab Emirates
countryGBR=United Kingdom
countryUMI=United States Minor Outlying Islands
countryUSA=United States of America
countryURY=Uruguay
countryUZB=Uzbekistan
countryVUT=Vanuatu
countryVEN=Venezuela
countryVNM=Viet Nam
countryVGB=Virgin Islands (British)
countryVIR=Virgin Islands (U.S)
countryWLF=Wallis and Futuna
countryESH=Western Sahara
countryYEM=Yemen
countryZMB=Zambia
countryZWE=Zimbabwe
countryUNIV=Other countries
Native JS SDK configurations
For details, see: